Homemade Cinnamon Swirl Bread
 Save
Save
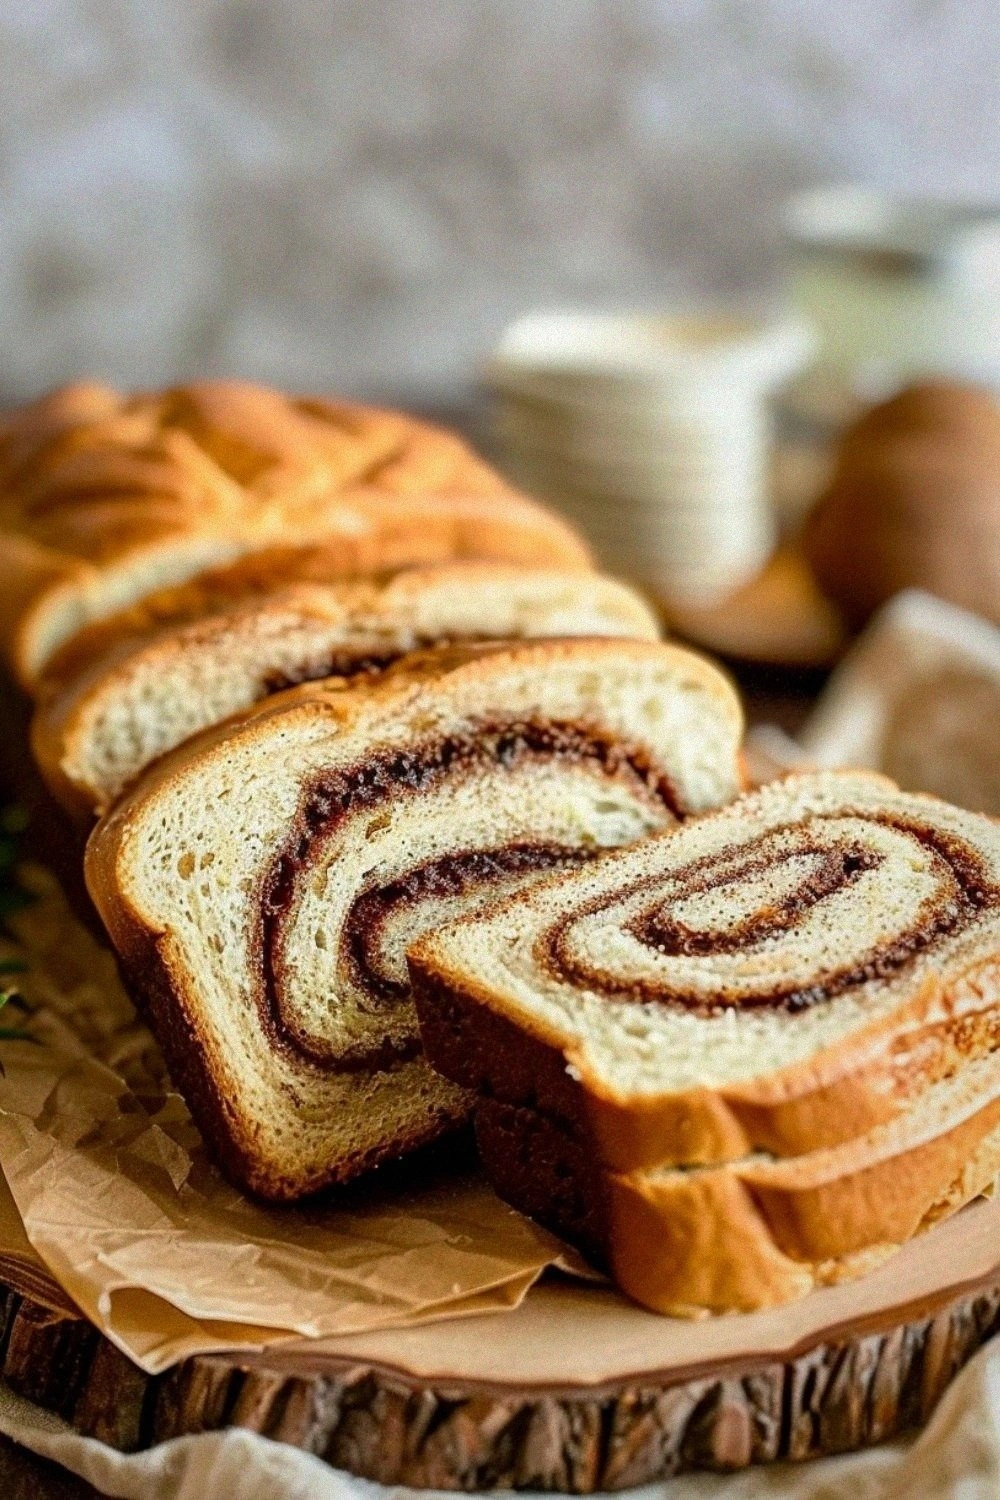
It was a crisp Saturday morning in late autumn, the kind of day when the kitchen feels like the coziest corner of the world. I remember pulling a fresh loaf of cinnamon swirl bread out of the oven, the golden crust crackling softly as I lifted the lid, and a cloud of sweet, spiced steam swirling around me like an embrace. The scent of melted butter, caramelized brown sugar, and warm cinnamon wrapped itself around the whole house, coaxing sleepy family members from their blankets and drawing them to the table. That moment, with the buttery swirl glistening against the crust, became a memory I replay whenever I need a little comfort, and now I’m sharing it with you.
What makes this homemade cinnamon swirl bread stand out isn’t just the aroma—although, trust me, that alone could win over any skeptic. It’s the perfect balance between a soft, pillowy crumb and a slightly crisp, caramelized topping that gives you that satisfying bite every time. The dough is enriched with just enough butter and milk to stay tender, yet it holds its shape beautifully, allowing the cinnamon swirls to stay distinct and eye‑catching. And the best part? You don’t need a stand mixer or a baker’s degree; a simple bowl, a wooden spoon, and a bit of patience are all you need to create bakery‑level magic at home.
But wait—there’s a secret trick that I only discovered after countless batches, and it’s the difference between a good loaf and an unforgettable one. I’ll reveal that in step four of the instructions, where a tiny tweak to the dough’s hydration can turn a dense crumb into a cloud‑like texture. Imagine slicing into a warm piece, the cinnamon swirl pulling away in delicate ribbons, the butter melting on the tongue, and the sweet‑spicy flavor dancing on your palate. That’s the kind of experience I want you to have, and I’m excited to walk you through every detail.
Here’s exactly how to make it — and trust me, your family will be asking for seconds, thirds, and maybe even a whole extra loaf. Grab a cup of coffee, preheat your oven, and let’s dive into the comforting world of homemade cinnamon swirl bread. The journey from mixing bowl to golden‑brown masterpiece is filled with little moments of joy, and I promise you’ll love every single one.
🌟 Why This Recipe Works
- Flavor Depth: The combination of brown sugar and a generous amount of cinnamon creates a deep, caramel‑like sweetness that permeates every bite, while a hint of vanilla adds a subtle background note that elevates the overall profile.
- Texture Harmony: By incorporating both butter and milk into the dough, you achieve a tender crumb that stays moist, yet the outer crust develops a slight crunch that provides a satisfying contrast.
- Ease of Execution: This recipe uses a simple kneading method that can be done by hand, so you don’t need fancy equipment—just a sturdy surface and a little love.
- Time Efficiency: With a total hands‑on time of about 15 minutes and a rise time that fits nicely into a morning coffee break, you can have fresh bread ready for brunch or an afternoon snack without feeling rushed.
- Versatility: The base loaf is perfect on its own, but it also serves as an excellent canvas for toppings like toasted nuts, a drizzle of honey, or even a spread of cream cheese.
- Nutrition Balance: While indulgent, the recipe includes whole‑milk and a modest amount of sugar, delivering a comforting treat that still offers protein from the egg and a touch of fiber from the flour.
- Ingredient Quality: Using high‑quality butter and fresh spices makes a noticeable difference in flavor intensity, turning a simple loaf into a standout centerpiece.
- Crowd‑Pleasing Factor: The familiar scent of cinnamon evokes warm memories, making this bread a guaranteed hit at family gatherings, brunches, or even a cozy solo breakfast.
🥗 Ingredients Breakdown
The Foundation
All great breads start with a solid foundation, and in this case, it’s the combination of all‑purpose flour, active dry yeast, and warm milk. The flour provides the structural framework, while the yeast is the leavening hero that creates those airy pockets in the crumb. Warm milk (around 105°F/40°C) awakens the yeast without killing it, ensuring a steady rise. If you’re looking for a slightly richer dough, you can swap half of the all‑purpose flour for bread flour, which adds extra gluten strength.
Aromatics & Spices
Cinnamon is the star here, delivering that warm, sweet heat that makes this loaf instantly recognizable. Pair it with brown sugar, which not only sweetens but also adds a subtle molasses undertone that deepens the flavor. A pinch of salt balances the sweetness and enhances the overall taste, while a splash of vanilla extract adds a fragrant backdrop that rounds out the profile. If you’re feeling adventurous, a pinch of nutmeg or cardamom can add an extra layer of complexity.
The Secret Weapons
Butter and an egg are the secret weapons that turn a simple bread into a luxurious treat. The butter, melted and cooled slightly, coats the flour particles, creating a tender crumb and a glossy crust. The egg adds richness, color, and a subtle binding quality that helps the dough hold its shape during the rise. For those with dairy sensitivities, you can substitute the butter with a high‑quality plant‑based spread and use a flax egg, though the texture will be slightly different.
Finishing Touches
A final brush of melted butter before baking gives the crust a beautiful shine and an extra layer of flavor. Sprinkling a light dusting of coarse sugar on top adds a subtle crunch that contrasts nicely with the soft interior. And don’t forget the extra cinnamon‑brown‑sugar swirl that you’ll spread over the rolled dough—this is what creates those gorgeous, marbled ribbons that make the bread look as good as it tastes.
With your ingredients prepped and ready, let's get cooking. Here’s where the fun really begins, and I’ll walk you through each step with the detail you need to achieve bakery‑level perfection.
🍳 Step-by-Step Instructions
🔐 Expert Tips for Perfect Results
The Taste Test Trick
Before you bake the final loaf, take a tiny piece of dough and bake it on a parchment square for 2‑3 minutes. This mini‑test reveals whether your seasoning balance is spot‑on; if it’s too sweet, add a pinch more salt to the main dough. I once served a batch that was overly sweet, and this quick test would have saved me a lot of embarrassment. Trust your palate, and adjust as needed.
Why Resting Time Matters More Than You Think
Allowing the dough to rest after kneading (the 10‑minute bench rest) relaxes the gluten, making the rolling process smoother and preventing tears in the swirl. I once tried to skip this rest and ended up with a jagged, uneven swirl that looked more like a patchwork quilt than a graceful ribbon. Patience here translates directly into a cleaner, more professional‑looking final product.
The Seasoning Secret Pros Won’t Tell You
A dash of orange zest added to the cinnamon filling gives the bread a bright, citrusy lift that balances the deep sweetness. This subtle addition is a favorite of many pastry chefs, yet it’s rarely mentioned in basic recipes. Try it once, and you’ll notice how the aroma becomes even more inviting, especially on cooler mornings.
How to Achieve the Perfect Crust
Steam is your secret weapon for a glossy, crackly crust. Place a shallow pan of hot water on the lower rack of the oven during the first 15 minutes of baking. The steam delays crust formation, allowing the loaf to expand fully before the exterior hardens. When you finally remove the bread, the crust will have that bakery‑style shine and a satisfying snap.
Storing for Maximum Freshness
Wrap the cooled loaf tightly in a double layer of parchment followed by a reusable silicone bag. This method keeps the crust from drying out while preserving the soft interior. I’ve found that this combination keeps the bread fresh for up to four days, and the flavor actually deepens after a night’s rest.
🌈 Delicious Variations to Try
One of my favorite things about this recipe is how versatile it is. Here are some twists I’ve tried and loved:
Apple‑Cinnamon Swirl
Add a thin layer of finely diced apples mixed with a touch of lemon juice to the cinnamon butter before rolling. The apples soften during baking, releasing a gentle tartness that brightens the sweet cinnamon flavor. It’s like a cozy apple pie hidden inside a loaf.
Nutty Pecan Crunch
Stir chopped toasted pecans into the cinnamon‑sugar filling for an added crunch and buttery depth. The nuts toast in the oven, releasing a nutty aroma that pairs beautifully with the caramelized crust. This variation makes the bread feel a bit more indulgent—perfect for holiday brunches.
Chocolate‑Hazelnut Swirl
Swap half of the brown sugar for a smooth hazelnut spread and add 2 tablespoons of cocoa powder to the filling. The result is a rich, mocha‑like swirl that satisfies both cinnamon lovers and chocolate addicts. Serve with a dollop of whipped cream for an extra decadent treat.
Maple‑Bourbon Glaze
Brush the loaf with a mixture of pure maple syrup, a splash of bourbon, and a pinch of sea salt during the last 5 minutes of baking. The glaze caramelizes into a glossy, slightly boozy finish that adds complexity and a hint of warmth—ideal for chilly evenings.
Savory Herb Twist
For a savory take, omit the cinnamon and brown sugar, and instead spread softened butter mixed with rosemary, thyme, and grated Parmesan. The herb‑infused loaf makes a wonderful accompaniment to soups or a bold breakfast sandwich. It’s a surprising spin that many guests adore.
Pumpkin‑Spice Delight (Seasonal)
In the winter months, blend canned pumpkin puree into the dough and add pumpkin pie spice to the cinnamon mixture. The subtle earthiness of pumpkin complements the sweet spices, creating a comforting loaf that feels like a hug on a plate. Pair it with a drizzle of maple butter for a truly festive experience.
📦 Storage & Reheating Tips
Refrigerator Storage
Once completely cooled, wrap the loaf tightly in parchment paper followed by a layer of aluminum foil, then store it in an airtight container. In the fridge, the bread stays fresh for up to five days. Before serving, let it sit at room temperature for 20‑30 minutes to regain its softness.
Freezing Instructions
Slice the loaf first, then place the slices in a single layer on a baking sheet and freeze until solid. Transfer the frozen slices to a zip‑top freezer bag, removing as much air as possible. The bread will keep for up to three months, and you can reheat individual slices straight from the freezer.
Reheating Methods
To revive a slice, preheat your oven to 350°F (175°C), place the slice on a baking sheet, and warm for 5‑7 minutes. For a microwave‑friendly option, wrap a slice in a damp paper towel and heat for 15‑20 seconds—just enough to melt the butter without making it rubbery. The trick to reheating without drying it out? Add a splash of milk or a tiny pat of butter on top before heating.
❓ Frequently Asked Questions
Can I use whole‑wheat flour instead of all‑purpose?
What if I don’t have a kitchen thermometer?
Can I make this recipe gluten‑free?
Why does my bread turn out pale on top?
How long can I keep the bread at room temperature?
Can I add raisins or dried cranberries?
What’s the best way to slice the bread?
Can I turn this into a cinnamon roll version?
Place the rolled loaf seam‑side down into a greased 9×5‑inch loaf pan. Cover it loosely with plastic wrap and let it proof for a second time, about 30‑45 minutes, until it puffs up just above the rim of the pan. While it’s proofing, preheat your oven to 350°F (175°C). The second rise gives the bread its final lift and ensures a tender crumb inside.
Before baking, brush the top of the loaf with a little melted butter and sprinkle a tablespoon of coarse sugar for extra crunch. Slide the pan into the preheated oven and bake for 30‑35 minutes, or until the top is a deep golden brown and a tap on the bottom sounds hollow. If the crust darkens too quickly, tent the loaf with aluminum foil halfway through baking.
Remove the bread from the oven and let it cool in the pan for 10 minutes, then transfer it to a wire rack to cool completely. This cooling period allows the steam to escape, preventing a soggy bottom and letting the flavors settle. Slice it while still warm for the ultimate melt‑in‑your‑mouth experience, or wait until it’s fully cooled for a firmer slice that holds its shape. Serve with a pat of butter, a drizzle of honey, or just as is—your choice!
And there you have it! But before you dig in, let me share some tips that will take this from great to absolutely unforgettable…
Similar Recipes
 Appetizers
detox citrus and kale salad with oranges and lemon vinaigrette
Learn how to make delicious detox citrus and kale salad with oranges and lemon vinaigrette. Easy…
 Appetizers
Smoky Chipotle Street Corn Cups: Recipe Guide
Delicious Smoky Chipotle Street Corn Cups: Recipe Guide
 Appetizers
Rosemary Sea Salt Pretzel Bites: A Delicious Twist on a Classic Snack
Delicious Rosemary Sea Salt Pretzel Bites: A Delicious Twist on a Classic Snack
 Appetizers
Cheesy Delight Stuffed Potato Pancakes: A Comfort Food Favorite
Delicious Cheesy Delight Stuffed Potato Pancakes: A Comfort Food Favorite
 Appetizers
Cranberry Relish Recipe – Fresh, Sweet & Tangy Holiday Side
Learn how to make delicious Cranberry Relish Recipe – Fresh, Sweet & Tangy Holiday Side. Easy…
 Appetizers
Easy Banana Oatmeal Cookies Recipe
Learn how to make delicious Easy Banana Oatmeal Cookies Recipe. Easy recipe with step-by-step instructions.
 Appetizers
Savory Ham & Cheese Bliss Sliders: Irresistible Comfort Food for Any Occasion
Delicious Savory Ham & Cheese Bliss Sliders: Irresistible Comfort Food for Any Occasion
 Appetizers
warm roasted carrot and parsnip soup with lemon and ginger
Learn how to make delicious warm roasted carrot and parsnip soup with lemon and ginger. Easy…

Susan
I cook these recipes at home before they ever land here — simple ingredients, clear steps.