Minty Delight: Cool Mint Oreo Icebox Cake
 Save
Save
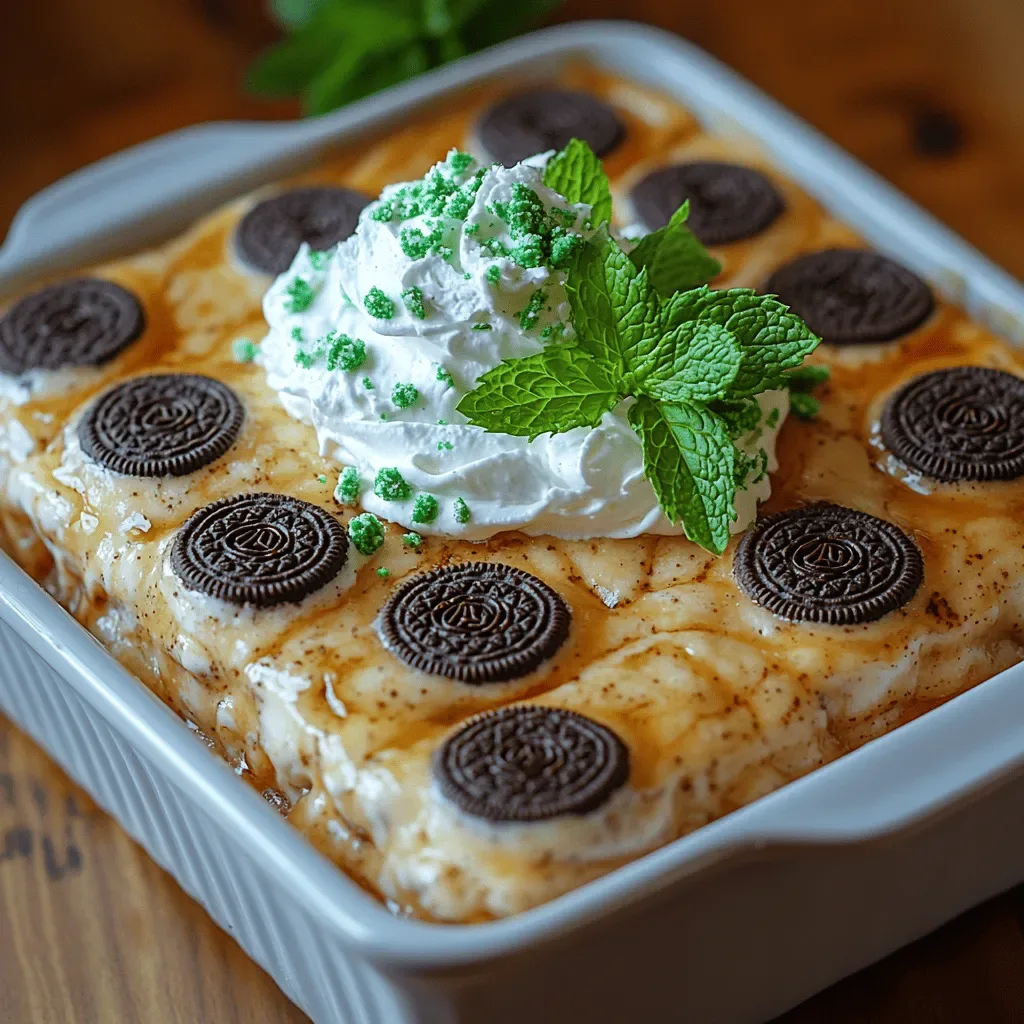
Imagine a dessert that feels like a cool breeze on a warm morning—soft, creamy, and speckled with chocolatey crunch. Minty Delight: Cool Mint Oreo Icebox Cake delivers that exact sensation, making it the perfect brunch treat or a lazy‑Sunday breakfast indulgence.
What sets this cake apart is the harmonious marriage of peppermint‑infused whipped cream, rich chocolate Oreo crumbs, and a silky vanilla mousse that sets without baking. The result is a light, airy layer cake that stays refreshingly cool, letting the mint shine without being overpowering.
Family members who love chocolate, kids who adore minty sweets, and anyone craving a no‑oven dessert will adore this creation. Serve it at brunch tables, holiday brunches, or as a surprise after‑school snack.
The process is straightforward: crush the cookies, whip a mint‑kissed cream, layer, and let the cake set in the refrigerator. No oven, no fuss—just a few minutes of assembly and a few hours of chilling.
Why You'll Love This Recipe
Cool & Refreshing: The mint‑infused cream gives a crisp, palate‑cleansing bite that feels perfect for early‑day meals or hot summer brunches.
No Oven Required: All you need is a fridge, making it ideal for kitchens without a full‑size oven or for quick, stress‑free preparation.
Eye‑Catching Layers: The contrasting dark Oreo crumbs and pale mint cream create a striking visual that impresses guests before the first forkful.
Customizable Sweetness: Adjust the amount of sugar or swap the mint extract for fresh peppermint leaves to match any sweetness preference.
Tips & Tricks
Perfecting the Recipe
Use a chilled bowl. Keeping the mixing bowl and beaters cold helps the cream whip faster and hold peaks longer.
Press the cookie base firmly. A compact crust prevents cracks when you unmold the cake after chilling.
Don’t over‑whip. Stop whipping as soon as soft peaks form; over‑whipped cream can become grainy and separate.
Flavor Enhancements
For an extra burst of freshness, fold in finely chopped fresh peppermint leaves into the whipped cream. A drizzle of dark chocolate ganache over the top just before serving adds a luxurious contrast. If you love a hint of citrus, add a teaspoon of orange zest to the mousse.
Common Mistakes to Avoid
Skipping the chilling step will cause the layers to slide and the cake to fall apart. Also, using warm butter for the crust can make the base soggy; melt the butter and let it cool slightly before mixing with the crumbs.
Pro Tips
Layer with a spatula. Use the back of a spoon to smooth each layer, creating a professional‑look finish.
Use a springform pan. It allows you to release the cake without damaging the delicate edges.
Freeze for transport. If you need to move the cake, freeze it for 30 minutes, then keep it chilled until serving.
Variations
Ingredient Swaps
Replace the classic Oreo cookies with chocolate graham crackers for a slightly sweeter crust. Swap peppermint extract for a splash of crème de menthe for an adult‑friendly version. For a dairy‑free twist, use coconut cream in place of heavy cream and a vegan cream cheese alternative in the mousse.
Dietary Adjustments
To make the cake gluten‑free, choose certified gluten‑free chocolate sandwich cookies. For a lower‑sugar option, halve the powdered sugar and use a sugar‑free sweetened condensed milk. Keto dieters can substitute the condensed milk with a blend of heavy cream and erythritol, keeping the carb count minimal.
Serving Suggestions
Slice the cake into elegant wedges and serve with fresh berries for a pop of acidity. A dollop of extra mint‑whipped cream on the side elevates presentation. Pair with a chilled glass of sparkling lemonade for a brunch‑ready combo.
Storage Info
Leftover Storage
Allow any remaining cake to cool completely, then cover tightly with plastic wrap and place in an airtight container. Store in the refrigerator for up to 4 days. For longer keeping, freeze individual slices wrapped in parchment and then a freezer bag; they retain quality for up to 2 months.
Reheating Instructions
This cake is best enjoyed cold, but if you prefer a softer texture, let a slice sit at room temperature for 15‑20 minutes before serving. To warm gently, place a slice on a plate and microwave on low (30 % power) for 20‑30 seconds, watching closely to avoid melting the cream.
Frequently Asked Questions
Can I make this cake a day ahead?
What if I don’t have a springform pan?
Can I substitute the mint extract with fresh mint leaves?
This Minty Delight Icebox Cake proves that a spectacular dessert can be assembled without turning on the oven. With clear steps, storage guidance, and plenty of ways to personalize it, you’re equipped to create a cool, mint‑kissed treat that brightens any brunch table. Feel free to experiment with flavors, textures, and presentations—your imagination is the only limit. Enjoy every refreshing bite!
Minty Delight: Cool Mint Oreo Icebox Cake
Delicious Minty Delight: Cool Mint Oreo Icebox Cake
Ingredients
Cookie Base
- 24 Oreo cookies (about 1½ cups crushed)
- 2 Tbsp unsalted butter, melted
Mint‑Whipped Cream
- 1 ½ cups heavy whipping cream
- ¼ cup powdered sugar
- 1 tsp pure peppermint extract
Vanilla Mousse
- 8 oz cream cheese, softened
- ½ cup sweetened condensed milk
- 1 tsp vanilla extract
Garnish (optional)
- Fresh mint leaves
- Chocolate shavings
Instructions
Layering the Cake
- First Cream Layer. Spread half of the mint‑whipped cream evenly over the cookie crust, smoothing with an offset spatula. The layer should be about ¼‑inch thick, creating a cool foundation for the mousse.
- Mousse Layer. Gently fold the vanilla mousse into the remaining mint‑whipped cream, then spoon this combined mixture over the first cream layer. Use a spatula to level the surface, ensuring an even thickness.
- Final Cream Top. Finish with the remaining mint‑whipped cream, spreading it to the edges of the pan. This top layer will become the visible “frosting” once the cake is unmolded.
- Chill. Cover the pan loosely with plastic wrap and refrigerate for at least 4 hours, preferably overnight. The cooling time allows the layers to set, the flavors to meld, and the cake to become slice‑ready.
- Serve. Before serving, run a thin knife around the edge of the pan, release the springform, and gently lift the cake onto a serving platter. Garnish with fresh mint leaves and chocolate shavings for visual appeal.
Similar Recipes
 Desserts
Pumpkin Cheesecake Butter Bars
Indulge in the perfect fall dessert with our Pumpkin Cheesecake Butter Bars – a buttery crust,…
 Desserts
Oreo Dump Cake Recipe – Just 5 Ingredients & Real Talk
Learn how to make delicious Oreo Dump Cake Recipe – Just 5 Ingredients & Real Talk.…
 Desserts
Crockpot Cinnamon Pear Compote: A Delightful Recipe
Delicious Crockpot Cinnamon Pear Compote: A Delightful Recipe
 Desserts
The Ultimate Apple Crumble Delight: A Heartwarming Dessert Recipe
Delicious The Ultimate Apple Crumble Delight: A Heartwarming Dessert Recipe
 Desserts
Frozen Peach Melba Popsicles Recipe
Delicious Frozen Peach Melba Popsicles Recipe
 Desserts
Decadent Delight: Guilt-Free Chocolate Chia Pudding
Delicious Decadent Delight: Guilt-Free Chocolate Chia Pudding
 Desserts
Pumpkin Chocolate Truffle Bites
Indulge in velvety pumpkin chocolate truffle bites—perfectly spiced, creamy, and coated in rich chocolate. Ideal for…
 Desserts
Chewy Pistachio Pudding Cookies for Everyone’s Sweet Cravings
Learn how to make delicious Chewy Pistachio Pudding Cookies for Everyone’s Sweet Cravings. Easy recipe with…

Susan
I cook these recipes at home before they ever land here — simple ingredients, clear steps.