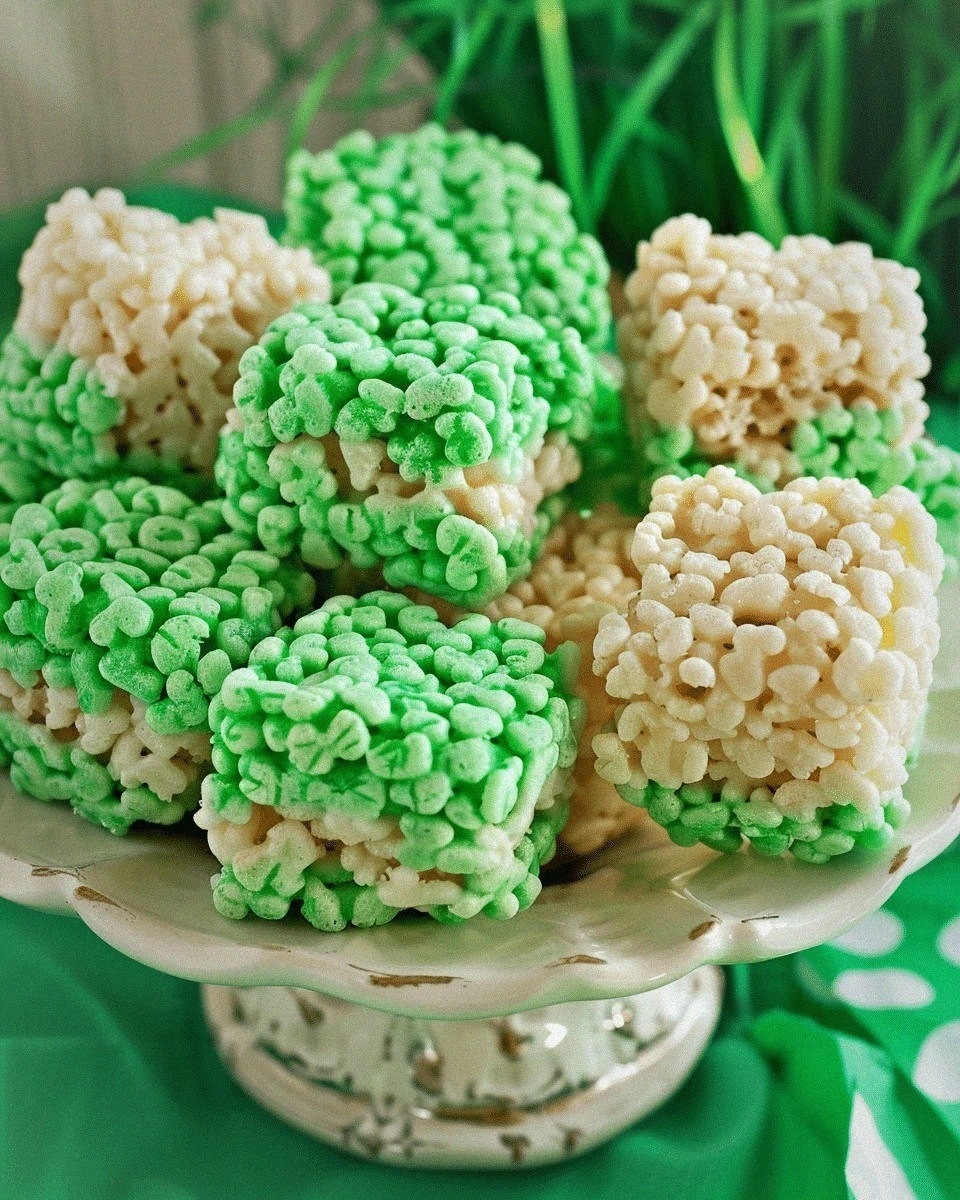
St. Patrick’s Day Rice Krispie Treat Bites
 Save
Save
It was a chilly March afternoon, the kind where the wind whistles through the cracked windows and the scent of fresh rain clings to the air. I was hunched over my kitchen counter, stirring a pot of thick Irish stew for my family’s St. Patrick’s Day dinner, when I realized something was missing—a sweet, bite‑size treat that could stand up to the bold flavors of corned beef and cabbage. The moment I lifted the lid on the pot of melted butter and marshmallows, a cloud of fragrant steam rose, tinged with a faint hint of vanilla, and I knew I had stumbled onto something magical. That cloud swirled around my head like a green‑tinted vortex, and I imagined tiny golden squares dusted with emerald sparkle, ready to be devoured by eager hands.
I remembered the first time I made classic Rice Krispie treats as a kid, the way the crispy cereal crackled under my teeth and the sweet, buttery melt that lingered on the palate. But this version is different; it’s a celebration of St. Patrick’s Day in every bite, with vivid green, gold, and blue hues that look like a miniature parade on a plate. The secret lies in a simple trick: a splash of food coloring that transforms ordinary marshmallow‑kissed rice cereal into a festive confetti of colors, while a dash of butter keeps everything perfectly tender. Have you ever wondered why store‑bought versions never capture that home‑cooked glow? The answer is in the love and the little details that we’ll explore together.
As the butter melted and the marshmallows softened, I could hear the faint sizzle, a sound that promised a crisp, chewy texture once the mixture set. I added the green food coloring first, watching it swirl like a fresh spring meadow, then a splash of yellow and blue to create a rainbow effect that would make any leprechaun jealous. The aroma grew richer, a buttery caramel note that made my stomach rumble in anticipation. I couldn’t resist tasting a spoonful of the warm mixture, and the moment it hit my tongue, I felt the perfect balance of sweet, buttery, and a hint of salty crunch—an experience that was both nostalgic and brand‑new.
Now, I’m thrilled to share this recipe with you, because I know how a simple, handheld treat can become the star of a holiday spread. Imagine your guests reaching for these bite‑sized delights, their eyes lighting up at the vibrant colors, and the room filling with the comforting scent of toasted marshmallows. Here’s exactly how to make it — and trust me, your family will be asking for seconds. But wait, there’s a secret trick in step four that will take these treats from good to unforgettable, so keep reading!
🌟 Why This Recipe Works
- Flavor Depth: The combination of butter and marshmallows creates a rich, caramel‑like base that coats each cereal piece, delivering a buttery sweetness that lingers long after the bite. This depth is amplified by the subtle vanilla undertone that emerges as the marshmallows melt, making every bite feel indulgent.
- Texture Harmony: The crispy rice cereal provides a light, airy crunch, while the marshmallow‑butter mixture binds everything together without becoming soggy. The result is a perfect balance between snap and chew, a texture profile that kids and adults alike adore.
- Ease of Preparation: With just one pot and a handful of pantry staples, you can whip up these treats in under an hour. No fancy equipment, no complex techniques—just melt, mix, color, and press.
- Time Efficiency: The entire process, from melting the butter to setting the bites, takes about 45 minutes, leaving plenty of time to enjoy the festivities and other dishes on your St. Patrick’s Day menu.
- Versatility: While the recipe celebrates the green, gold, and blue of St. Patrick’s Day, you can easily swap colors or add mix‑ins like chocolate chips, dried fruit, or nuts to suit any occasion.
- Ingredient Quality: Using real butter instead of margarine ensures a richer flavor, and mini marshmallows melt evenly, giving you a smooth, glossy coating that looks as good as it tastes.
- Crowd‑Pleasing Factor: These bite‑size treats are perfect for parties, potlucks, or a simple after‑dinner snack. Their festive appearance and familiar taste make them an instant hit with both kids and adults.
- Nutrition Balance: While they are a treat, the portion size keeps calories in check, and the rice cereal provides a modest amount of whole‑grain carbs, making them a better option than many store‑bought confections.
🥗 Ingredients Breakdown
The Foundation
Butter is the cornerstone of this recipe, providing a glossy, buttery sheen that coats each rice cereal flake. When melted, butter creates a luscious base that carries the sweet marshmallow flavor and helps the colors spread evenly. Choose unsalted butter for better control over the salt level; you can always add a pinch of sea salt later if you want a sweet‑and‑salty contrast.
Mini marshmallows are the secret to a smooth, velvety coating. Their small size ensures they melt quickly and uniformly, eliminating the clumps that larger marshmallows can cause. If you’re out of mini marshmallows, you can pulse regular marshmallows in a food processor for a few seconds to achieve a similar texture.
Colorful Magic
Green food coloring is the star of the show for St. Patrick’s Day, delivering that iconic emerald hue. A few drops are enough; too much can make the flavor slightly bitter, so add gradually while stirring. If you prefer a natural alternative, you can use a pinch of matcha powder or spirulina, which also adds a subtle earthy note.
Yellow and blue food coloring are added to create a playful rainbow effect that mimics the Irish flag’s colors and adds visual excitement. When mixed with the green, they create swirls that look like festive confetti. Remember, a little goes a long way—start with a drop each and adjust to your liking.
Binding & Sweetness
Rice Krispies cereal provides the essential crunch that defines a Rice Krispie treat. Its light, airy texture absorbs the buttery marshmallow mixture without becoming soggy, ensuring each bite stays crisp. For a heartier version, you can substitute half the cereal with toasted quinoa or puffed amaranth.
Non‑stick spray or a thin layer of butter for greasing the pan is crucial to prevent the treats from sticking. I prefer a quick spray of non‑stick cooking spray because it creates an even, invisible barrier that releases the bites cleanly. If you’re using butter, spread a thin, even coat with a paper towel, making sure every corner is covered.
Finishing Touches
A pinch of sea salt can elevate the sweetness, balancing the flavors and enhancing the overall taste. It’s a tiny addition that makes a big difference, especially if you’re serving these bites alongside other sweet desserts.
Finally, a light dusting of powdered sugar can add a snow‑like finish, giving the treats a festive sparkle that looks stunning on a St. Patrick’s Day platter. Use a fine sieve to avoid clumps and to keep the dusting even.
With your ingredients prepped and ready, let's get cooking. Here's where the fun really begins...
🍳 Step-by-Step Instructions
🔐 Expert Tips for Perfect Results
The Taste Test Trick
Before you press the mixture into the pan, pause for a quick taste test. Scoop a tiny spoonful and let it cool on your tongue for a second. If the sweetness feels a bit flat, add a pinch of sea salt or a dash of vanilla extract. This small adjustment balances the flavors and makes the final bites sing.
Why Resting Time Matters More Than You Think
Allowing the treats to rest for at least 20 minutes isn’t just about firmness; it gives the butter and marshmallow molecules time to bond with the cereal. This resting period creates that perfect chew‑to‑crunch ratio. I once tried to cut them while still warm and ended up with crumbled pieces—lesson learned!
The Seasoning Secret Pros Won’t Tell You
A pinch of flaky sea salt sprinkled on top right before the mixture sets adds a subtle crunch and enhances the sweet flavors. It’s a technique used by pastry chefs to give desserts that extra “wow” factor without adding extra sugar. Trust me, your guests will notice the difference.
Color Consistency Hack
Food coloring can sometimes bleed into the marshmallow mixture unevenly. To keep colors bright and consistent, dissolve each food coloring in a teaspoon of warm water before adding it to the melt. This ensures an even distribution and prevents streaky patches.
Cutting Cleanly Every Time
Heat a thin metal spatula in hot water, dry it, and run it along the top of the set slab before cutting. The warm blade glides through the treats, giving you clean, straight edges without dragging the mixture. I’ve used this trick for years, and it never fails.
🌈 Delicious Variations to Try
One of my favorite things about this recipe is how versatile it is. Here are some twists I've tried and loved:
Lucky Charms Remix
Swap half of the Rice Krispies for Lucky Charms mini‑marshmallows. The extra marshmallow bits add a burst of sweetness and a fun, colorful look that feels like a breakfast‑themed party in every bite.
Chocolate‑Covered Shamrock
After the bites have cooled, dip the tops in melted dark chocolate and sprinkle with green sprinkles. The contrast of rich chocolate with the buttery crunch creates an indulgent treat that’s perfect for dessert tables.
Nutty Irish Delight
Stir in ½ cup of toasted chopped almonds or pecans before pressing the mixture into the pan. The nuts add a subtle earthiness and a satisfying crunch that pairs beautifully with the sweet marshmallow base.
Coconut‑Lime Twist
Add ¼ cup of unsweetened shredded coconut and a teaspoon of lime zest to the mixture. The coconut brings a tropical aroma, while the lime zest adds a bright, citrusy pop that cuts through the richness.
Spiced Autumn Version
Mix in a pinch of cinnamon, nutmeg, and a dash of pumpkin spice. This variation is perfect for transitioning from St. Patrick’s Day to the cozy flavors of fall, and the warm spices complement the buttery base beautifully.
Gluten‑Free Crunch
Replace the Rice Krispies with a gluten‑free puffed rice cereal. The texture remains light, and the flavor stays true to the original, making it safe for guests with gluten sensitivities without sacrificing the crunch.
📦 Storage & Reheating Tips
Refrigerator Storage
Place the bites in an airtight container lined with a parchment sheet to prevent them from sticking together. Store them in the fridge for up to 5 days. The cool environment keeps the butter firm, preserving the chewiness. If you notice any condensation, simply pat the top with a paper towel before resealing.
Freezing Instructions
For longer storage, arrange the bites on a baking sheet and freeze them individually for 1‑2 hours. Once solid, transfer them to a zip‑top freezer bag. They’ll keep for up to 3 months. When you’re ready to enjoy them, let them thaw at room temperature for 15 minutes, and they’ll be as fresh as the day you made them.
Reheating Methods
To revive a slightly hardened bite, microwave it for 5‑7 seconds on high. The butter will soften, and the marshmallow coating will regain its glossy sheen. For a more uniform warm‑up, place the bites on a baking sheet and heat in a 300°F (150°C) oven for 5 minutes. The trick to reheating without drying it out? A splash of milk or a drizzle of melted butter over the top before warming.
❓ Frequently Asked Questions
What if I don’t have food coloring?
Can I make these treats gluten‑free?
How long can I keep the bites at room temperature?
Can I add extra mix‑ins like chocolate chips?
Do I need to use a non‑stick pan?
Can I make these treats ahead of time for a party?
What’s the best way to transport these bites?
Similar Recipes
 Desserts
Dreamy Fruit Pizza Recipe
Delicious Dreamy Fruit Pizza Recipe
 Desserts
Pumpkin Sugar Cake Snacks
Enjoy pumpkin sugar cake snacks – a spiced pumpkin, sweet sugar, and buttery cake blend, perfect…
 Desserts
Strawberry Bliss No-Bake Parfaits: The Perfect Summer Treat
Delicious Strawberry Bliss No-Bake Parfaits: The Perfect Summer Treat
 Desserts
Biscoff Bliss Cheesecake Bars Recipe: A Sweet Indulgence
Delicious Biscoff Bliss Cheesecake Bars Recipe: A Sweet Indulgence
 Desserts
Classic Bourbon-Infused Bread Pudding: Step-By-Step Guide
Delicious Classic Bourbon-Infused Bread Pudding: Step-By-Step Guide
 Desserts
Grandma’s Decadent Chocolate Pie: A Timeless Treat
Delicious Grandma’s Decadent Chocolate Pie: A Timeless Treat
 Desserts
sweet and spicy candied pecans for holiday gift boxes
Learn how to make delicious sweet and spicy candied pecans for holiday gift boxes. Easy recipe…
 Desserts
Minty Delight: Cool Mint Oreo Icebox Cake
Delicious Minty Delight: Cool Mint Oreo Icebox Cake

Susan
I cook these recipes at home before they ever land here — simple ingredients, clear steps.
Other Reader Favorites
 Dinner
Freezer Prep Chicken Teriyaki Stir Fry for Kids
Learn how to make delicious Freezer Prep Chicken Teriyaki Stir Fry for Kids. Easy recipe with…
 Dinner
Savory Onion Beef Fried Rice: A Flavorful Comfort Dish
Delicious Savory Onion Beef Fried Rice: A Flavorful Comfort Dish
 Dinner
Creamy Chicken Taco Casserole Recipe
Delicious Creamy Chicken Taco Casserole Recipe
 Desserts
Decadent Protein-Packed Brownie for One
Delicious Decadent Protein-Packed Brownie for One