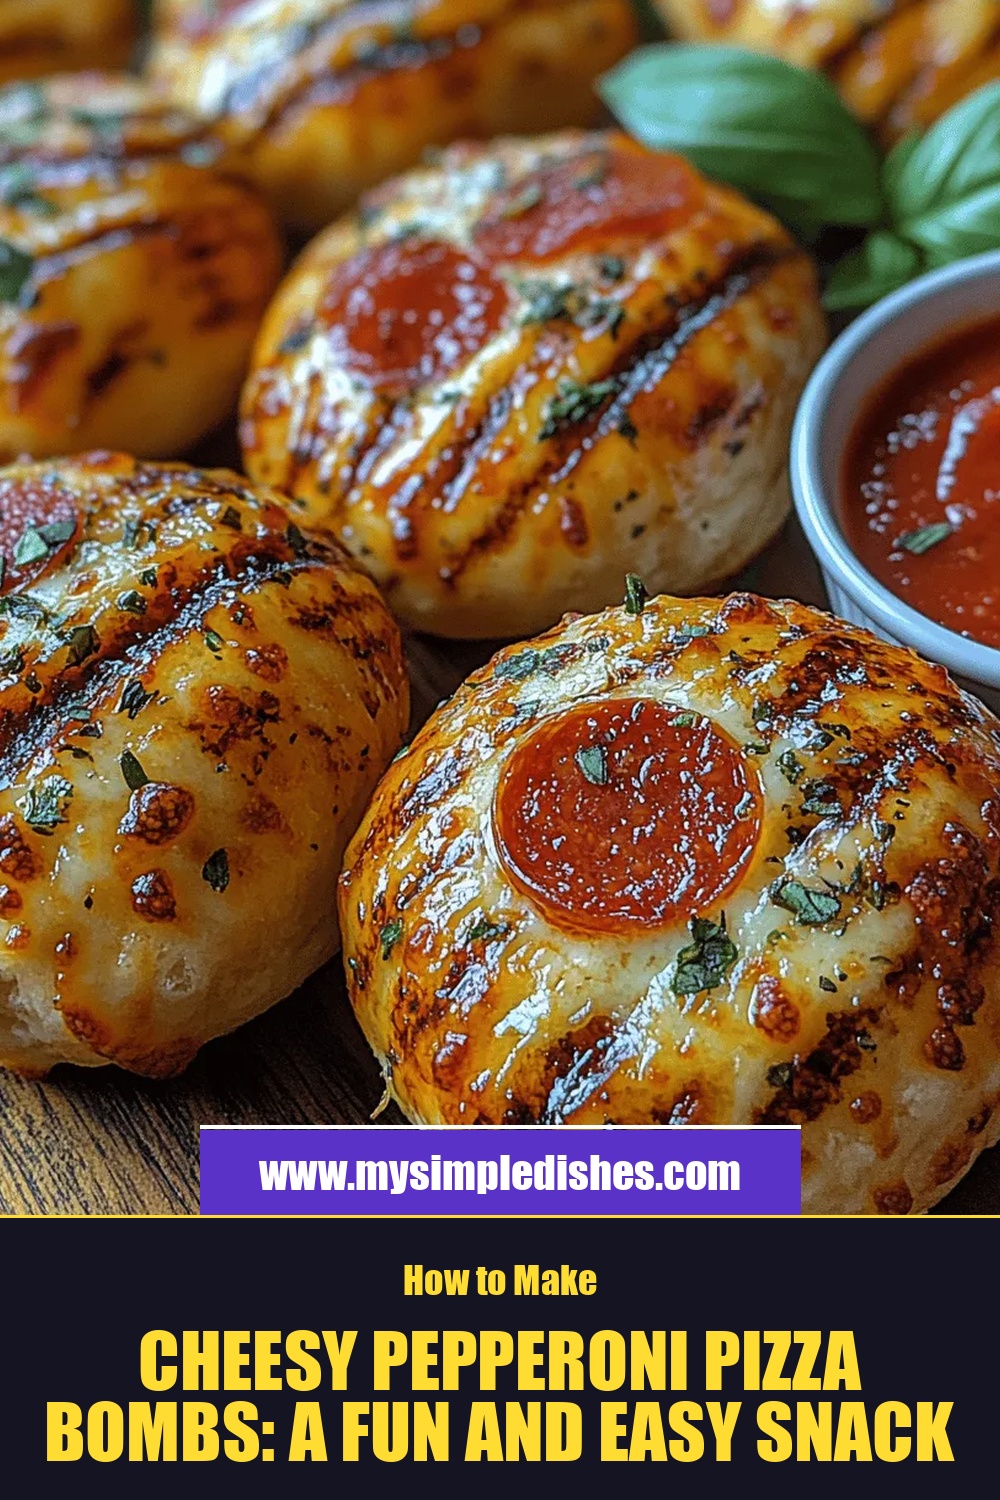
Cheesy Pepperoni Pizza Bombs: A Fun and Easy Snack Recipe
 Save
Save
Imagine the classic pizza experience wrapped inside a bite‑size, golden‑brown pocket that melts in your mouth. Cheesy Pepperoni Pizza Bombs turn a beloved dinner favorite into a handheld snack that’s perfect for brunch tables, weekend gatherings, or a playful breakfast treat.
What makes these bombs special is the marriage of stretchy mozzarella, spicy pepperoni, and a buttery, herbed dough that puffs up into a light, airy interior while keeping the edges satisfyingly crisp.
Pizza lovers of all ages will adore them, especially kids who love “pizza in a ball,” and adults who appreciate a fun twist on a comfort classic. Serve them at weekend brunches, after‑school parties, or as a hearty snack while watching the game.
The process is straightforward: mix a simple dough, fold in cheese and pepperoni, seal, bake, and finish with a drizzle of marinara. In under half an hour you’ll have a tray of bubbling, cheesy goodness ready to share.
Why You'll Love This Recipe
Irresistible Cheesy Pull: The molten mozzarella stretches with every bite, delivering that classic pizza string‑cheese feeling in a compact, handheld form.
Quick & Easy Prep: With just a handful of pantry staples and a 20‑minute prep time, these bombs are ideal for busy mornings or lazy brunches.
Customizable Flavor: Swap pepperoni for sausage, add veggies, or sprinkle extra herbs—each bomb can be tailored to your family’s taste buds.
Perfect for Sharing: Their bite‑size nature encourages communal eating, making them a crowd‑pleasing centerpiece for any brunch spread.
Tips & Tricks
Perfecting the Recipe
Cold Butter Matters. Keep the butter chilled until it hits the flour. Cold fat creates steam pockets, resulting in a flakier crust.
Don’t Over‑Knead. Mix just until the dough comes together; over‑working develops gluten, making the bombs tough instead of tender.
Seal the Edges Well. Press the dough firmly around the filling and crimp with a fork to prevent cheese leakage during baking.
Use a Light Hand with Sauce. Too much marinara can soggy the crust; a thin glaze gives flavor without compromising texture.
Flavor Enhancements
Mix a tablespoon of finely chopped fresh basil into the cheese filling for a herbaceous lift. For a smoky kick, add a pinch of smoked paprika to the dough. Finish each bomb with a drizzle of garlic‑infused olive oil right after baking for extra richness.
Common Mistakes to Avoid
Skipping the egg wash can lead to a pale, less‑crisp top. Also, avoid overcrowding the baking sheet; bombs need space to expand, or they’ll steam and become soggy.
Pro Tips
Prep the Dough Ahead. The dough can be refrigerated for up to 24 hours, wrapped tightly, which enhances flavor and makes shaping easier.
Use a Pizza Stone. Baking on a pre‑heated stone gives a crispier bottom and a more uniform rise.
Temperature Check. An instant‑read thermometer should read 190°F (88°C) at the center of a bomb; this ensures the cheese is fully melted.
Serve Immediately. The bombs are at their fluffiest within the first 10 minutes of leaving the oven; they lose steam and become denser after cooling.
Variations
Ingredient Swaps
Replace pepperoni with spicy Italian sausage crumbles or diced ham for a different protein profile. Swap mozzarella for a blend of cheddar and provolone for a sharper melt. For a veggie‑only version, add sautéed mushrooms, spinach, and sun‑dried tomatoes in place of meat.
Dietary Adjustments
Use gluten‑free all‑purpose flour to keep the dish safe for gluten‑intolerant guests. For dairy‑free, substitute butter with coconut oil and use a plant‑based mozzarella alternative. A low‑carb twist swaps regular flour for almond flour and reduces the amount of marinara, focusing on cheese and herbs.
Serving Suggestions
Pair the bombs with a simple arugula salad tossed in lemon vinaigrette, or serve alongside crispy hash browns for a heartier brunch. A side of garlic‑buttered garlic knots lets guests scoop up any extra sauce, turning the meal into a true pizza‑themed feast.
Storage Info
Leftover Storage
Allow the bombs to cool completely, then place them in an airtight container. In the refrigerator they stay fresh for 3‑4 days. For longer keeping, freeze in a single layer on a baking sheet, then transfer to a freezer‑safe bag; they’ll last up to 3 months without losing flavor.
Reheating Instructions
Reheat frozen or refrigerated bombs in a preheated 350°F (175°C) oven for 10‑12 minutes, covered with foil to prevent drying. Remove the foil for the last 2 minutes to restore crispness. A quick microwave burst (30‑seconds) works in a pinch, but the oven method preserves the flaky texture.
Frequently Asked Questions
Can I make these pizza bombs ahead of time?
What if I don’t have a pizza stone?
Can I freeze the uncooked bombs?
What side dishes work best with pizza bombs?
Cheesy Pepperoni Pizza Bombs deliver all the comfort of pizza in a playful, bite‑size form that’s perfect for brunch or any casual gathering. With a quick dough, melty cheese, and a bright marinara glaze, they’re easy to master yet impressive enough to wow guests. Feel free to experiment with toppings, herbs, or dietary swaps—your kitchen, your rules. Serve them warm, share the joy, and enjoy every cheesy, pepperoni‑packed bite!
Cheesy Pepperoni Pizza Bombs: A Fun and Easy Snack Recipe
Delicious Cheesy Pepperoni Pizza Bombs: A Fun and Easy Snack Recipe
Ingredients
Dough & Base
- 2 cups all‑purpose flour
- 1 ½ tsp baking powder
- ¼ tsp salt
- 4 Tbsp unsalted butter, cold and cubed
- ¾ cup whole milk, chilled
Filling
- 1 ½ cups shredded mozzarella cheese
- ½ cup pepperoni slices, chopped
- ¼ cup grated Parmesan cheese
Sauce & Finish
- ½ cup marinara sauce (store‑bought or homemade)
- 1 tsp dried oregano
- ¼ tsp crushed red pepper flakes (optional)
Instructions
Baking the Bombs
- Preheat the Oven. Set your oven to 375°F (190°C) and line a baking sheet with parchment. A hot oven creates a quick rise, giving the bombs a light, airy interior.
- Egg Wash (Optional). Lightly brush each bomb with a beaten egg mixed with a splash of milk. This step adds a golden sheen and a slightly crisp exterior.
- Bake. Place the bombs on the prepared sheet and bake for 12‑15 minutes, or until the tops are deep golden and the cheese inside is bubbling. The edges should be puffed and firm to the touch.
- Add Marinara Glaze. While the bombs bake, warm the marinara sauce in a small saucepan, stirring in oregano and red‑pepper flakes. Once the bombs are out of the oven, drizzle the hot sauce over each one, allowing it to soak into the crust.
- Cool Slightly & Serve. Let the bombs rest for 3‑4 minutes. This short rest lets the cheese set just enough to keep the bombs from falling apart when you pick them up. Serve warm with extra sauce on the side for dipping.
Similar Recipes
 Appetizers
Spicy Green Chili Turkey Quesadilla Squares
Delicious Spicy Green Chili Turkey Quesadilla Squares
 Appetizers
Discovering Fresh & Tangy Tomato Basil Bruschetta Skewers
Delicious Discovering Fresh & Tangy Tomato Basil Bruschetta Skewers
 Appetizers
Cozy Cream of Broccoli Soup with Cheddar Croutons
Learn how to make delicious Cozy Cream of Broccoli Soup with Cheddar Croutons. Easy recipe with…
 Appetizers
Flavorful Tomato Basil Tart: Assembling and Baking to Perfection
Delicious Flavorful Tomato Basil Tart: Assembling and Baking to Perfection
 Appetizers
Creamy Vegan Macaroni Salad Delight: A Refreshing Recipe for Every Occasion
Delicious Creamy Vegan Macaroni Salad Delight: A Refreshing Recipe for Every Occasion
 Appetizers
Asian Chicken Cranberry Salad: 5 Reasons to Love It
Learn how to make delicious Asian Chicken Cranberry Salad: 5 Reasons to Love It. Easy recipe…
 Appetizers
Healthy Creamy Carrot Ginger Soup For A Light Lunch
Learn how to make delicious Healthy Creamy Carrot Ginger Soup For A Light Lunch. Easy recipe…
 Appetizers
Refreshing Tomato Aspic Delight: A Culinary Journey into a Classic Gelatin Dish
Delicious Refreshing Tomato Aspic Delight: A Culinary Journey into a Classic Gelatin Dish

Susan
I cook these recipes at home before they ever land here — simple ingredients, clear steps.