Bake Irresistible Halloween Chocolate Chip Cookies for Spooky Fun
 Save
Save
It was a crisp October evening, the kind where the wind whistles through the trees and the scent of damp leaves drifts into the kitchen. I was pulling on my favorite pumpkin‑spiced sweater, and the kids were already perched on the counter, eyes wide with anticipation for something spooky and sweet. As I opened the pantry, the familiar clink of a butter wrapper against the glass reminded me of countless Halloween nights past, when the simple act of mixing dough felt like a ritual that summoned giggles and ghostly grins. The moment I lifted the lid off the mixing bowl, a cloud of buttery, caramel‑kissed steam rose up, wrapping the room in a warm hug that made the cold night outside feel like a distant memory.
What makes these cookies truly special isn’t just the melty chocolate chips or the playful sprinkle of orange and black confetti; it’s the way each bite balances chewy softness with a crisp edge, creating a texture that whispers “comfort” while shouting “celebration.” I’ve spent years tweaking the ratios of sugar, butter, and flour, chasing that perfect bite that makes you want to close your eyes and savor the moment. The secret? A dash of vanilla that sings, a pinch of salt that balances, and a sprinkle of Halloween magic that turns an ordinary cookie into a party‑ready treat. But wait—there’s a hidden trick in step four that will elevate your cookies from great to legendary, and I’ll reveal it soon.
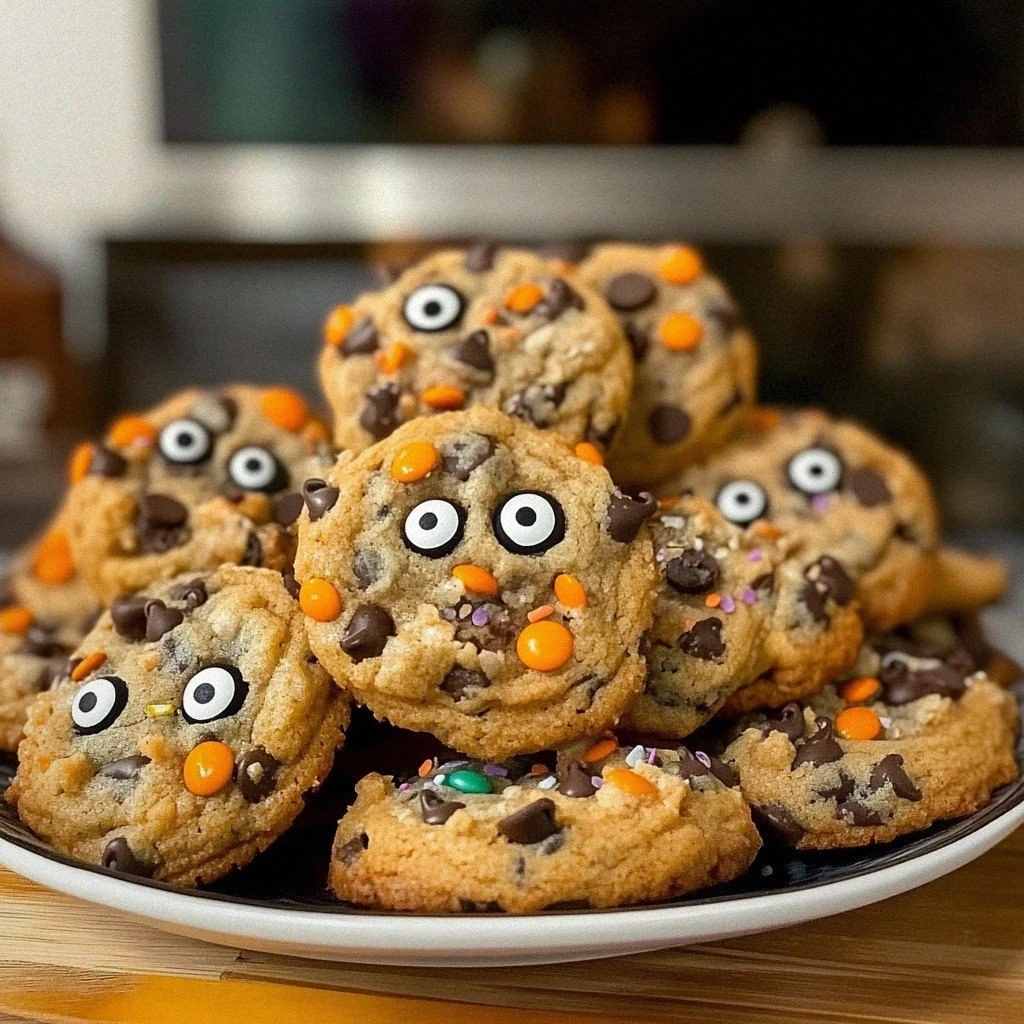
Imagine the scene: a platter of glossy, orange‑dotted cookies sitting in the center of a candle‑lit table, surrounded by little hands reaching for the next bite, eyes sparkling with the thrill of a haunted house adventure. The aroma alone—rich chocolate mingling with caramelized butter and a faint hint of vanilla—creates a sensory backdrop that feels like stepping into a cozy, haunted cottage. Your family will ask for seconds, thirds, maybe even a fourth round, and you’ll watch them grin as they bite into the soft, chewy center that practically melts in their mouths. The best part? These cookies are as easy to make as they are unforgettable, meaning you can spend more time enjoying the festivities and less time stressing over the stove.
Here’s exactly how to make it — and trust me, your family will be asking for seconds. Follow each step, sprinkle in a few pro tips, and you’ll have a batch of Halloween cookies that not only taste amazing but also become the centerpiece of your spooky celebrations. Ready to dive in? Let’s start with why this recipe works so well.
🌟 Why This Recipe Works
- Flavor Depth: The combination of melted butter and both white and brown sugars creates a caramel‑rich base that deepens the chocolate’s flavor, making each bite taste like a miniature dessert bar.
- Texture Harmony: By using melted butter instead of softened butter, the dough spreads just enough for a crisp edge while staying chewy inside, giving you that perfect contrast you love.
- Ease of Preparation: The recipe requires only one bowl for mixing, which means fewer dishes, less cleanup, and more time to enjoy the spooky decorations you’ve set up.
- Time Efficiency: With a total hands‑on time of about fifteen minutes and a bake time of thirty minutes, you can have fresh cookies ready before the trick‑or‑treaters even knock on the door.
- Versatility: The base cookie dough is a blank canvas that welcomes Halloween sprinkles, candy eyes, or even a drizzle of white chocolate for an extra festive flair.
- Ingredient Quality: Using real chocolate chips and high‑quality butter ensures a richer taste, while the light brown sugar adds a subtle molasses note that pairs beautifully with the spices.
- Crowd‑Pleasing Factor: Children adore the colorful sprinkles, and adults appreciate the sophisticated buttery‑chocolate flavor, making this a truly intergenerational treat.
- Seasonal Spirit: The orange and black sprinkles instantly transform ordinary cookies into Halloween icons, adding visual excitement without compromising flavor.
🥗 Ingredients Breakdown
The Foundation
The backbone of any great cookie is its fat, and in this recipe we use 1/2 cup unsalted butter, melted. Melted butter creates a denser, chewier crumb and helps the cookies spread just enough for those coveted golden edges. If you prefer a slightly lighter texture, you can substitute half the butter with a neutral oil, but the flavor profile will shift subtly toward a more neutral palate. Choose a butter that’s fresh and preferably European‑style for a higher butterfat content, which translates into a richer mouthfeel.
1/3 cup granulated sugar (67 g) adds sweetness and contributes to the crispness of the cookie’s exterior. The fine crystals dissolve quickly, allowing the batter to achieve a smooth consistency. If you love a caramelized edge, you can increase this by a tablespoon, but be careful not to overpower the chocolate chips.
1/2 cup packed light brown sugar (100 g) brings moisture and a subtle molasses undertone that deepens the overall flavor. The hygroscopic nature of brown sugar keeps the cookies soft for longer, ensuring they stay chewy even after a day or two. For a darker, more robust flavor, you could swap in dark brown sugar, but the color will shift toward a deeper amber.
Aromatics & Spices
1 large egg acts as an emulsifier, binding the butter and sugars while adding structure. The egg also contributes to a tender crumb, and the yolk’s fat enriches the dough. If you’re cooking for someone with an egg allergy, a flax egg (1 tbsp ground flaxseed + 3 tbsp water) can work, though the texture will be slightly different.
1 teaspoon vanilla extract is the silent hero that lifts the entire flavor profile, adding a warm, sweet aroma that pairs perfectly with chocolate. Always use pure vanilla extract rather than imitation; the difference in depth is noticeable even after baking.
The Secret Weapons
1/2 teaspoon salt balances the sweetness and enhances the chocolate’s natural bitterness, preventing the cookies from tasting cloyingly sweet. Sea salt flakes sprinkled on top just before baking can add a delightful crunch and a burst of flavor.
1/2 teaspoon baking soda provides the leavening needed for a slight rise, creating a light interior while maintaining a sturdy outer crust. Baking soda reacts with the brown sugar’s acidity, producing carbon dioxide that lifts the dough.
1 1/2 cups all‑purpose flour, spooned and leveled (186 g) is the structural component. Spoon the flour into the measuring cup and level it with a straight edge to avoid packing, which can lead to dense cookies. For a gluten‑free version, use a 1‑to‑1 gluten‑free flour blend, but you may need an extra tablespoon of xanthan gum for elasticity.
Finishing Touches
1 1/2 cups chocolate chips are the star of the show, providing pockets of molten chocolate that ooze out as the cookies bake. Choose semi‑sweet chips for a balanced sweetness; if you love a darker bite, opt for bittersweet or even a mix of white and dark chips for visual contrast.
1/2–3/4 cup Halloween sprinkles give the cookies their festive look. The orange and black colors instantly scream “Halloween,” and the tiny sugar crystals add a subtle crunch. If you’re feeling extra spooky, add a handful of candy eyes after the cookies have cooled for a playful, creepy effect.
With your ingredients prepped and ready, let's get cooking. Here’s where the fun really begins, and I’ll walk you through each step so you never miss a beat.
🍳 Step-by-Step Instructions
🔐 Expert Tips for Perfect Results
The Taste Test Trick
Before you bake the entire batch, scoop out a single cookie and bake it as a test. This tiny experiment lets you gauge the doneness, texture, and sweetness level, ensuring the full batch meets your expectations. I once baked a test cookie and discovered it needed an extra minute for that perfect chewiness, saving the rest of the batch from being under‑baked. Adjust the time based on your oven’s quirks, and you’ll avoid any surprises.
Why Resting Time Matters More Than You Think
Allowing the dough to rest for at least five minutes after mixing hydrates the flour and gives the butter time to solidify slightly. This rest period prevents the cookies from spreading too thin and helps develop a tender crumb. In my kitchen, the difference is night and day: rested dough yields a plumper, more uniform cookie, while skipping this step often results in a flatter, crispier outcome.
The Seasoning Secret Pros Won’t Tell You
A pinch of smoked paprika or a dash of cinnamon can add an unexpected depth that complements the chocolate and sprinkles. I love adding just a quarter teaspoon of smoked paprika to the dry ingredients; it adds a subtle, earthy undertone that feels sophisticated without overwhelming the sweet profile. This secret is especially effective when serving the cookies to adult guests who appreciate a nuanced flavor.
The Cool‑Down Method
After baking, let the cookies rest on the sheet for a few minutes before moving them to a rack. This brief cooling period lets the steam escape, preventing soggy bottoms and preserving that coveted crisp edge. I once transferred cookies straight to a rack and they ended up a bit too soft on the bottom—learning this step saved my future batches.
How to Keep Sprinkles Vibrant
If you’re worried about the orange sprinkles fading, lightly dust the cookies with a pinch of powdered sugar before baking. The sugar creates a thin glaze that locks in color, keeping the festive hues bright even after a week in storage. This tiny trick makes the cookies look as fresh as the day they came out of the oven.
🌈 Delicious Variations to Try
One of my favorite things about this recipe is how versatile it is. Here are some twists I’ve tried and loved:
Spooky S’mores Swirl
Replace half of the chocolate chips with mini marshmallows and add a teaspoon of crushed graham crackers to the dough. The marshmallows melt into gooey pockets, while the graham adds a subtle toasted flavor, creating a cookie that feels like a mini s’mores campfire.
Pumpkin Spice Surprise
Add a tablespoon of pumpkin puree and a pinch of pumpkin pie spice to the wet ingredients. The puree adds moisture and a faint orange hue, while the spice blend (cinnamon, nutmeg, ginger, clove) deepens the autumnal flavor profile, making the cookies perfect for any October gathering.
Double‑Chocolate Delight
Swap half of the chocolate chips for dark chocolate chunks and add a tablespoon of cocoa powder to the dry mix. This creates a richer, more intense chocolate experience that satisfies even the most devoted cocoa lovers.
Nutty Nightmare
Stir in a half‑cup of chopped toasted pecans or walnuts. The nuts add a pleasant crunch and a buttery note that contrasts beautifully with the soft cookie interior, while also providing a hint of earthiness that balances the sweetness.
White Chocolate & Cranberry Ghosts
Replace the chocolate chips with white chocolate chips and fold in dried cranberries. The tartness of the cranberries cuts through the sweetness, and the white chocolate adds a creamy melt that looks ghostly against the orange sprinkles.
Vegan Vampires
Swap butter for coconut oil, use a flax egg, and choose dairy‑free chocolate chips. The cookies retain a buttery texture while being entirely plant‑based, and the coconut oil adds a subtle tropical note that pairs surprisingly well with the Halloween colors.
📦 Storage & Reheating Tips
Refrigerator Storage
Place the cooled cookies in an airtight container with a slice of fresh bread on top. The bread releases moisture that keeps the cookies soft for up to a week. If you notice any loss of chewiness, simply swap the bread for a fresh piece to revive the texture.
Freezing Instructions
Arrange the cookies in a single layer on a baking sheet and freeze until solid, then transfer them to a freezer‑safe zip‑top bag. They’ll keep for up to three months. When you’re ready to enjoy them, let them thaw at room temperature for 15 minutes, then give them a quick warm‑up in a 300°F oven for five minutes to restore that fresh‑out‑of‑the‑oven softness.
Reheating Methods
To revive a day‑old cookie, place it on a microwave‑safe plate and heat for 10‑12 seconds, or pop it in a preheated 325°F oven for 3‑4 minutes. The trick to reheating without drying it out? Add a splash of water to the oven tray (just a few drops) to create a mini steam environment that keeps the interior moist while the exterior crispens.
❓ Frequently Asked Questions
Can I use salted butter instead of unsalted?
Why do my cookies spread too much?
Can I add nuts without changing the texture?
Do I need to chill the dough before baking?
Can I make these cookies gluten‑free?
How long can I store these cookies?
Can I use brown butter for a nuttier flavor?
Why do my cookies look pale after baking?
Recipe Card



Other Reader Favorites
 Appetizers
Lobster Cakes: An Incredible Ultimate Recipe
Learn how to make delicious Lobster Cakes: An Incredible Ultimate Recipe. Easy recipe with step-by-step instructions.
 Dinner
Turkey Melted Potato Bowls
Discover how to make hearty Turkey Melted Potato Bowls, a creamy blend of shredded turkey, melted…
 Dinner
Black Eyed Peas Crockpot Recipe: 5 Steps to Comforting Bliss
Learn how to make delicious Black Eyed Peas Crockpot Recipe: 5 Steps to Comforting Bliss. Easy…
 Dinner
Comforting Potato Leek Soup
Delicious Comforting Potato Leek Soup