Christmas Candy
 Save
Save
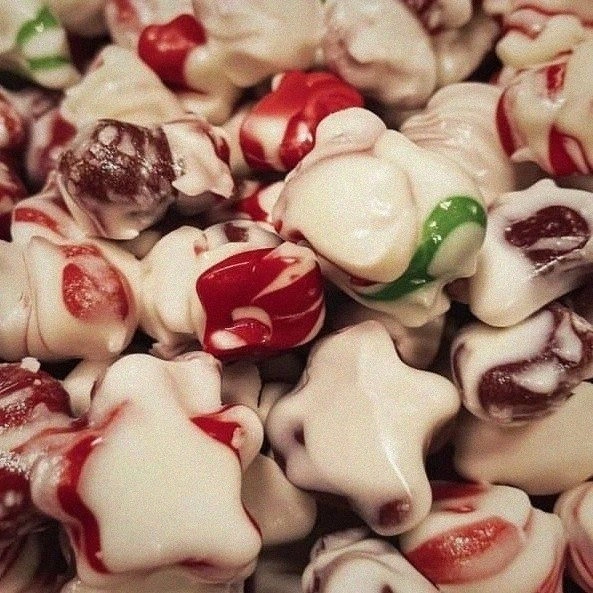
The first time I ever tasted a piece of homemade Christmas candy, I was eight years old, perched on a stool in my grandmother’s kitchen while snowflakes performed a slow ballet outside the window. The moment she lifted the lid on the pot, a cloud of sweet, buttery steam rose up and curled around my nose, whispering promises of festive joy. I could hear the faint crackle of the chocolate as it melted, feel the soft give of the pecans as they were folded in, and see the ruby‑red glint of cranberries peeking through the glossy white surface. That memory has become the north star of my holiday baking, a beacon that guides me back to the same comforting flavors year after year. Here’s the thing: the recipe I’m about to share isn’t just a list of ingredients; it’s a portal to that warm kitchen, the kind where laughter mixes with the scent of toasted nuts and the sound of a spoon clinking against a ceramic bowl becomes a holiday rhythm.
When you finally taste the finished candy, you’ll notice a delicate balance that feels both indulgent and surprisingly wholesome. The white chocolate provides a creamy, melt‑in‑your‑mouth base, while the dried cranberries add a bright, tart pop that cuts through the richness like a burst of winter berries. The pecans bring a buttery crunch that reminds you of the crackling fire in the hearth, and together they create a texture symphony that keeps you reaching for just one more bite. Have you ever wondered why store‑bought holiday candies sometimes feel flat or overly sweet? The secret lies in the quality of each component and the love you fold into every step—something you’ll discover as we walk through the process together.
But wait—there’s a twist that will elevate this candy from “nice” to “unforgettable.” I’ll reveal a simple trick in step four that turns ordinary white chocolate into a glossy, snappy coating that even professional pastry chefs envy. Trust me on this one: once you master that glossy sheen, you’ll never settle for dull, matte candy again. And the best part? The whole recipe takes less than an hour, meaning you can whip up a batch while the Christmas tree lights are being strung, and still have time to enjoy the fruits of your labor before the first carol starts.
Here’s exactly how to make it — and trust me, your family will be asking for seconds, thirds, and maybe even a fourth round before the night is over. Grab your favorite mixing bowl, preheat your oven, and get ready to create a candy that captures the sparkle of tinsel and the warmth of a holiday hug. Ready? Let’s dive in and make this season’s most memorable treat together.
🌟 Why This Recipe Works
- Flavor Depth: The combination of white chocolate, tart cranberries, and buttery pecans creates a layered taste experience that evolves with each bite, keeping the palate engaged from start to finish. The sweet‑creamy base is balanced by the natural acidity of the berries, preventing the candy from feeling cloyingly sweet.
- Texture Contrast: You get a smooth, melt‑in‑your‑mouth coating contrasted with the satisfying crunch of toasted pecans, and the chewy burst of dried cranberries. This interplay of textures makes the candy feel luxurious and interesting, rather than one‑dimensional.
- Ease of Execution: With only three core ingredients and a handful of simple steps, this recipe is approachable for both novice cooks and seasoned bakers. No fancy equipment is required—just a saucepan, a spatula, and a baking sheet.
- Time Efficiency: The total hands‑on time is under 20 minutes, and the cooking time is a quick 15‑minute melt‑and‑mix, leaving you plenty of room to enjoy the holiday hustle without feeling rushed.
- Versatility: While the base recipe shines on its own, it serves as a perfect canvas for adding spices, drizzles, or even a dash of sea salt to tailor the flavor to your family’s preferences.
- Nutrition Boost: Pecans contribute heart‑healthy monounsaturated fats and antioxidants, while cranberries add a dose of vitamin C and fiber. Even though this is a treat, you’re still getting a tiny nutritional perk.
- Crowd‑Pleasing Factor: The candy’s festive white hue and ruby specks make it an instant visual hit on any holiday platter, and the familiar flavors appeal to both kids and adults alike.
🥗 Ingredients Breakdown
The Foundation: White Chocolate Chips
White chocolate chips are the canvas upon which all other flavors paint their story. Their high cocoa butter content gives the candy a silky melt that coats each bite in a luxurious veil. Because they’re already pre‑tempered, they melt evenly and set with a smooth, glossy finish that looks as festive as a snow‑covered pine. If you’re looking for an upgrade, opt for a premium brand that lists cocoa butter as the first ingredient rather than vegetable oils. The result? A richer mouthfeel and a more stable snap when the candy hardens.
The Bright Burst: Dried Cranberries
Dried cranberries bring a tangy pop that cuts through the sweet creaminess of the chocolate, echoing the bright red ornaments that dangle from the tree. Their natural chewiness adds a playful texture, and their slight tartness awakens the palate, preventing the candy from feeling one‑note sweet. When selecting cranberries, look for ones that are plump, glossy, and not overly dried out; a little moisture helps them stay tender after being enveloped in chocolate. If fresh cranberries are on hand, you can quickly dry them in a low‑heat oven for a more intense flavor. The secret? A light dusting of sugar before drying locks in that glossy shine.
The Crunchy Companion: Chopped Pecans
Pecans are the unsung heroes of holiday confections, offering buttery richness and a subtle, earthy undertone that grounds the candy’s sweetness. When toasted lightly, their natural oils are released, creating a fragrant aroma that fills the kitchen like a warm blanket. Choose raw, unsalted pecans and give them a quick roast in a dry skillet—just a few minutes until they turn golden and start to perfume the air. If you’re allergic or prefer a different nut, almonds or walnuts make excellent substitutes, though they’ll shift the flavor profile slightly.
The Secret Touch: Coconut Oil
A teaspoon of coconut oil might seem like a tiny addition, but it works wonders for texture and shine. The oil blends seamlessly with the cocoa butter in the white chocolate, creating a smoother melt and a snap that’s both firm and forgiving. It also helps the candy release from the parchment paper without sticking, making clean-up a breeze. If you’re avoiding coconut, a neutral‑flavored oil like grapeseed can stand in, though you’ll miss a hint of tropical aroma. The best part? This tiny trick is often overlooked, yet it makes a world of difference in the final presentation.
With your ingredients prepped and ready, let's get cooking. Here's where the fun really begins...
🍳 Step-by-Step Instructions
Start by gathering a heavy‑bottomed saucepan and setting it over low heat. Add the 12 oz of white chocolate chips, stirring constantly with a silicone spatula to prevent scorching. As the chocolate begins to melt, you’ll notice a sweet, milky aroma rising—this is the first sign that you’re on the right track. Keep the heat gentle; a slow melt ensures a glossy finish and prevents the chocolate from seizing.
Once the chocolate is almost fully melted, drizzle in the teaspoon of coconut oil and continue stirring until the mixture is smooth and glossy. The oil will melt instantly, blending into the chocolate like a silky river. At this point, the chocolate should have a glossy sheen that reflects the kitchen lights, a visual cue that the base is ready for the next step. Trust me on this one: the oil is the secret to that professional‑look snap.
Now, fold in the 1.5 cups of dried cranberries. Use a gentle folding motion to coat each berry evenly without crushing them. You’ll hear a faint “pop” as the berries sink into the warm chocolate, and the scent will shift to a bright, tart note that cuts through the sweet base. Let the mixture sit for a minute so the cranberries can absorb a touch of the chocolate, enhancing their juiciness.
Here’s where it gets interesting: add the 1.5 cups of chopped pecans, but first give them a quick toast in a dry skillet over medium heat for about 3‑4 minutes. You’ll hear a gentle sizzle and smell a nutty fragrance that signals they’re perfectly toasted. Toss the warm pecans into the chocolate mixture, allowing the heat to release their natural oils, which will mingle with the cocoa butter for a richer flavor. The result? A candy that boasts a deep, buttery crunch that’s impossible to resist.
Prepare a baking sheet by lining it with parchment paper or a silicone baking mat. Using a spoon or a small ice‑cream scoop, drop generous spoonfuls of the chocolate mixture onto the sheet, spacing them about an inch apart. As you place each dollop, you’ll notice the chocolate beginning to set around the edges, forming a delicate crust while the center stays soft. This is the moment where the candy starts to take shape, and the aroma intensifies, filling the kitchen with a festive perfume.
Transfer the baking sheet to a pre‑heated oven set to 250°F (120°C) for about 10‑12 minutes. The low temperature gently firms the chocolate without melting the berries or nuts, preserving their texture. Keep a close eye on the candy; you’ll see the edges turn a pale gold and the surface become glossy. When the candy feels set to the touch but still has a slight give, it’s ready to be removed.
Allow the candy to cool on the baking sheet for 5‑10 minutes, then carefully transfer each piece to a wire rack to finish cooling completely. As the candy cools, you’ll hear a faint “snap” when you press a finger lightly on the surface—a satisfying sign that the chocolate has set properly. This cooling period also lets the flavors meld, creating a harmonious blend of sweet, tart, and nutty notes.
Once fully cooled, arrange the candy on a festive platter or wrap individual pieces in parchment for a charming gift. The glossy white coating will catch the light, and the ruby specks of cranberries will sparkle like tiny ornaments. Store the candy in an airtight container at room temperature, and you’ll have a treat that stays fresh and delightful for up to a week. And the result? A batch of holiday candy that looks as good as it tastes, ready to be shared with loved ones.
And there you have it! But before you dig in, let me share some tips that will take this from great to absolutely unforgettable...
🔐 Expert Tips for Perfect Results
The Taste Test Trick
Before you pour the mixture onto the sheet, scoop a tiny amount onto a spoon and let it cool for a minute. This mini‑taste test lets you gauge the balance of sweetness and tartness, giving you a chance to adjust with a pinch of sea salt or a dash more cranberries. I once added a pinch of flaky sea salt after tasting, and it turned the candy into a sophisticated treat that even my adult cousins raved about.
Why Resting Time Matters More Than You Think
After the candy has set, letting it rest for at least 30 minutes before serving allows the flavors to meld fully. During this time, the cocoa butter re‑crystallizes, giving the candy its signature snap. Skipping this step can result in a softer bite that feels less polished, so set a timer and enjoy a quiet moment while the candy reaches perfection.
The Seasoning Secret Pros Won’t Tell You
A pinch of finely ground pink Himalayan salt sprinkled over the top right before the candy sets adds a subtle contrast that heightens the sweetness without overpowering it. The salt crystals also catch the light, creating a speckled appearance reminiscent of snowflakes. I discovered this trick during a holiday baking class, and it instantly elevated my candy to a restaurant‑level finish.
Temperature Control is Key
Using a candy thermometer isn’t necessary, but keeping the saucepan temperature low (around 115°F/46°C) ensures the chocolate melts evenly and stays glossy. If the heat spikes, the chocolate can seize, turning grainy and unworkable. A gentle heat also protects the delicate flavor of the cranberries, preserving their bright acidity.
The Power of Presentation
Arrange the finished candy on a platter lined with fresh pine branches or sprigs of rosemary for a rustic holiday vibe. The green contrast highlights the white candy and red berries, making each piece look like a miniature holiday ornament. I once served these at a Christmas brunch, and guests kept asking for the “decorative” version because it felt like a gift in itself.
🌈 Delicious Variations to Try
One of my favorite things about this recipe is how versatile it is. Here are some twists I've tried and loved:
Cinnamon Spice Surprise
Add a teaspoon of ground cinnamon and a pinch of nutmeg to the melted chocolate before folding in the cranberries. The warm spices complement the tart berries and give the candy a cozy, holiday‑spice aroma that evokes mulled wine and gingerbread.
White Chocolate & Peppermint Crunch
Stir in crushed peppermint candy canes (about ¼ cup) after the chocolate has melted. The minty shards provide a refreshing coolness that cuts through the richness, perfect for those who love a classic peppermint‑chocolate combo.
Nut‑Free Delight
Swap the pecans for toasted pumpkin seeds or sunflower seeds for a nut‑free version. The seeds add a subtle earthiness and a satisfying crunch while keeping the candy safe for anyone with nut allergies.
Dark Chocolate Duo
Replace half of the white chocolate chips with high‑quality dark chocolate chips (70% cacao). This creates a beautiful marbled effect and introduces a bittersweet depth that pairs beautifully with the sweet cranberries.
Citrus Zest Burst
Add the zest of one orange or lemon to the chocolate mixture before adding the nuts. The bright citrus notes lift the overall flavor profile, making the candy feel fresher and more vibrant.
Caramel Drizzle Finish
After the candy has set, drizzle a thin stream of homemade caramel over the top. The caramel adds a buttery sweetness that binds the flavors together and creates an eye‑catching glossy finish.
📦 Storage & Reheating Tips
Refrigerator Storage
Place the candy in an airtight container lined with parchment paper to prevent sticking. Store it in the refrigerator for up to two weeks; the cool environment keeps the chocolate firm and the nuts fresh. Before serving, let the candy sit at room temperature for 15‑20 minutes to regain its melt‑in‑your‑mouth texture.
Freezing Instructions
If you want to keep the candy for the entire holiday season, freeze it in a single layer on a baking sheet, then transfer the frozen pieces to a zip‑top bag. They’ll stay good for up to three months. To thaw, simply move them to the refrigerator for an hour, then bring them to room temperature before enjoying.
Reheating Methods
Should the candy lose its snap, a quick reheating in a 150°F (65°C) oven for 5 minutes restores its glossy sheen and snap without melting the berries. Alternatively, you can place the candy in a microwave‑safe dish and heat in 10‑second bursts, checking frequently to avoid overheating.
❓ Frequently Asked Questions
Can I use milk chocolate instead of white chocolate?
Do I need to toast the pecans?
Can I add a glaze or coating?
How long will the candy stay fresh?
Can I make this candy vegan?
What if I don’t have a candy thermometer?
Can I use fresh cranberries instead of dried?
Is it okay to use a silicone baking mat instead of parchment?


Other Reader Favorites
 Desserts
Irresistible Valentine Lemon Raspberry Cake Recipe
Learn how to make delicious Irresistible Valentine Lemon Raspberry Cake Recipe. Easy recipe with step-by-step instructions.
 Desserts
Coconut Cream Pie: Silky, Dreamy, Bakery-Style Dessert at Home
Learn how to make delicious Coconut Cream Pie: Silky, Dreamy, Bakery-Style Dessert at Home. Easy recipe…
 Dinner
Cheesy Zucchini Pasta Bake Recipe
Delicious Cheesy Zucchini Pasta Bake Recipe
 Dinner
Creamy Tomato Spinach Skillet Pasta
Delicious Creamy Tomato Spinach Skillet Pasta