Honey Layer Cake: A Delectable Recipe to Try Today!
 Save
Save
The first time I baked a honey‑kissed cake was on a breezy Saturday in early spring, when the garden was just beginning to whisper promises of fresh blossoms. I remember pulling the pan from the oven and being greeted by a cloud of golden‑amber steam that curled around my kitchen like a warm hug, carrying the sweet scent of honey and vanilla straight to the living room. My youngest cousin, eyes wide with curiosity, asked if the cake was “made of sunshine,” and I laughed, saying that the honey we used was harvested from my grandmother’s own hives, a secret family treasure passed down through generations. That moment—those aromas, the soft crackle of the cake’s crust as I lifted the parchment—still lingers in my memory, and it’s exactly why I’m so excited to share this recipe with you today.
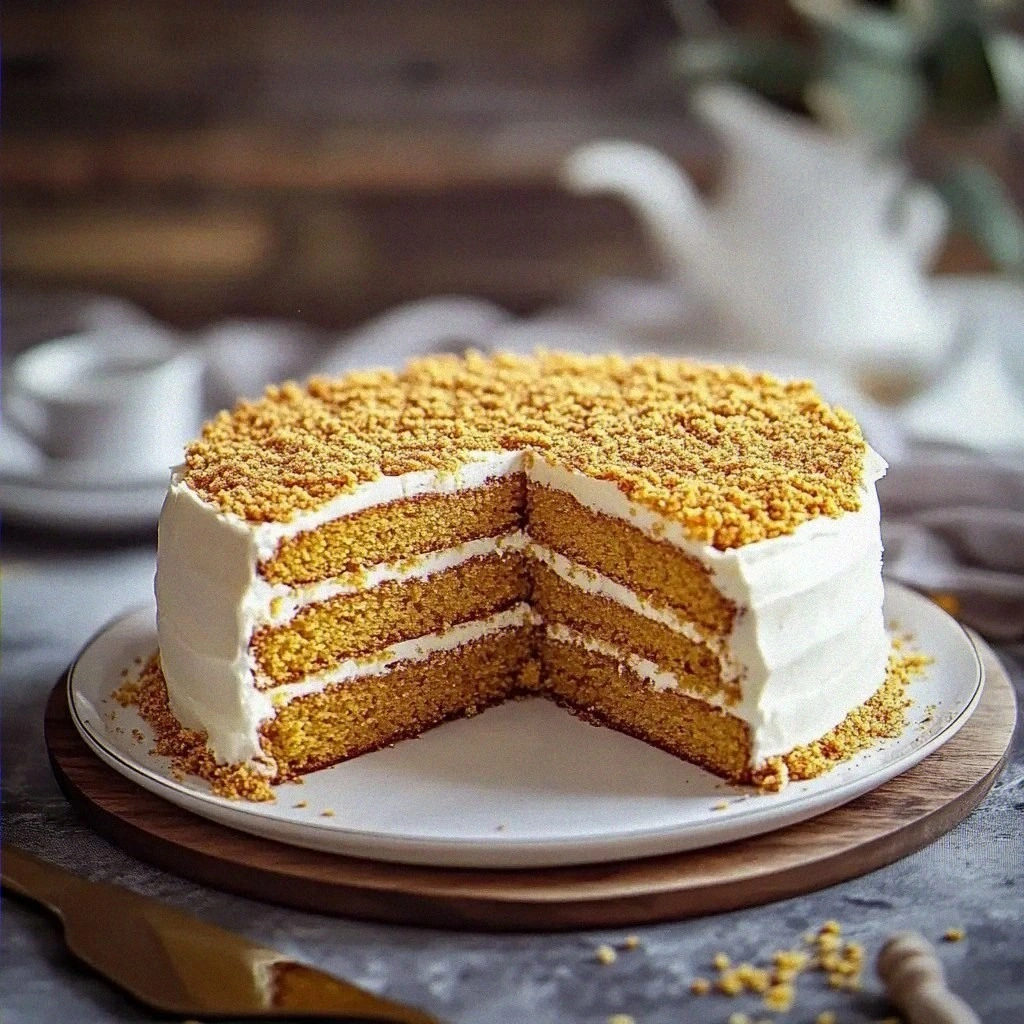
Honey Layer Cake isn’t just another dessert; it’s a celebration of balance, where the natural floral notes of honey mingle with the richness of butter and the airy lift of whipped cream. Imagine slicing through three buttery layers, each one moist and tender, then spreading a cloud‑light frosting that melts on your tongue, leaving a lingering hint of honeyed caramel. The cake’s texture is a symphony: a tender crumb that yields to a crisp, caramelized edge, all crowned with a silky, slightly sweet frosting that feels like a dream. But wait—there’s a secret technique in step 4 that takes the crumb from fluffy to unforgettable, and I’ll reveal it just a little later.
If you’ve ever wondered why bakery‑style honey cakes taste so different from the ones you make at home, the answer lies in a few simple yet powerful choices: quality honey, precise temperature control, and a little bit of patience. I’ve spent countless afternoons tweaking this recipe, learning that a pinch of salt can amplify the honey’s natural brightness, and that the butter must be at room temperature to create that perfect, velvety batter. The result is a cake that looks as stunning as it tastes, with layers that hold their shape beautifully, making it ideal for celebrations, brunches, or simply a cozy night in with a cup of tea.
Here’s the thing: the journey from raw ingredients to a show‑stopping honey layer cake is filled with little moments that make cooking feel like storytelling. From the moment you whisk the butter and sugar until they turn pale and fluffy, to the instant you hear the batter hit the pan and sizzle gently, each step adds a chapter to the narrative of your kitchen. And the best part? You don’t need a professional oven or fancy equipment—just a few pantry staples, a trusty mixer, and a willingness to experiment. So, are you ready to dive in? Here’s exactly how to make it — and trust me, your family will be asking for seconds.
🌟 Why This Recipe Works
- Flavor Depth: The combination of honey and vanilla creates a layered sweetness that isn’t cloying, allowing each bite to reveal subtle floral undertones while still delivering that comforting cake flavor you love.
- Moisture Balance: Honey acts as a natural humectant, locking in moisture so the cake stays tender for days, which is why leftovers taste just as good as the first slice.
- Texture Harmony: By creaming butter and sugar first, you introduce air bubbles that give the cake its light, airy crumb, while the addition of baking soda and powder ensures a gentle rise without a gritty texture.
- Ease of Execution: The recipe uses a single bowl for the batter, reducing cleanup time and making the process less intimidating for beginner bakers.
- Versatility: This cake serves as a perfect canvas for seasonal fruit, spices, or even a drizzle of chocolate, letting you adapt it to any occasion or flavor craving.
- Nutrition Boost: Using real honey instead of refined sugar adds trace minerals and antioxidants, giving you a slightly healthier indulgence without sacrificing taste.
- Crowd‑Pleaser Factor: The golden hue and aromatic profile make it visually appealing and universally loved, ensuring it’s the star of any dessert table.
🥗 Ingredients Breakdown
The Foundation
All‑purpose flour forms the structural backbone of the cake, providing the right amount of gluten to give the crumb its gentle chew without turning it rubbery. When measuring, I always spoon the flour into the measuring cup and level it off with a flat edge; this prevents over‑packing, which can lead to a dense texture. If you’re looking for a gluten‑free twist, a blend of rice flour and tapioca starch works beautifully, though you’ll need a small amount of xanthan gum to mimic the elasticity of wheat. The butter, softened to room temperature, is the source of richness, and it also helps create that melt‑in‑your‑mouth mouthfeel that makes every bite feel luxurious.
Sweetening & Leavening
Granulated sugar not only sweetens but also contributes to the cake’s tender crumb by aerating the butter when creamed together. The honey, the star of the show, adds a natural sweetness with floral notes and keeps the cake moist for days. Baking soda and baking powder work together: the soda reacts with the acidity of the honey, giving a quick lift, while the powder provides a steady rise throughout the bake. A pinch of salt may seem trivial, but it amplifies the flavors, balancing the sweetness and enhancing the honey’s complexity.
The Secret Weapons
Eggs act as binders and also add richness; using large, room‑temperature eggs ensures they incorporate smoothly without curdling the batter. Vanilla extract brings a warm, aromatic backdrop that ties the honey and butter together. For the frosting, heavy whipping cream creates a light, airy base that can be whipped to soft peaks, while powdered sugar sweetens it without adding grainy texture. A second splash of vanilla in the frosting mirrors the cake’s flavor, creating a cohesive taste experience from first bite to last.
Finishing Touches
A drizzle of extra honey over the assembled cake adds a glossy finish and a burst of extra sweetness right before serving. You can also sprinkle a pinch of flaky sea salt on top to create a sweet‑salty contrast that elevates the dessert to restaurant quality. Fresh berries, toasted nuts, or a dusting of cinnamon are optional garnishes that add color and texture, turning a simple slice into a visual masterpiece.
With your ingredients prepped and ready, let's get cooking. Here's where the fun really begins...
🍳 Step-by-Step Instructions
Preheat your oven to 350°F (175°C) and grease three 8‑inch round cake pans with butter, then line the bottoms with parchment paper. This ensures the cakes release cleanly and retain their perfect round shape. While the pans are prepping, take a moment to inhale the sweet scent of the butter as it softens—this is your first hint of the richness to come. Once the pans are ready, set them aside on a cooling rack; the anticipation builds, and trust me, the next step is where the magic starts to happen.
In a large mixing bowl, combine the softened butter, granulated sugar, and honey. Using a handheld mixer on medium speed, beat the mixture for about 3‑4 minutes until it turns pale, fluffy, and the volume has roughly doubled. This creaming process traps air, which will later expand in the oven, giving you that light, airy crumb. As you beat, notice the subtle caramel aroma rising—if you’re not getting that, you may need a touch more honey for depth. Pro Tip: Scrape down the sides of the bowl at least twice during this stage to ensure an even, uniform batter.
Add the eggs one at a time, beating well after each addition. Then stir in the vanilla extract, letting its fragrant perfume mingle with the sweet butter mixture. The batter will look glossy and smooth, a sign that the emulsification is perfect. If the mixture looks curdled, keep beating gently; the butter and honey will come back together. This step is crucial because it builds the structure that holds the layers together, and a well‑incorporated egg base prevents cracks later on.
In a separate bowl, whisk together the flour, baking soda, baking powder, and salt. Once combined, sift the dry ingredients into the wet mixture in three additions, folding gently with a spatula after each addition. Here’s where the secret trick comes in: add a tablespoon of warm water (about 110°F) with the final addition of flour. This extra moisture activates the leavening agents more evenly, resulting in a cake that rises beautifully without a dense center. The batter should be thick but pourable, with a smooth, velvety texture.
Divide the batter evenly among the three prepared pans, smoothing the tops with an offset spatula. Tap each pan lightly on the counter to release any large air bubbles. Place the pans in the preheated oven and bake for 22‑25 minutes, or until a toothpick inserted into the center comes out clean with just a few moist crumbs. You’ll know they’re done when the edges start to pull away slightly from the pan and the tops are a light golden brown. While the cakes bake, the kitchen fills with a sweet, honey‑laden perfume that makes waiting feel like a celebration.
While the cakes cool in their pans for 10 minutes, whip the heavy cream in a chilled bowl using high speed until soft peaks form. Gradually add the powdered sugar and the second teaspoon of vanilla extract, continuing to whip until stiff peaks develop. The frosting should be glossy, smooth, and hold its shape when the beaters are lifted. If it looks too loose, add a little more powdered sugar; if too stiff, a splash of milk or additional cream will loosen it just enough.
Once the cakes have cooled for 10 minutes, run a thin knife around the edges of each pan, then carefully invert them onto a wire rack to cool completely. This step prevents the bottoms from becoming soggy from steam. While the layers are cooling, drizzle a thin stream of honey over the top of each cake—this not only adds shine but also infuses extra honey flavor into the crumb. The honey will seep slightly, creating a subtle caramelized crust that’s simply irresistible.
To assemble, place the first layer on a serving platter and spread a generous dollop of whipped honey frosting, smoothing it to the edges. Add the second layer, repeat the frosting, and finish with the third layer on top. Once the stack is complete, spread a thin “crumb coat” of frosting over the entire cake to lock in any loose crumbs, then refrigerate for 15 minutes to set. After chilling, apply a final thick layer of frosting, using an offset spatula to create smooth swirls or rustic peaks—whichever style speaks to your heart. Finally, drizzle a little more honey in a decorative pattern and, if you wish, sprinkle a pinch of flaky sea salt for a sweet‑salty contrast.
And there you have it! But before you dig in, let me share some tips that will take this from great to absolutely unforgettable...
🔐 Expert Tips for Perfect Results
The Taste Test Trick
Before you bake, taste a tiny spoonful of the batter (the raw egg risk is minimal if you’re using pasteurized eggs). This quick test lets you gauge the sweetness level and decide if you need a splash more honey or a pinch of extra salt. I once added too much honey and learned the hard way that a dash of sea salt can rescue the balance without compromising the honey’s floral notes. Trust me on this one: a well‑balanced batter leads to a perfectly balanced cake.
Why Resting Time Matters More Than You Think
After frosting, let the cake rest in the refrigerator for at least 30 minutes. This short chill allows the frosting to firm up, making slicing cleaner and preventing crumbs from falling apart. I’ve seen impatient bakers cut into a warm cake only to watch the frosting slide off like melted butter—patience truly pays off. The rest period also lets the honey permeate the crumb, deepening the flavor profile.
The Seasoning Secret Pros Won’t Tell You
A pinch of fine sea salt sprinkled on the finished cake can transform the sweetness, creating a nuanced flavor that feels more sophisticated. It’s the same trick chefs use on caramel sauces to brighten the taste. If you love a hint of citrus, add a zest of lemon or orange to the frosting for a bright contrast that lifts the honey’s earthiness. This subtle twist often surprises guests, making them think you spent hours perfecting the recipe.
Layer Alignment Mastery
Use a ruler or a cake leveler to trim the tops of each layer so they’re perfectly flat before stacking. Uneven layers can cause the cake to tilt, leading to messy frosting drips. I once tried to stack a slightly domed layer and ended up with a lopsided tower that looked more like a leaning tower of Pisa than a cake. A quick trim ensures a stable base and a professional appearance.
Whipping Cream Temperature
Always chill your mixing bowl and whisk attachments before whipping the cream. Cold equipment helps the cream reach stiff peaks faster and prevents it from turning buttery. I once left the bowl out on a warm countertop, and the cream never whipped properly, leaving a runny frosting that melted the moment it touched the cake. Keep everything icy, and you’ll have a frosting that holds up beautifully, even on a warm day.
🌈 Delicious Variations to Try
One of my favorite things about this recipe is how versatile it is. Here are some twists I’ve tried and loved:
Citrus‑Honey Fusion
Add the zest of one lemon and a tablespoon of freshly squeezed lemon juice to the batter for a bright, tangy contrast. The citrus cuts through the honey’s sweetness, creating a refreshing flavor that’s perfect for spring brunches. Pair with a light dusting of powdered sugar and a few candied lemon slices for an elegant finish.
Spiced Autumn Delight
Incorporate a teaspoon each of ground cinnamon, nutmeg, and a pinch of cloves into the dry ingredients. This spice blend turns the cake into a cozy, autumn‑inspired treat that pairs wonderfully with caramel sauce. Serve warm with a scoop of vanilla ice cream for the ultimate comfort dessert.
Berry‑Burst Layer Cake
Fold a cup of fresh mixed berries (blueberries, raspberries, strawberries) into the batter just before pouring it into the pans. The berries burst during baking, leaving pockets of juicy sweetness throughout the crumb. Top with a berry compote and a drizzle of honey for a vibrant, colorful presentation.
Chocolate‑Honey Indulgence
Replace ¼ cup of flour with cocoa powder and add a tablespoon of melted dark chocolate to the batter. The chocolate deepens the flavor, while the honey keeps the cake moist and adds a subtle floral note that pairs beautifully with cocoa. Finish with a chocolate ganache drizzle for a decadent twist.
Nutty Crunch Surprise
Stir in half a cup of toasted chopped almonds or hazelnuts into the batter for a pleasant crunch. The nuts add a buttery richness that complements the honey, and they also bring a beautiful visual contrast. Sprinkle a few extra toasted nuts on top before serving for added texture.
📦 Storage & Reheating Tips
Refrigerator Storage
Store the cake in an airtight container or tightly wrapped in plastic wrap for up to 4 days. The honey acts as a natural preservative, keeping the cake moist longer than typical butter cakes. If you plan to serve the cake within 24 hours, you can keep it uncovered at room temperature, but be sure to place it away from direct sunlight to prevent the frosting from melting.
Freezing Instructions
For longer storage, freeze the cake in layers. Wrap each cooled layer tightly in plastic wrap, then place them in a freezer‑safe bag. The cake will keep for up to 2 months. When ready to use, thaw overnight in the refrigerator, then let it sit at room temperature for about an hour before frosting. This method preserves the texture and flavor without any ice crystals.
Reheating Methods
To enjoy a warm slice, place a single serving on a microwave‑safe plate and heat for 10‑15 seconds, or warm a larger slice in a preheated oven at 300°F (150°C) for 5‑7 minutes. The trick to reheating without drying it out? Add a splash of milk or a drizzle of honey over the slice before warming; the added moisture keeps the crumb tender and the frosting silky.
❓ Frequently Asked Questions
Can I use raw honey instead of processed honey?
What if I don’t have a stand mixer?
Can I substitute the heavy cream frosting with buttercream?
Why does my cake sink in the middle?
Can I add gluten‑free flour?
How long can I keep the frosting?
Is it okay to use salted butter?
Can I make this cake in a sheet pan?

Other Reader Favorites
 Dinner
Crafting the Perfect Mediterranean Quinoa Bliss Bowls: A Healthy Delight
Delicious Crafting the Perfect Mediterranean Quinoa Bliss Bowls: A Healthy Delight
 Dinner
one pot garlic lemon chicken with winter squash and spinach
Learn how to make delicious one pot garlic lemon chicken with winter squash and spinach. Easy…
 Breakfast
Sweet Corn & Cheddar Quiche: A Delicious Recipe
Delicious Sweet Corn & Cheddar Quiche: A Delicious Recipe
 Dinner
Budget-Friendly Turkey Meatloaf and Glaze
Learn how to make delicious Budget-Friendly Turkey Meatloaf and Glaze. Easy recipe with step-by-step instructions, tips,…