Irresistible KitKat Cheesecake That Will Wow Your Guests
 Save
Save
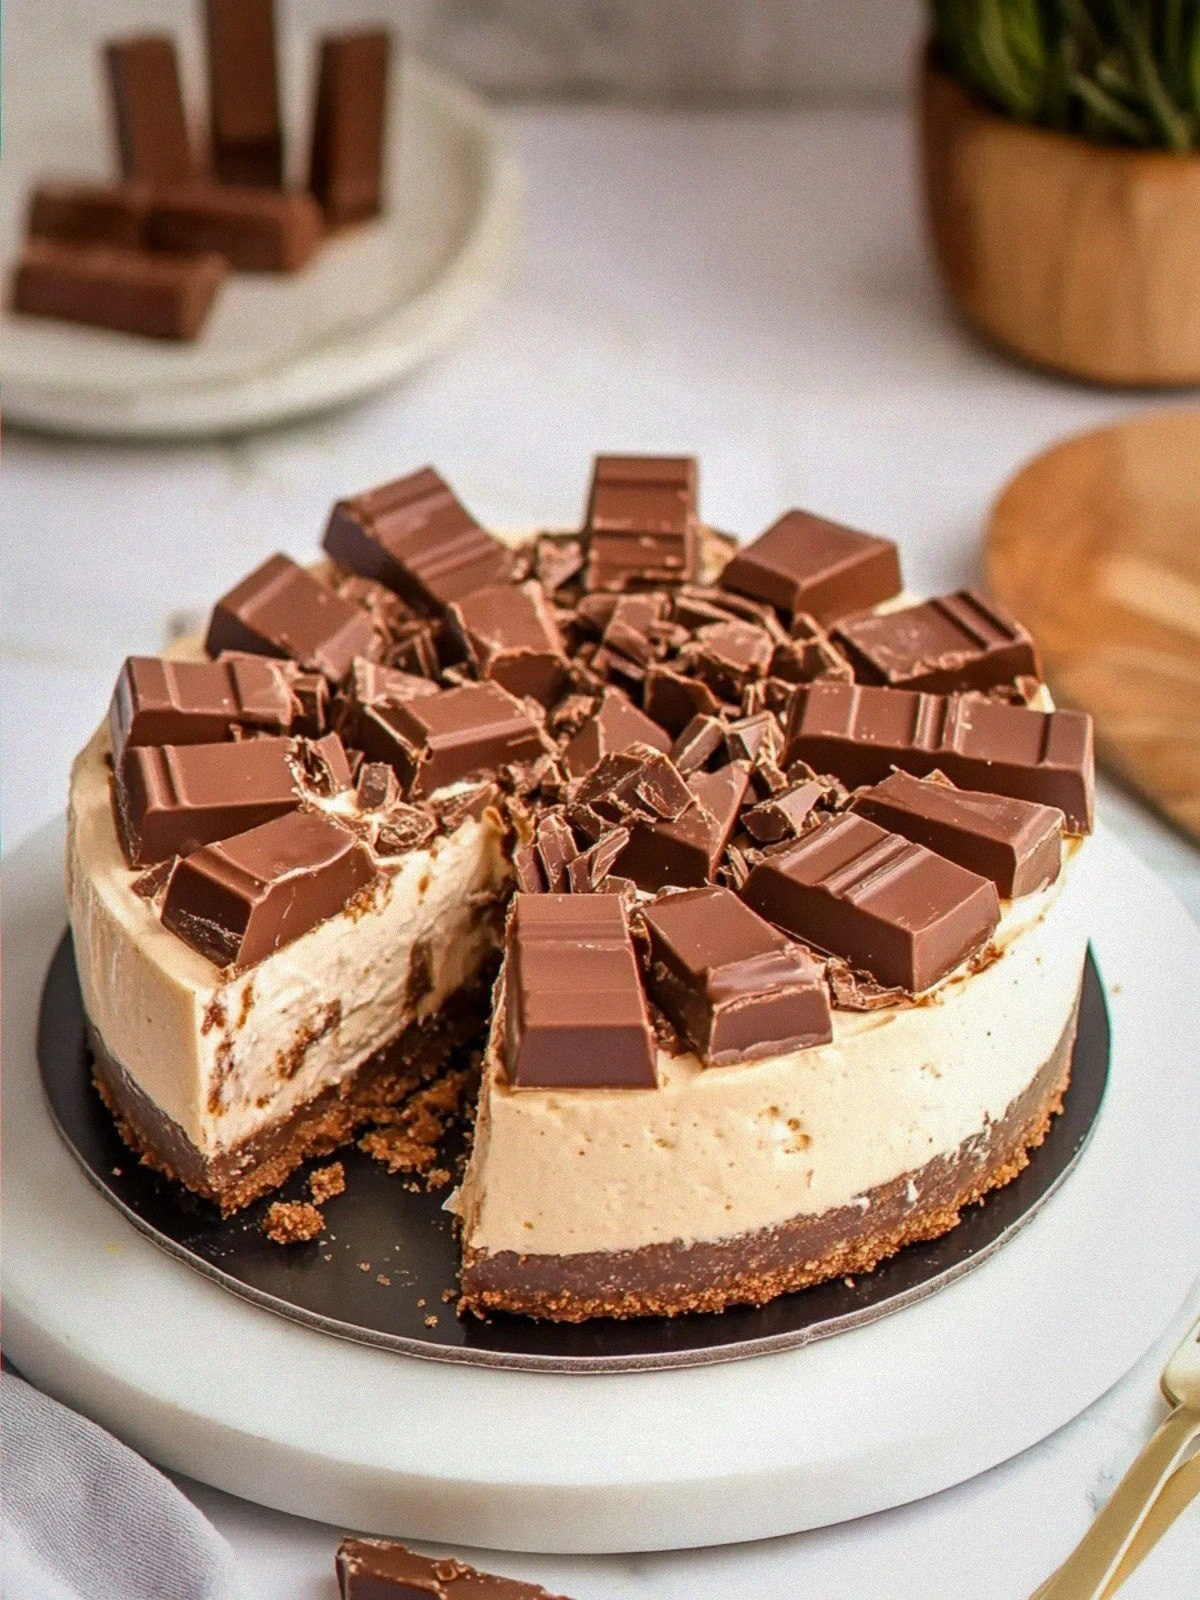
It was a crisp autumn evening when I first decided to turn my love‑affair with KitKat bars into something a little more elegant. I remember the sound of the crinkly wrapper as I snapped a finger‑sized piece in half, the snap echoing like a tiny applause in my kitchen. The aroma of melted chocolate and buttery biscuits rose like a warm hug, and before I knew it, a simple snack was morphing into a decadent cheesecake that would become the star of every gathering. I poured the silky cream cheese mixture into the prepared crust, feeling the cool metal of the springform pan against my fingertips, and the whole room seemed to hold its breath as the oven worked its quiet magic.
What makes this KitKat cheesecake truly irresistible is the way it balances the familiar crunch of a chocolate bar with the luxurious smoothness of a classic New York‑style cheesecake. The base, a buttery crumble of digestive biscuits, offers a buttery, slightly salty canvas that catches the eye and the palate. The filling is a dreamy blend of cream cheese, double cream, and a generous amount of crushed KitKat pieces that melt into ribbons of chocolatey goodness, creating a texture that feels both airy and indulgent. Imagine slicing through that golden crust to reveal a velvety interior speckled with glossy chocolate shards that catch the light like tiny constellations.
But here's the thing: the secret to that flawless, glossy top isn’t just the chocolate glaze; it’s a handful of tricks that most home cooks overlook. In step four, I’ll reveal a temperature hack that guarantees a perfectly set cheesecake without any dreaded cracks. And later, we’ll talk about a surprising ingredient that most people skip—yet it makes all the difference in achieving that melt‑in‑your‑mouth richness. Trust me, you’ll want to keep reading because each tip is a little piece of culinary gold that turns an ordinary dessert into a show‑stopping masterpiece.
Now, if you’re ready to impress your family, wow your friends, or simply treat yourself to a slice of heaven, you’re in the right place. I’ve broken down every step, from the moment you open that bag of KitKat fingers to the final garnish that adds that wow factor on the plate. Here’s exactly how to make it — and trust me, your family will be asking for seconds, and maybe even a third round.
🌟 Why This Recipe Works
- Flavor Depth: The combination of dark chocolate and milk‑filled KitKat pieces creates layers of cocoa, caramel, and a hint of hazelnut that dance on the tongue. Each bite delivers a burst of sweet and slightly bitter notes, keeping the palate intrigued from start to finish.
- Texture Harmony: The crunchy biscuit crust contrasts beautifully with the silky cheesecake filling, while the crushed KitKat adds a delightful chewiness that prevents the dessert from feeling one‑dimensional.
- Ease of Execution: Despite its fancy appearance, the recipe uses pantry staples and requires only a handful of tools—no fancy equipment needed, making it accessible for both beginners and seasoned bakers.
- Time Efficiency: With a total hands‑on time of about 15 minutes and a bake time of 30 minutes, you can have this show‑stopper ready in under an hour, leaving plenty of time for other party prep.
- Versatility: The base can be swapped for graham crackers or even almond flour for a gluten‑free version, and the chocolate topping can be flavored with orange zest or espresso for a twist.
- Crowd‑Pleasing Factor: Kids love the familiar KitKat flavor, while adults appreciate the sophisticated cheesecake texture, making it a universal hit at any gathering.
- Ingredient Quality: Using real butter, premium dark chocolate, and high‑fat cream cheese ensures a rich mouthfeel and prevents a watery or grainy finish.
- Nutrition Balance: While indulgent, the recipe offers protein from the cheese and a modest amount of carbs, giving you a dessert that feels rewarding without being overly heavy.
🥗 Ingredients Breakdown
The Foundation – Crust & Base
The 350 g of digestive biscuits provide a buttery, slightly sweet foundation that holds the entire cake together. When you crush them into fine crumbs, they release a subtle caramel aroma that pairs perfectly with the melted butter. Speaking of butter, the 160 g of unsalted butter not only binds the crumbs but also adds a luxurious mouthfeel that you can taste in every bite. If you’re looking for a gluten‑free twist, try using gluten‑free digestive biscuits or even a mix of almond meal and oat flour for a nutty undertone.
Aromatics & Spices – Flavor Enhancers
The 2 tsp of vanilla extract is the quiet hero of this recipe, weaving a fragrant backdrop that elevates the chocolate and cheese. Vanilla’s floral notes cut through the richness, providing balance and a lingering aftertaste that keeps you reaching for another slice. For an extra layer of depth, you could add a pinch of sea salt or a dash of espresso powder, but the vanilla alone does a stellar job of rounding out the flavors.
The Secret Weapons – KitKat & Cream
The star of the show, 32 pieces of KitKat fingers, bring that unmistakable snap and creamy caramel center that most desserts lack. When folded into the cheesecake mixture, they melt just enough to create ribbons of chocolate while still retaining small crunchy bits for texture. The 480 ml of double cream and an additional 100 ml of double cream create a luscious, airy filling that’s richer than any standard recipe. If you’re after a lighter version, you can substitute half of the double cream with whole milk, but the decadence will be slightly reduced.
Finishing Touches – Chocolate & Garnish
The 100 g of dark chocolate or chocolate chips forms a glossy glaze that gives the cheesecake its stunning visual appeal and a final burst of bittersweet flavor. Melt it gently over a bain‑marie to avoid scorching, and you’ll have a smooth river of chocolate that sets with a beautiful sheen. Finally, the 6 pieces of crushed KitKat fingers sprinkled on top act as a garnish, adding a final crunch and a visual cue that tells everyone exactly what’s inside.
With your ingredients prepped and ready, let's get cooking. Here’s where the fun really begins…
🍳 Step-by‑Step Instructions
🔐 Expert Tips for Perfect Results
The Taste Test Trick
Before you pour the filling into the crust, take a tiny spoonful and taste it. This is your moment to adjust sweetness or add a pinch more vanilla if needed. I once discovered a subtle bitterness from the dark chocolate and balanced it with an extra teaspoon of sugar, turning a potential flaw into a perfect harmony.
Why Resting Time Matters More Than You Think
Allowing the cheesecake to chill for several hours is not just about firming up; it also gives the flavors time to meld. The butter in the crust absorbs the cream cheese aroma, while the KitKat pieces soften just enough to release their caramel notes without turning mushy. Skipping this step is a common mistake that leads to a crumbly texture.
The Seasoning Secret Pros Won’t Tell You
A pinch of flaky sea salt sprinkled on the chocolate glaze just before serving can elevate the dessert dramatically. The salt accentuates the chocolate’s bitterness and the sweetness of the cheesecake, creating a balanced flavor profile that feels sophisticated.
The Perfect Crust Consistency
If the biscuit‑butter mixture feels too dry, add an extra tablespoon of melted butter; if it’s too wet, toss in a few more biscuit crumbs. The right crumbly‑yet‑firm texture ensures the crust holds up when you slice, preventing any soggy bottom.
How to Avoid Cracks
Bake the cheesecake in a water bath (bain‑marie) for an even, gentle heat. This method adds moisture to the oven environment, reducing the risk of surface cracks caused by rapid temperature changes. I once baked a cheesecake without a water bath and ended up with a cracked top—definitely a lesson learned!
🌈 Delicious Variations to Try
One of my favorite things about this recipe is how versatile it is. Here are some twists I’ve tried and loved:
Espresso‑Infused KitKat Cheesecake
Replace 2 tsp of vanilla with 1 tsp of instant espresso powder dissolved in 1 tbsp of hot water. The coffee notes deepen the chocolate flavor, creating a mocha‑like experience that’s perfect for brunch.
White Chocolate & Raspberry Swirl
Swap the dark chocolate glaze for melted white chocolate and swirl in a raspberry coulis before chilling. The bright tartness of the raspberry cuts through the richness, offering a refreshing contrast.
Nutty Crunch KitKat
Add 50 g of toasted chopped hazelnuts to the crust mixture and sprinkle a handful on top of the chocolate glaze. The nutty aroma complements the caramel inside the KitKat, adding an extra layer of texture.
Salted Caramel Drizzle
Prepare a quick salted caramel sauce and drizzle it over the final glaze. The salty‑sweet combination intensifies the dessert’s complexity, making it a crowd‑pleaser at any party.
Mini Cheesecake Bites
Divide the batter into a muffin tin lined with paper liners and bake for 20 minutes. These bite‑size portions are perfect for cocktail parties and allow guests to sample multiple variations in one sitting.
📦 Storage & Reheating Tips
Refrigerator Storage
Cover the cheesecake loosely with plastic wrap or store it in an airtight container. It will stay fresh for up to 4 days, retaining its creamy texture and chocolate glaze. If the glaze dulls, a quick microwave for 10 seconds can revive its shine.
Freezing Instructions
Wrap the entire cheesecake tightly in a double layer of cling film, then place it in a freezer‑safe bag. It can be frozen for up to 2 months. To thaw, move it to the refrigerator overnight; the chocolate glaze will soften, but a brief re‑drizzle of melted chocolate can restore its glossy finish.
Reheating Methods
If you prefer a warm slice, place a portion on a microwave‑safe plate and heat for 15‑20 seconds. For a more even warmth, warm the slice in a preheated oven at 150 °C (300 °F) for 5‑7 minutes, adding a splash of milk or cream to keep it from drying out. The trick to reheating without drying it out? A splash of milk or a dollop of whipped cream on top right before serving.
❓ Frequently Asked Questions
Can I use a different type of chocolate for the glaze?
Do I need to use a springform pan?
Can I make this cheesecake gluten‑free?
How do I prevent cracks on the surface?
Can I add fresh fruit on top?
Is it okay to use low‑fat cream cheese?
How long can I keep the cheesecake at room temperature?
Can I substitute the KitKat with another candy bar?
Place the springform pan on a baking tray and slide it into the preheated oven. Bake for 30 minutes, or until the edges are set and the center still has a slight wobble—think of a soft‑boiled egg where the center jiggles just a touch. As the cheesecake bakes, a faint nutty aroma will rise, mingling with the sweet scent of chocolate.
While the cheesecake is cooling, melt the 100 g of dark chocolate in a heat‑proof bowl over simmering water, stirring until glossy. Once melted, drizzle the chocolate over the cooled cheesecake in a decorative pattern, allowing it to cascade like a silky waterfall. Finally, sprinkle the 6 pieces of crushed KitKat fingers over the top for that final crunch and visual pop.
Allow the cheesecake to chill in the refrigerator for at least 4 hours, preferably overnight. This resting period lets the flavors meld and the texture firm up, ensuring clean slices that hold together beautifully. When you finally cut into it, you’ll hear a faint sigh as the knife glides through the smooth surface—an audible promise of the indulgent taste that follows.
Similar Recipes
 Desserts
Crunchy Butterfinger Delight Pie Recipe
Delicious Crunchy Butterfinger Delight Pie Recipe
 Desserts
Eggnog Cookies with Eggnog Frosting
Learn how to make delicious Eggnog Cookies with Eggnog Frosting. Easy recipe with step-by-step instructions.
 Desserts
Harvest Quinoa Pudding Delight: A Seasonal Treat
Delicious Harvest Quinoa Pudding Delight: A Seasonal Treat
 Desserts
Homemade Oreo Cinnamon Roll Delight: A Dreamy Recipe!
Learn how to make delicious Homemade Oreo Cinnamon Roll Delight: A Dreamy Recipe!. Easy recipe with…
 Desserts
Frosty Grape Candy Bliss: The Ultimate Sweet Treat
Delicious Frosty Grape Candy Bliss: The Ultimate Sweet Treat
 Desserts
Raspberry Almond Crumble Bars: A Perfect Blend of Sweet and Tart
Delicious Raspberry Almond Crumble Bars: A Perfect Blend of Sweet and Tart
 Desserts
Peanut Butter Bliss Oat Cups: A Deliciously Nutritious Snack
Delicious Peanut Butter Bliss Oat Cups: A Deliciously Nutritious Snack
 Desserts
christmas oreo: 7 Joyful Steps to Festive Bliss
Learn how to make delicious christmas oreo: 7 Joyful Steps to Festive Bliss. Easy recipe with…

Susan
I cook these recipes at home before they ever land here — simple ingredients, clear steps.