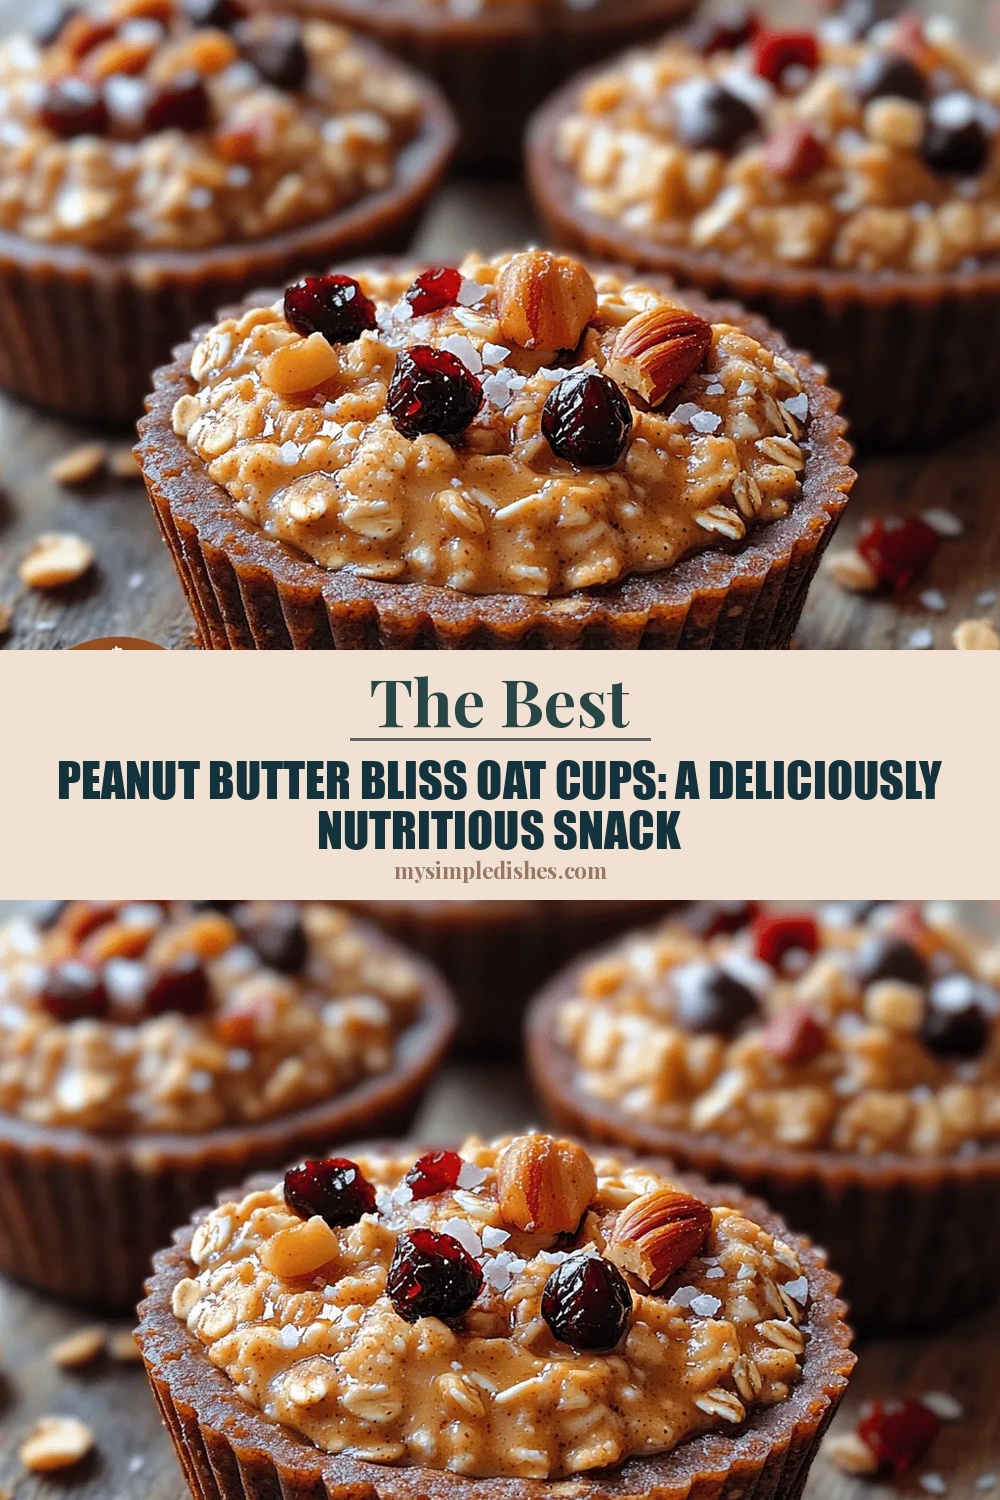
Peanut Butter Bliss Oat Cups: A Deliciously Nutritious Snack
 Save
Save
Imagine a bite‑size snack that feels like a hug for your taste buds while fueling your body for the day ahead. Peanut Butter Bliss Oat Cups deliver that comforting crunch, a creamy peanut swirl, and a hint of natural sweetness—all in a handheld, grab‑and‑go package.
What makes these cups truly special is the harmonious blend of wholesome rolled oats, silky peanut butter, and a touch of honey that creates a naturally sweet, protein‑packed treat without any refined flour or added preservatives.
Busy parents, fitness enthusiasts, and anyone craving a nutritious snack will fall in love with these cups. They shine at breakfast tables, brunch buffets, or as an afternoon pick‑me‑up when you need sustained energy.
The process is delightfully simple: combine dry and wet components, press the mixture into muffin tins, bake until lightly golden, and finish with a drizzle of extra peanut butter for that irresistible finish.
Why You'll Love This Recipe
Wholesome Energy Boost: Oats and peanut butter supply complex carbs, healthy fats, and plant‑based protein, keeping you full and focused for hours without a sugar crash.
Minimal Ingredients, Maximum Flavor: Only a handful of pantry staples are needed, yet the combination creates a rich, layered taste that feels far more elaborate.
Kid‑Friendly & Guilt‑Free: The natural sweetness from banana and honey appeals to little palates, while the absence of refined sugars keeps the snack nutritionally sound.
Versatile & Customizable: Add chocolate chips, dried fruit, or nuts to match your cravings, making each batch uniquely yours.
Tips & Tricks
Perfecting the Recipe
Measure Liquids Accurately. Too much milk can make the mixture soggy, while too little leaves the cups crumbly. Use a liquid measuring cup for precision.
Press Firmly. Compact the batter in each liner; a denser pack yields a cleaner slice after baking and prevents crumbling.
Use Ripe Bananas. Over‑ripe bananas are sweeter and mash more easily, ensuring a smooth wet mixture without lumps.
Watch the Browning. If the tops start to darken before the centers are set, loosely cover the pan with foil for the remaining bake time.
Flavor Enhancements
Add a pinch of cinnamon or a dash of espresso powder to the dry mix for a warm undertone. For a tropical twist, stir in shredded coconut and replace half the honey with pineapple juice.
Common Mistakes to Avoid
Skipping the rest period after baking can cause the cups to fall apart when you lift them. Also, avoid over‑mixing—once the wet and dry are combined, stop stirring to keep the texture light.
Pro Tips
Line with Silicone Molds. Reusable silicone liners make removal effortless and are eco‑friendly compared to paper.
Freeze for Later. After cooling, wrap each cup individually in parchment and freeze. They reheat perfectly for a quick snack on busy mornings.
Toast the Oats First. Lightly toasting oats in a dry skillet for 3‑4 minutes adds a nutty depth that elevates the overall flavor.
Use Natural Peanut Butter. Choose a brand with only peanuts (and maybe a pinch of salt) for the purest taste and fewer added sugars.
Variations
Ingredient Swaps
Replace peanut butter with almond or cashew butter for a different nutty profile. Swap honey for agave nectar to keep the snack vegan. For a chocolate‑lover’s version, stir in cocoa powder and top with mini chocolate chips.
Dietary Adjustments
Use gluten‑free rolled oats to accommodate gluten sensitivities. Opt for a plant‑based milk (almond, oat, or soy) and a vegan sweetener to make the entire recipe dairy‑free and vegan. For a low‑sugar version, halve the honey and add a few drops of stevia.
Serving Suggestions
Serve the oat cups alongside a dollop of Greek yogurt for extra protein, or pair them with a fresh fruit salad for a balanced brunch. They also travel well in a lunchbox, making them a perfect on‑the‑go snack.
Storage Info
Leftover Storage
Allow the cups to cool completely, then transfer them to an airtight container. Store in the refrigerator for up to four days. For longer keeping, place each cup in a freezer‑safe bag, label, and freeze for up to three months; this preserves flavor and texture.
Reheating Instructions
Reheat refrigerated cups in a 300°F (150°C) oven for 8‑10 minutes, covered with foil to prevent drying. In the microwave, heat one cup on high for 30‑45 seconds, then add a quick drizzle of milk or extra peanut butter to restore moisture.
Frequently Asked Questions
Can I make these oat cups ahead of time?
What if I don’t have chia seeds?
How can I make these cups sweeter without adding more honey?
Peanut Butter Bliss Oat Cups bring together simple pantry staples, wholesome nutrition, and a burst of comforting flavor in a convenient, portable form. By following the step‑by‑step guide, mastering storage tips, and experimenting with the suggested variations, you’ll have a go‑to snack that fuels busy mornings and satisfies sweet cravings alike. Feel free to tweak ingredients, add your favorite toppings, and make each batch uniquely yours. Enjoy every bite of this deliciously nutritious treat!
Peanut Butter Bliss Oat Cups: A Deliciously Nutritious Snack
Delicious Peanut Butter Bliss Oat Cups: A Deliciously Nutritious Snack
Ingredients
Dry Base
- 1 ½ cups rolled oats
- ¼ cup chia seeds (optional)
- ¼ teaspoon sea salt
Wet Mixture
- ½ cup natural peanut butter (smooth or crunchy)
- ¼ cup honey or maple syrup
- ½ cup milk (dairy or plant‑based)
- 1 ripe banana, mashed
- 1 teaspoon vanilla extract
Add‑Ins & Toppings
- ⅓ cup dark chocolate chips (optional)
- ⅓ cup dried cranberries or raisins (optional)
- Extra peanut butter for drizzling
- Sliced banana or fresh berries for garnish
Instructions
Combining & Baking
- Merge Wet & Dry. Pour the wet mixture over the dry oat blend. Stir gently with a spatula until everything is just combined—over‑mixing can make the cups dense. If you’re adding chocolate chips or dried fruit, fold them in now for even distribution.
- Press Into Muffin Tins. Line an 8‑cup muffin pan with silicone or paper liners. Using a spoon or a small ice‑cream scoop, fill each cup about three‑quarters full, then press the surface down firmly with the back of the spoon. A compact base helps the cups hold their shape after baking.
- Bake. Preheat the oven to 350°F (175°C). Place the pan in the center rack and bake for 18‑20 minutes, or until the tops turn a light golden brown and a toothpick inserted into the center comes out clean. The gentle heat sets the structure without drying out the interior.
- Cool Slightly. Remove the pan from the oven and let the cups rest for 5 minutes. This brief cooling period allows them to firm up, making it easier to lift them out of the liners without breaking.
- Finish with Toppings. Drizzle a thin line of extra peanut butter over each cup, then garnish with sliced banana or fresh berries. The added drizzle adds visual appeal and an extra burst of nutty flavor right before serving.
Similar Recipes
 Desserts
Sweet & Salty Caramel Bliss Popcorn Recipe
Delicious Sweet & Salty Caramel Bliss Popcorn Recipe
 Desserts
Nutty Apple Crunch Energy Bars: Recipe Completion and Nutritional Insights
Delicious Nutty Apple Crunch Energy Bars: Recipe Completion and Nutritional Insights
 Desserts
Melt-in-Your-Mouth Cake
Learn how to make delicious Melt-in-Your-Mouth Cake. Easy recipe with step-by-step instructions.
 Desserts
Creamy Raspberry Dream Bars Recipe
Delicious Creamy Raspberry Dream Bars Recipe
 Desserts
Triple Decker Key Lime Pie: A Delightful Twist on an American Classic
Delicious Triple Decker Key Lime Pie: A Delightful Twist on an American Classic
 Desserts
Key Lime Bliss Bars: A Refreshing Dessert Delight
Delicious Key Lime Bliss Bars: A Refreshing Dessert Delight
 Desserts
Almond Joy Coconut Bars Recipe: A Sweet Treat for Everyone
Delicious Almond Joy Coconut Bars Recipe: A Sweet Treat for Everyone
 Desserts
Creamy Carrot Ginger Delight: A Comforting Recipe for Every Occasion
Delicious Creamy Carrot Ginger Delight: A Comforting Recipe for Every Occasion

Susan
I cook these recipes at home before they ever land here — simple ingredients, clear steps.