
Introduction
Key Lime Pie is more than just a dessert; it’s a testament to the vibrant culinary heritage of the Florida Keys and a beloved staple in American dessert culture. This iconic pie, characterized by its tangy flavor and creamy texture, has captivated the taste buds of many for generations. Its origins can be traced back to the late 1800s, with a rich history that intertwines with the fishing industry of the Florida Keys and the availability of key limes, a smaller and more aromatic variety of lime.
While the traditional Key Lime Pie is a timeless favorite, today we’re diving into a delightful twist on this classic: the Triple Decker Key Lime Pie. This version enhances the original with an extra layer of flavor and texture, making it not only a feast for the palate but also a visually stunning centerpiece for any gathering. Imagine not just a single layer of zesty key lime filling, but three distinct layers: a crumbly graham cracker crust, a creamy key lime filling, and a luscious meringue topping, crowned with a fluffy whipped cream layer. Each bite brings a delightful contrast of textures, from the crunch of the crust to the smooth filling and the airy meringue.
Join us as we explore the intricacies of making this delightful Triple Decker Key Lime Pie, a recipe that promises not only to satisfy your sweet tooth but also to impress your guests. Whether you’re preparing for a summer barbecue, a holiday feast, or simply a family dessert night, this pie is sure to become a new favorite.
Understanding Key Ingredients
To create the perfect Triple Decker Key Lime Pie, it’s essential to understand the key ingredients that contribute to its unique flavor and texture. Each component plays a vital role in achieving the desired outcome, and knowing how they work together will help you master this recipe.
Graham Crackers and Their Role in the Crust
The foundation of any great pie begins with its crust, and for our Triple Decker Key Lime Pie, graham crackers are the star. Graham crackers are sweet, crisp biscuits made from whole wheat flour, which provide a subtle nuttiness that perfectly complements the tangy key lime filling. Their origin dates back to the 19th century, when Sylvester Graham, a dietary reformer, promoted a vegetarian diet rich in whole grains.
When crushed and combined with melted butter and sugar, graham crackers create a crumbly yet sturdy crust that holds up well against the vibrant filling. The texture is key; a well-made graham cracker crust should be both crunchy and slightly chewy, providing a satisfying contrast to the smooth layers above.
To achieve the perfect crust, it’s essential to ensure that the crumbs are finely ground and evenly mixed with the butter. Baking the crust until golden enhances its flavor and sets the structure, allowing it to hold together beautifully once filled.
The Essence of Key Limes
Next, we have the hero of our pie: key limes. Unlike standard limes, key limes are smaller, with a thinner skin and a more intense, aromatic flavor profile. They are typically more tart and fragrant, which makes them the ideal choice for a key lime pie. The unique flavor of key limes adds depth and brightness to the filling, elevating the dessert from ordinary to extraordinary.
In addition to their delightful taste, key limes also offer health benefits. They are a good source of vitamin C, which is essential for a healthy immune system, and they contain antioxidants that can help combat inflammation. Incorporating key limes into your diet can also aid digestion and contribute to healthy skin.
Sweetened Condensed Milk: A Creamy Essential
Sweetened condensed milk is another crucial ingredient in our Triple Decker Key Lime Pie. This thick, creamy substance is made by removing most of the water content from milk and adding sugar, resulting in a rich and luscious product that enhances the pie’s creaminess.
In the context of our key lime pie, sweetened condensed milk not only sweetens the filling but also provides a velvety texture that balances the tartness of the key limes. Its thick consistency helps bind the filling ingredients together, creating a smooth and cohesive layer that melts in your mouth.
The Importance of Egg Yolks and Whites
Eggs are fundamental to the structure and taste of the Triple Decker Key Lime Pie. The yolks contribute to the creamy filling, adding richness and helping it set properly. When combined with the sweetened condensed milk and key lime juice, egg yolks create a luscious custard-like texture that is both indulgent and satisfying.
On the other hand, egg whites play a pivotal role in the meringue topping. When beaten to stiff peaks, egg whites trap air, creating a light and fluffy structure that contrasts beautifully with the denser layers beneath. The science behind meringue involves the denaturation of proteins in the egg whites, which allows them to stabilize and maintain their volume when whipped. This airy topping not only adds an elegant finish but also balances the overall richness of the pie.
Step-by-Step Instructions for Preparing the Triple Decker Key Lime Pie
Now that we’ve covered the key ingredients, it’s time to dive into the step-by-step instructions for preparing this delicious Triple Decker Key Lime Pie. Follow along closely to ensure you achieve the best results, and don’t hesitate to refer back to the ingredient descriptions for additional insight.
Preparing the Graham Cracker Crust
1. Gather Your Ingredients: For the graham cracker crust, you will need:
– 1 ½ cups of graham cracker crumbs
– ⅓ cup of granulated sugar
– ⅓ cup of unsalted butter, melted
– A pinch of salt
2. Preheat the Oven: Begin by preheating your oven to 350°F (175°C). This ensures that the crust will bake evenly and develop a pleasant golden color.
3. Mix the Crust Ingredients: In a medium-sized mixing bowl, combine the graham cracker crumbs, granulated sugar, and a pinch of salt. Pour in the melted butter and mix until the crumbs are evenly coated and the mixture resembles wet sand.
4. Press the Mixture into a Pie Dish: Transfer the crumb mixture to a 9-inch pie dish. Using your fingers or the bottom of a measuring cup, firmly press the crumbs into the bottom and up the sides of the dish. Make sure to create an even layer for optimal baking.
5. Bake the Crust: Place the pie dish in the preheated oven and bake for about 8-10 minutes, or until the crust is lightly golden and set. Be careful not to overbake, as this can lead to a tough crust. Once done, remove from the oven and allow it to cool completely before adding the filling.
Crafting the Key Lime Filling
1. Gather Your Filling Ingredients: For the key lime filling, you will need:
– 1 cup of freshly squeezed key lime juice (about 20-25 key limes)
– 1 can (14 ounces) of sweetened condensed milk
– 4 large egg yolks
– Zest of 2 key limes
2. Combine Filling Ingredients: In a mixing bowl, whisk together the sweetened condensed milk, egg yolks, and key lime juice until well combined. The mixture should be smooth and creamy, with no lumps.
3. Add the Zest: Fold in the key lime zest to enhance the filling’s flavor. The zest adds an extra layer of aroma and brings brightness to the filling.
4. Cool the Filling: Allow the filling to rest at room temperature for about 15 minutes. This cooling time is crucial as it helps the flavors meld together and ensures a smoother texture once poured into the crust.
5. Pour Filling into Crust: Once the crust has cooled completely, pour the key lime filling into the prepared graham cracker crust. Spread it evenly with a spatula.
6. Bake the Filling: Place the pie back into the oven and bake for an additional 15-20 minutes, or until the filling is set but still slightly jiggly in the center. Remove from the oven and let it cool at room temperature for about 30 minutes before refrigerating. This cooling period is important for achieving the right consistency before adding the meringue layer.
Making the Meringue Layer
1. Prepare Your Egg Whites: For the meringue, you will need:
– 4 large egg whites
– ½ teaspoon of cream of tartar
– ½ cup of granulated sugar
– A pinch of salt
2. Whip the Egg Whites: In a clean, dry mixing bowl, add the egg whites and cream of tartar. Using an electric mixer, beat the egg whites on medium speed until they become frothy.
3. Add Sugar Gradually: Slowly add the granulated sugar, one tablespoon at a time, while continuing to beat the egg whites. This gradual addition helps to stabilize the meringue. Continue to beat until stiff peaks form and the mixture is glossy.
4. Spread the Meringue: Once the key lime filling has cooled and set in the refrigerator, take the pie out and spread the meringue evenly over the top. Use a spatula to create peaks and swirls for an attractive finish.
5. Bake the Meringue: Return the pie to the oven for about 10-12 minutes, or until the meringue is lightly golden. Keep a close eye on it to ensure it doesn’t burn.
6. Chill the Pie: After baking, remove the pie from the oven and allow it to cool at room temperature. Once cooled, place it in the refrigerator for at least 3 hours to set completely before serving.
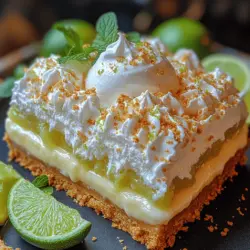
By following these steps, you’ll be well on your way to creating a stunning Triple Decker Key Lime Pie that is sure to impress everyone at your next gathering. Stay tuned for the next part, where we’ll explore additional tips and common questions about this delightful dessert!
{{image_1}}
Techniques for Beating Egg Whites to Achieve Stiff Peaks
Achieving stiff peaks when beating egg whites is essential for creating the perfect meringue for your Triple Decker Key Lime Pie. Start with room temperature egg whites, as they whip up more effectively than cold ones. Ensure your mixing bowl and beaters are clean and free of any grease or yolk, as these can prevent the egg whites from whipping properly.
1. Start Slow: Begin beating the egg whites on a low speed until they become frothy. This initial phase allows you to incorporate air gradually.
2. Increase Speed: Once frothy, increase the mixer speed to medium-high. Continue beating until soft peaks form. At this stage, the egg whites will hold their shape but will still droop when you lift the beaters.
3. Add Sugar Gradually: To achieve stiff peaks, slowly add granulated sugar while continuing to whip the egg whites. Adding sugar too quickly can deflate the mixture.
4. Check for Stiff Peaks: As you beat, watch for the formation of stiff peaks. This means that when you lift the beaters, the peaks should stand straight up without drooping.
Tips for Incorporating Sugar for the Perfect Meringue Texture
Incorporating sugar correctly is crucial for a smooth and glossy meringue. Here’s how to do it:
– Use Fine Sugar: Opt for superfine sugar or pulse granulated sugar in a food processor to create a finer texture. This helps it dissolve more quickly and evenly in the egg whites.
– Timing is Everything: Introduce sugar once the egg whites reach soft peaks. This allows for the sugar to dissolve fully, resulting in a silky finish.
– Continuous Beating: After adding the sugar, continue to beat the mixture for several minutes until it becomes thick and shiny. You want the sugar to fully dissolve; taste a small amount to check for any grittiness.
Assembling the Pie
Once your meringue is ready, it’s time to assemble your Triple Decker Key Lime Pie. Begin by layering the components carefully to create an eye-catching dessert.
1. Layer the Key Lime Filling: Start with the first layer of key lime filling, ensuring an even spread.
2. Add the Meringue: Spoon a generous amount of meringue over the filling. Use a spatula to spread it evenly to the edges of the crust, sealing in the filling.
3. Create Heights: For the next layer, add more key lime filling and repeat the process, topping it with meringue each time.
Detailed Instructions on Layering the Meringue
Layering the meringue skillfully will enhance the visual appeal of your pie. Here’s how to do it:
– Spread Evenly: Use a spatula to spread the meringue over each layer of filling, ensuring that it reaches the edges of the pie crust. This prevents shrinkage during baking.
– Make Swirls and Peaks: To create aesthetic swirls, use the back of a spoon or spatula to gently drag through the meringue, forming soft peaks. This not only looks beautiful but also adds texture that will crisp up during baking.
Baking the Meringue
The baking process is crucial for achieving a perfectly set meringue. Here are key points to keep in mind:
– Oven Temperature Control: Preheat your oven to a low temperature, typically around 325°F (160°C). A lower temperature allows the meringue to bake slowly, developing a crisp exterior without burning.
– Timing is Key: Bake the pie for about 10-15 minutes, or until the meringue is golden brown. Keep an eye on it to avoid over-baking.
Visual Cues for Knowing When the Meringue is Done
Knowing when your meringue is done is essential for perfecting your pie:
– Color: Look for a light golden color. The meringue should not be too dark; a pale golden hue indicates that it has set properly.
– Texture: The meringue should feel firm to the touch and will have a slightly crispy exterior while remaining soft inside.
Whipping Up the Cream Topping
For the final touch, a whipped cream topping adds a luscious finish to your pie.
1. Ingredients: Use heavy whipping cream and sugar. For added flavor, consider vanilla extract.
2. Chill Your Equipment: Place your mixing bowl and beaters in the refrigerator for about 15 minutes before whipping. This helps the cream whip faster and increases volume.
3. Beat the Cream: Start at a low speed and gradually increase. Beat until soft peaks form, then add sugar and continue beating until stiff peaks form.
Suggestions for Achieving the Ideal Consistency
To ensure your whipped cream is perfect:
– Don’t Overbeat: Stop mixing as soon as stiff peaks form. Overbeating can turn the cream grainy and lead to butter formation.
– Use Cold Cream: Starting with chilled heavy cream helps achieve the best volume and texture.
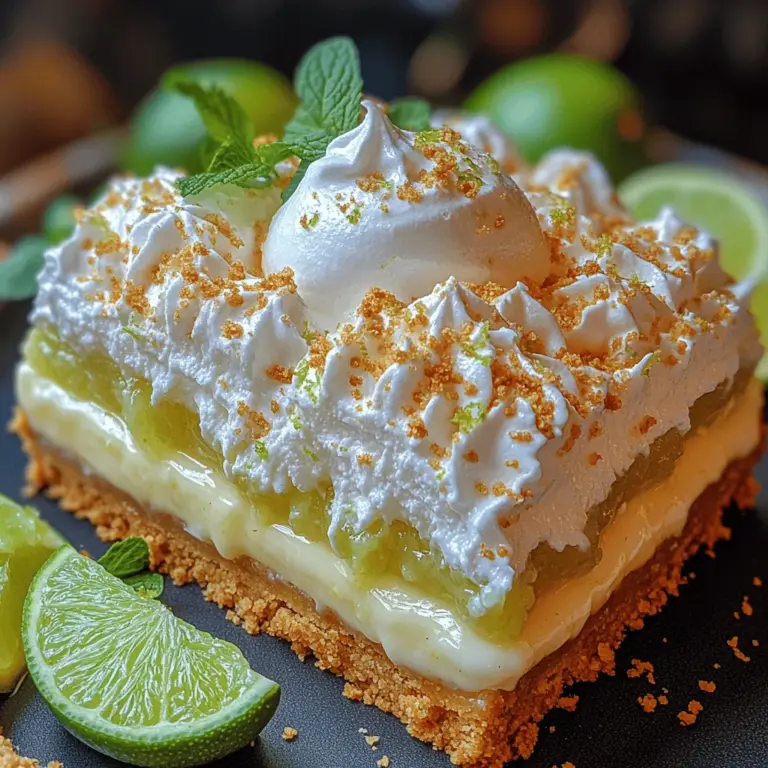
Serving Suggestions and Presentation Ideas
With your pie beautifully layered and topped, it’s time to serve!
Best Ways to Slice and Serve the Pie
– Chill Before Slicing: Allow the pie to chill in the refrigerator for at least an hour before slicing. This helps the layers set and makes for cleaner cuts.
– Clean Cuts: Use a sharp knife dipped in warm water to slice clean wedges. Wipe the knife with a towel between cuts for the best results.
Suggestions for Serving with Garnishes
– Garnishes: Serve each slice with a lime wedge and fresh mint leaves for a pop of color and flavor.
– Plating: Consider drizzling some additional key lime filling or a berry coulis on the plate for a fun presentation.
Pairing Ideas: What to Serve with Your Key Lime Pie
To elevate your dessert experience, consider these pairing ideas:
– Beverage Pairings: A refreshing iced tea or a light sparkling wine complements the tartness of the pie beautifully. For a non-alcoholic option, a coconut water or limeade makes a great match.
– Additional Desserts: If you’re hosting a Key Lime-themed meal, consider serving mini Key Lime tarts or coconut macaroons alongside your pie for variety.
Storage and Shelf Life
Knowing how to store your Key Lime Pie correctly ensures it stays fresh and delicious.
Best Practices for Storing Leftover Key Lime Pie
– Refrigerator Storage: Cover the pie loosely with plastic wrap or foil to prevent it from absorbing odors. It should be stored in the refrigerator where it can last for about 3-4 days.
– Freezing: If you need to store it for a longer period, you can freeze slices of the pie. Wrap individual pieces tightly in plastic wrap and then in aluminum foil to prevent freezer burn.
Shelf Life Expectations
– Freshness: When stored properly, your Key Lime Pie will remain fresh for up to a week in the refrigerator and about 2-3 months in the freezer.
Conclusion
The Triple Decker Key Lime Pie is a delightful dessert that layers the perfect balance of tartness and sweetness, all while showcasing a beautiful presentation. Whether you’re celebrating a special occasion or simply indulging in a sweet treat, this pie will impress your guests and leave them craving more.
Baking this pie at home not only brings joy through the process but also creates an avenue for sharing a delicious treat with friends and family. So gather your ingredients, embrace the baking journey, and enjoy the satisfaction of creating your very own Triple Decker Key Lime Pie!