Introduction
The world of desserts is vast, filled with an array of flavors that tantalize the taste buds and evoke cherished memories. Among these, the appeal of sweet and salty combinations has gained immense popularity, captivating dessert lovers with the unique balance that this flavor duo offers. Sweet & Salty Caramel Chocolate Chip Bars are a perfect embodiment of this trend, showcasing how contrasting flavors can come together harmoniously to create a delectable treat.
These bars are not only a delightful indulgence but also remarkably simple to prepare. With just a few key ingredients and easy-to-follow steps, you’ll be able to whip up a batch of these rich, gooey bars that are sure to impress family and friends alike. Whether you’re looking for a sweet snack to satisfy your cravings or a dessert to serve at gatherings, these bars check all the boxes, making them a must-try for any home baker.
The Allure of Sweet & Salty Combinations
Sweet and salty combinations have long captured the hearts of food enthusiasts. The interplay between sweetness and saltiness creates a complex flavor profile that tantalizes the palate and elevates the eating experience. When these two contrasting flavors are combined, they enhance each other, providing a depth of flavor that is both satisfying and addictive.
Popular sweet and salty desserts abound, from chocolate-covered pretzels to salted caramel brownies and even bacon-infused treats. Each of these desserts highlights the magic that happens when sugar meets salt, creating a perfect balance that draws you in for another bite. The secret lies in the careful proportion of each element; too much sweetness can overwhelm the palate, while too much salt can detract from the dessert’s intended flavor. The goal is to achieve a balance that brings out the best in both components, resulting in a dessert that is greater than the sum of its parts.
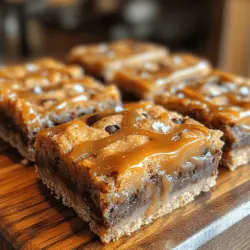
In the case of Sweet & Salty Caramel Chocolate Chip Bars, the combination of rich chocolate, gooey caramel, and a hint of sea salt creates an irresistible treat that satisfies various cravings. The warm, buttery base pairs beautifully with the sweet and creamy caramel layer, while the sprinkle of sea salt on top elevates the flavors, making each bite an unforgettable experience.
Ingredients Breakdown
To create these mouthwatering Sweet & Salty Caramel Chocolate Chip Bars, you’ll need a selection of simple yet essential ingredients. Below, we break down each component, highlighting its role in achieving the perfect texture and flavor.
For the Base
1. Unsalted Butter: The cornerstone of any good dessert, unsalted butter plays a critical role in the texture of the bars. It adds richness and moisture, resulting in a soft, chewy base. Using unsalted butter allows you to control the overall saltiness of the dessert, ensuring a balanced flavor.
2. Brown Sugar vs. Granulated Sugar: This recipe combines both brown sugar and granulated sugar to achieve the ideal flavor and moisture balance. Brown sugar, with its molasses content, imparts a rich, caramel-like flavor and adds moisture to the bars, while granulated sugar helps create a light and airy texture.
3. Eggs: Serving as the binding agent, eggs are essential for holding the ingredients together. They also contribute moisture, creating a tender crumb. The eggs will help give the bars a lovely rise and a rich flavor.
4. Vanilla Extract: A staple in dessert recipes, vanilla extract enhances the overall flavor profile. Its warm notes complement the sweetness of the chocolate and caramel, making each bite even more delightful.
5. Flour, Baking Soda, and Salt: The base of the bars relies on all-purpose flour, which provides structure. Baking soda acts as a leavening agent, ensuring that the bars rise properly and have a light texture. A pinch of salt is crucial; it enhances the sweetness and balances the flavors.
6. Chocolate Chips: Chocolate chips are the star of the show, adding a rich, melty texture to the bars. You can choose from semi-sweet, milk chocolate, or even dark chocolate chips, depending on your preference. Each type will contribute a unique flavor to the final product.
For the Caramel Layer
1. Caramel Candies: The caramel layer is the heart of these bars, providing that sweet and gooey texture that is simply irresistible. You can use store-bought caramel candies, which are quick and convenient, or make your own from scratch if you’re feeling adventurous. For a twist, consider using caramel sauce as an alternative.
2. Heavy Cream: To achieve a smooth and pourable caramel, heavy cream is essential. It helps to create a creamy consistency that blends beautifully with the caramel candies, ensuring that every bite is rich and luscious.
3. Sea Salt: To enhance the sweet and salty dynamic, a sprinkle of sea salt on top of the caramel layer is a must. It adds an extra layer of flavor that contrasts beautifully with the sweetness of the caramel and chocolate, making the bars all the more addictive.
Step-by-Step Instructions
Now that you’ve gathered your ingredients, it’s time to dive into the step-by-step instructions for creating these Sweet & Salty Caramel Chocolate Chip Bars. Follow these simple steps for a delicious result:
1. Preheat the Oven: Start by preheating your oven to 350°F (175°C). This ensures that your bars bake evenly and achieve the perfect texture.
2. Prepare the Baking Dish: Grease a 9×13-inch baking dish or line it with parchment paper for easy removal later. This will help prevent the bars from sticking and make cleanup a breeze.
3. Make the Base: In a large mixing bowl, cream together the unsalted butter, brown sugar, and granulated sugar until the mixture is light and fluffy. This process incorporates air into the mixture, which is crucial for achieving a light texture.
4. Add the Eggs and Vanilla: Beat in the eggs, one at a time, ensuring each is fully incorporated before adding the next. Then, mix in the vanilla extract until well combined.
5. Combine Dry Ingredients: In a separate bowl, whisk together the all-purpose flour, baking soda, and salt. Gradually add the dry ingredients to the wet mixture, stirring until just combined. Be careful not to overmix, as this can lead to tough bars.
6. Fold in the Chocolate Chips: Gently fold in the chocolate chips, ensuring they are evenly distributed throughout the batter. This will ensure that every bite is packed with chocolatey goodness.
7. Spread the Base in the Baking Dish: Pour the batter into the prepared baking dish, spreading it evenly with a spatula.
8. Prepare the Caramel Layer: In a small saucepan over low heat, combine the caramel candies and heavy cream. Stir continuously until the mixture is smooth and fully melted.
9. Pour the Caramel Over the Base: Once the caramel is ready, pour it over the cookie base in the baking dish, spreading it evenly with a spatula.
10. Sprinkle with Sea Salt: Finish by sprinkling a generous pinch of sea salt over the caramel layer. This step is crucial for enhancing the sweet and salty flavor profile that makes these bars so enticing.
11. Bake: Place the baking dish in the preheated oven and bake for about 25-30 minutes, or until the edges are golden brown and the center is set. The bars may appear slightly soft in the center, but they will firm up as they cool.
12. Cool and Slice: Once baked, remove the dish from the oven and allow the bars to cool in the pan for at least 15-20 minutes. After cooling, use a sharp knife to slice them into squares or rectangles, making them easy to serve.
As you embark on this culinary adventure, you’ll find that the process is as enjoyable as the end result. The Sweet & Salty Caramel Chocolate Chip Bars are sure to become a favorite in your dessert repertoire, combining the best of both worlds in one delightful package. Stay tuned as we delve deeper into tips for achieving the best results and answer common questions about this delectable treat in the next part of our article.

Preheat the Oven: Importance of Temperature in Baking
Before diving into the details of creating your Sweet & Salty Caramel Chocolate Chip Bars, preheating your oven is essential. The ideal baking temperature for this recipe is 350°F (175°C). Preheating is crucial because it ensures that once you place your mixture in the oven, it begins cooking immediately at the right temperature. This not only helps with even baking but also contributes to the proper rise and texture of your bars. A preheated oven provides the environment needed for the baking soda and baking powder to activate, leading to a perfectly fluffy and chewy bar.
Preparing the Base: Techniques for Creaming Butter and Sugar, and the Significance of Texture
The magic of any good dessert starts with the base. For our Sweet & Salty Caramel Chocolate Chip Bars, you will need to cream together softened butter and sugar. Start with 1 cup (2 sticks) of unsalted butter and 1 cup of brown sugar, packed. Using a hand mixer or a stand mixer, beat the butter and sugar together on medium speed until the mixture is light and fluffy, typically about 2-3 minutes.
The significance of texture at this stage cannot be understated; properly creamed butter and sugar create air pockets that help leaven the bars, resulting in a tender crumb. If your butter is too cold, it won’t cream well, leading to a dense texture. Conversely, overly melted butter can make the bars greasy. Aim for softened butter that still holds its shape but is easy to mix.
Adding Eggs and Vanilla: Tips for Incorporating Wet Ingredients
Once your butter and sugar are creamed to perfection, it’s time to introduce the wet ingredients: 2 large eggs and 1 teaspoon of pure vanilla extract. Crack the eggs into a separate bowl first to ensure no shell fragments make it into your mixture. Add the eggs one at a time, mixing well after each addition. This not only helps to incorporate the eggs but also contributes to the overall structure of the bars.
After the eggs, add the vanilla extract and mix until everything is well combined. The addition of vanilla enhances the overall flavor profile of the bars, balancing the sweetness of the sugar and chocolate.
Mixing Dry Ingredients: The Importance of Proper Mixing for Texture
Next, we turn our attention to the dry ingredients. In a separate bowl, whisk together 2 cups of all-purpose flour, 1 teaspoon of baking soda, and a pinch of salt. Whisking the dry ingredients together beforehand is essential because it ensures that the baking soda is evenly distributed throughout the flour. This step prevents any clumps of flour or baking soda, which can lead to uneven texture in your final product.
Gradually add the dry ingredients to the wet mixture, mixing on low speed or folding with a spatula. Over-mixing at this stage can develop the gluten in the flour, resulting in tougher bars. Aim for just combined; there should still be some visible flour streaks.
Incorporating Chocolate Chips: Techniques for Even Distribution
Now for the fun part: chocolate chips! You will need 1 cup of semi-sweet chocolate chips. To ensure an even distribution, it’s best to fold them into the batter gently. Use a spatula and scrape down the sides of the bowl to incorporate any remaining flour. This technique will help to evenly disperse the chocolate throughout the batter, ensuring each bite is filled with that delightful chocolatey goodness.
Spreading the Mixture: Ensuring Even Baking for Perfect Texture
Once your batter is ready, it’s time to spread it into your prepared baking pan. Line a 9×13 inch baking dish with parchment paper, leaving a bit of an overhang for easy removal later. Pour the batter into the pan and use a spatula to spread it evenly into the corners. This step is vital for even baking; if the batter is uneven, some parts may bake faster than others, leading to an inconsistent texture.
Baking Tips: Indicators of Doneness and Avoiding Overbaking
Place the baking dish in the preheated oven and bake for about 25-30 minutes. Keep an eye on your bars as they approach the end of the baking time. The edges should be set and slightly golden, while the center may still look a bit soft. A toothpick inserted in the center should come out with a few moist crumbs but not wet batter. Remember, the bars will continue to cook slightly after being removed from the oven, so it’s better to err on the side of underbaking than overbaking, which can lead to dry bars.
Preparing Caramel: Methods for Melting and Achieving a Smooth Consistency
While your bars are baking, you can prepare the caramel. For this recipe, you can use store-bought caramel sauce or make your own by melting 1 cup of caramel candies with 2 tablespoons of heavy cream in a microwave-safe bowl. Heat in 30-second increments, stirring in between, until the mixture is smooth and fully melted. Be careful not to overheat, as caramel can burn easily.
If you prefer a homemade caramel sauce from scratch, you can combine 1 cup of granulated sugar, 1/4 cup of butter, and 1/2 cup of heavy cream in a saucepan over medium heat. Stir continuously until the sugar dissolves and the mixture is bubbling. Cook for an additional 4-5 minutes without stirring until it turns a deep amber color, then remove from heat and allow to cool slightly before using.
Assembling the Bars: Timing and Technique for Pouring Caramel
Once your bars are baked and have cooled for about 10 minutes, it’s time to assemble. Carefully pour the prepared caramel sauce over the warm bars, spreading it evenly to cover the surface. The warmth of the bars will help the caramel spread better. For an added touch, you can sprinkle a few additional chocolate chips on top of the caramel before finishing with a sprinkle of flaky sea salt, enhancing both the taste and presentation.
Finishing Touches: The Role of Sea Salt in Enhancing Flavors
The final touch to elevate your Sweet & Salty Caramel Chocolate Chip Bars is the addition of flaky sea salt. Lightly sprinkle it over the caramel layer just before it sets. The contrast of the salty flakes against the sweet, rich caramel and chocolate creates a delightful balance of flavors. It’s this sweet and salty combination that makes these bars truly irresistible.
Cooling and Slicing: Best Practices for Achieving Perfect Squares
Allow the assembled bars to cool completely in the pan for at least an hour. This cooling period is essential; it allows the caramel to firm up, making it easier to slice. Once cooled, use the overhanging parchment paper to lift the bars out of the pan. Place them on a cutting board and, using a sharp knife, slice them into squares or rectangles, depending on your preference. Wipe the knife with a damp cloth between cuts for cleaner edges.
Serving Suggestions
These Sweet & Salty Caramel Chocolate Chip Bars are incredibly versatile when it comes to serving. They can be enjoyed plain, showcasing the rich flavors of caramel and chocolate. For an indulgent treat, serve them warm with a scoop of vanilla ice cream on the side. The melting ice cream complements the warm bars beautifully, creating a delightful dessert experience.
For a dessert platter, consider pairing these bars with a selection of other treats, such as brownies or fruit tarts. They also pair wonderfully with a hot cup of coffee or tea, making them perfect for an afternoon snack or dessert at a gathering.
Pairing Suggestions: Beverages or Other Desserts That Complement the Bars
When it comes to beverages, rich coffee or a creamy latte works well to balance the sweetness of the bars. If you prefer something colder, a glass of milk or a chocolate milkshake can also be a delightful pairing. For those who want a lighter option, a sparkling water with a hint of lemon can provide a refreshing contrast.
Storing the Bars: Best Practices to Maintain Freshness and Flavor
To keep your Sweet & Salty Caramel Chocolate Chip Bars fresh, store them in an airtight container at room temperature. They will remain delicious for up to a week. If you want to extend their shelf life, consider refrigerating them, which can help maintain their texture and prevent the caramel from becoming too sticky. However, allow them to come to room temperature before serving for the best flavor and texture.
Nutritional Information
While these bars are undoubtedly a treat, it’s essential to be mindful of portion sizes. Each bar is indulgent, so consider cutting them into smaller squares if serving at a gathering. Nutritionally speaking, each bar contains a mix of carbohydrates, fats, and sugars, so enjoy them in moderation as part of a balanced diet.
Conclusion
Creating Sweet & Salty Caramel Chocolate Chip Bars is not only a delightful baking experience but also a rewarding one as you get to enjoy the fruits of your labor. The process of making these bars—from creaming the butter and sugar to pouring over the luscious caramel—brings joy and satisfaction that is hard to match.
As you embark on this baking adventure, don’t hesitate to explore variations, such as adding nuts or using dark chocolate for a richer flavor. The joy of baking lies in creativity, and sharing these homemade treats with loved ones will undoubtedly spread happiness.
So gather your ingredients, preheat your oven, and get ready to indulge in one of the most delicious treats you’ll ever make. Happy baking!