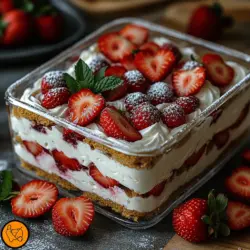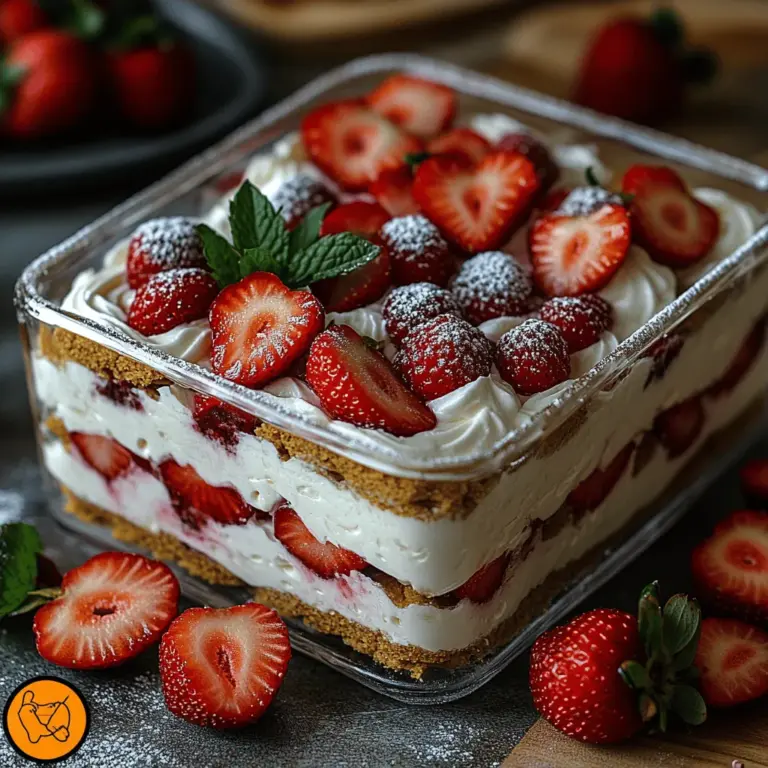
As the sun shines brighter and the temperatures rise, there’s nothing quite like a refreshing dessert to cool off your day. Enter the Berry Bliss Icebox Cake—a delightful summer treat that combines the sweetness of fresh berries with the rich creaminess of whipped cream, all nestled between layers of honey graham crackers. This no-bake dessert has quickly become a summer staple for many, and it’s easy to see why. Not only is it visually stunning, but it also captivates the palate with its layered textures and flavors.
The appeal of no-bake desserts, such as the Berry Bliss Icebox Cake, lies in their convenience. With minimal cooking involved, you can whip up this dessert in no time, leaving you more freedom to enjoy the sunny days with friends and family. Imagine a dessert that doesn’t require the oven and can be made ahead of time—perfect for picnics, barbecues, or simply enjoying at home. This icebox cake is not only easy to prepare, but it also showcases fresh, seasonal ingredients that elevate its taste and nutritional value.
In this article, we will explore the simplicity of the Berry Bliss Icebox Cake recipe while inviting you to discover the joy of making this delightful dessert. You’ll learn about the essential ingredients that make this cake stand out, along with step-by-step instructions to guide you through the process. Whether you’re a seasoned baker or a novice in the kitchen, this recipe is designed to be approachable and enjoyable for everyone.
Understanding the Ingredients
To create the perfect Berry Bliss Icebox Cake, it’s crucial to understand the role of each ingredient. Let’s delve into the main components that make this dessert truly blissful.
Heavy Whipping Cream
Heavy whipping cream is the star ingredient of this recipe, playing a vital role in providing the cake with its luscious texture and creamy flavor. The high fat content in heavy cream (usually around 36% or more) allows it to whip up beautifully, creating a stable and fluffy consistency that holds its shape. When selecting heavy cream for your icebox cake, look for products that are labeled as “heavy whipping cream” or “heavy cream”—these will give the best results in terms of both texture and flavor.
Tips for Selecting the Best Cream for Whipping:
– Check the fat content: Aim for heavy cream with at least 36% fat for optimal whipping.
– Look for pasteurized cream: This ensures safety and quality, as pasteurized cream has been heat-treated to eliminate bacteria.
– Choose fresh cream: Always check the expiration date and opt for the freshest product available.
Powdered Sugar
In baking, the type of sugar you use can significantly affect the final product. For the Berry Bliss Icebox Cake, powdered sugar is the preferred choice over granulated sugar. The fine texture of powdered sugar allows it to dissolve quickly into the whipped cream, resulting in a smooth and creamy consistency without any gritty texture. Additionally, powdered sugar contains a small amount of cornstarch, which helps stabilize the whipped cream and prevents it from deflating.
Why Choose Powdered Sugar?
– Smoothness: It blends seamlessly into the cream, enhancing the overall texture.
– Stability: The cornstarch content helps maintain the whipped cream’s structure.
Vanilla Extract
Vanilla is the unsung hero in many dessert recipes, and the Berry Bliss Icebox Cake is no exception. A splash of vanilla extract enhances the flavor profile of the whipped cream, adding depth and warmth that perfectly complements the fresh berries. When selecting vanilla extract, consider using pure vanilla extract for the best flavor. While imitation vanilla can be more affordable, it often lacks the complexity and richness of pure vanilla.
Suggestions for Using Vanilla:
– Pure Vanilla Extract: Offers a rich and authentic flavor that elevates your dessert.
– Imitation Vanilla Extract: A budget-friendly alternative, but may not provide the same depth of flavor.
Fresh Strawberries
Strawberries are the centerpiece of this delightful dessert, bringing a burst of flavor and vibrant color to the icebox cake. Not only are they delicious, but they also offer a range of nutritional benefits, including vitamin C, antioxidants, and dietary fiber. The freshness of the strawberries is crucial for achieving the best taste, so be sure to select ripe, juicy berries for your cake.
Tips for Choosing Ripe and Fresh Strawberries:
– Color: Look for berries that are bright red and free of white or green spots.
– Shape: Choose plump, firm strawberries that are not overly soft or squishy.
– Smell: Ripe strawberries should have a sweet, fragrant aroma.
Honey Graham Crackers
The base of the Berry Bliss Icebox Cake consists of honey graham crackers, which provide a delightful crunch and subtle sweetness. Their texture contrasts beautifully with the creamy layers of whipped cream and strawberries, adding a satisfying bite to each slice. If you have dietary restrictions, there are several alternatives available, such as gluten-free graham crackers or even oat-based options.
Overview of Flavor Profile and Texture:
– Flavor: The honey adds a hint of sweetness that complements the natural sugars in the strawberries.
– Texture: The crunchiness of the graham crackers balances the creaminess of the whipped cream, creating a delicious contrast.
Step-by-Step Instructions
Now that we understand the essential ingredients, let’s dive into the step-by-step instructions for preparing the Berry Bliss Icebox Cake. This process will guide you through making the whipped cream, layering the graham crackers, and assembling the cake.
Preparing the Whipped Cream
The first step in creating your Berry Bliss Icebox Cake is to prepare the whipped cream. Achieving the perfect whipped cream is crucial, as it forms the foundation of this dessert.
1. Chill Your Equipment: Before you begin, place your mixing bowl and beaters in the refrigerator for about 15 minutes. Chilling your equipment helps the cream whip faster and reach the desired consistency.
2. Measure the Ingredients: Pour 2 cups of heavy whipping cream into the chilled mixing bowl. Add 1 cup of powdered sugar and 1 teaspoon of vanilla extract.
3. Start Whipping: Begin mixing on low speed to incorporate the sugar and vanilla into the cream. Gradually increase the speed to medium-high as the mixture thickens.
4. Achieve the Right Consistency: Whip the cream until soft peaks form, which means that when you lift the beaters, the cream will hold a peak that gently bends over at the tip. Be careful not to overwhip, as this can lead to a grainy texture or even butter.
Common Mistakes to Avoid When Whipping Cream:
– Overwhipping: Stop whipping as soon as soft peaks form.
– Using warm cream: Always start with cold cream for the best results.
– Not chilling equipment: Chilled bowls and beaters make a noticeable difference in achieving whipped cream quickly.
Layering the Base
Once your whipped cream is ready, it’s time to layer the graham crackers, creating the foundation of your icebox cake. This step is essential for ensuring even distribution and balance of flavors.
1. Prepare a Baking Dish: Select a 9×13-inch baking dish or a similar-sized pan for assembling your cake. Ensure it’s clean and dry.
2. Arrange the Graham Crackers: Start by laying down a single layer of honey graham crackers at the bottom of the dish. You can break them into pieces if necessary to fit the edges properly, ensuring there are no gaps.
3. Spread the Whipped Cream: Once the graham crackers are arranged, spread a layer of whipped cream over them, using an offset spatula or the back of a spoon for an even finish. Ensure that the whipped cream covers all the graham crackers completely.
4. Add Fresh Strawberries: Next, layer fresh strawberries on top of the whipped cream. You can slice the strawberries for a more uniform distribution or leave them whole for a more rustic look.
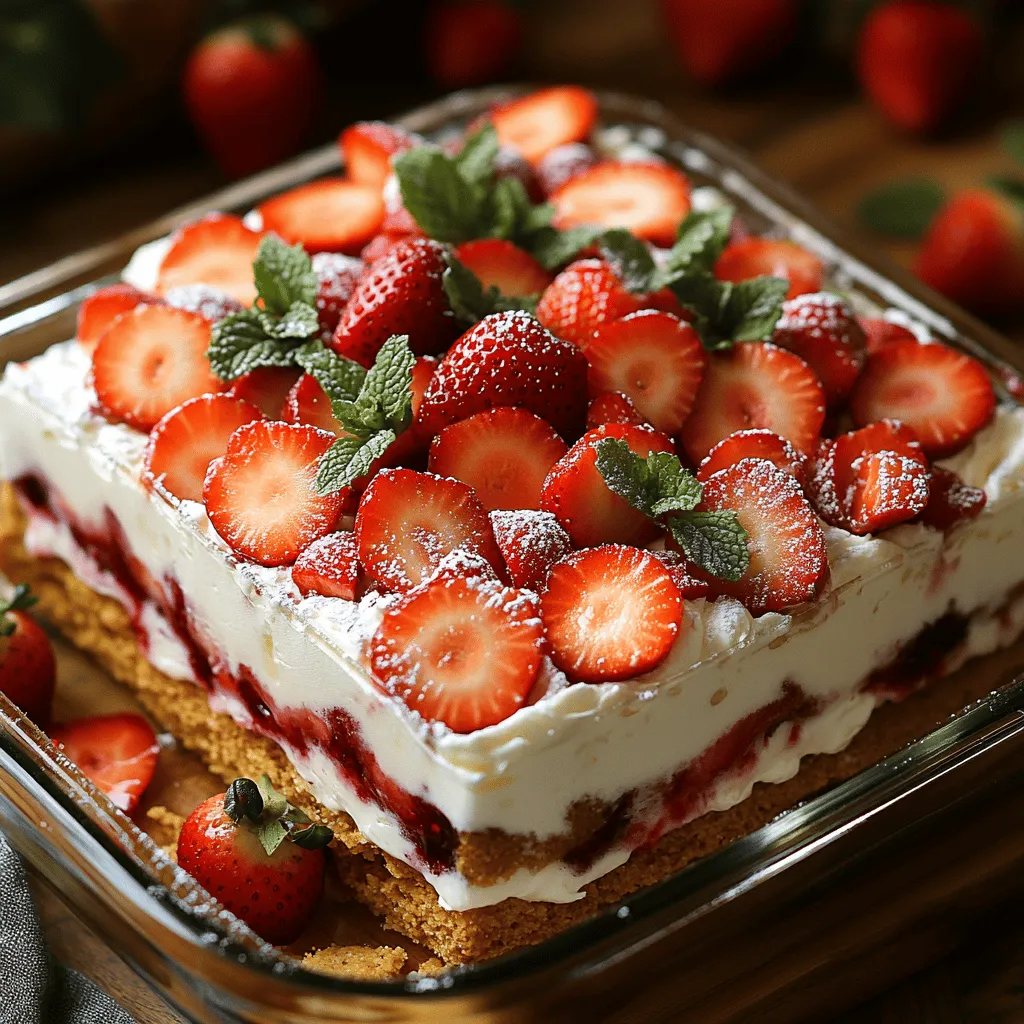
5. Repeat the Layers: Continue layering with more graham crackers, followed by whipped cream and strawberries, until you reach the top of the dish. The final layer should be whipped cream, which you can decorate with additional strawberries or even a drizzle of chocolate sauce if desired.
By following these steps, you’ll create a beautifully layered Berry Bliss Icebox Cake that is not only delicious but also visually appealing. This dessert is sure to impress your guests and elevate your summer gatherings, making it a must-try recipe for any occasion.
Suggestions for Alternative Bases
If you’re looking to switch things up with your Berry Bliss Icebox Cake, there are several alternative bases you can consider. While traditional graham crackers are a popular choice for their sweetness and texture, you might explore other options for a unique twist.
1. Vanilla Wafers: These provide a complementary flavor and a delightful crunch. Their delicate sweetness pairs beautifully with the creamy layers.
2. Chocolate Cookies: For a richer experience, chocolate wafer cookies or Oreos can be used. This variation brings a decadent taste that contrasts nicely with the fresh berries.
3. Pound Cake: Slices of homemade or store-bought pound cake can serve as a sturdy base. This option offers a denser texture and buttery flavor that enhances the overall dessert.
4. Ginger Snap Cookies: If you enjoy a bit of spice, ginger snaps add a zesty kick that can beautifully complement the sweetness of the berries.
Spreading the Cream
When it comes to assembling your icebox cake, spreading the whipped cream evenly is essential. Start by using a spatula or the back of a spoon to dollop the whipped cream onto the cracker layer.
– Technique for Spreading: Begin in the center and gently spread outward. Avoid dragging the spatula across the crackers too forcefully, as this can disturb the layers beneath. Instead, use a light hand, allowing the cream to settle softly onto the base.
– Maintaining Even Layers: To achieve a visually appealing presentation, it’s crucial to have even layers. This not only enhances the cake’s look but also ensures a consistent flavor and texture in every bite.
Adding Strawberries
Next, it’s time to incorporate those luscious strawberries.
– Best Practices for Slicing: For optimal layering, slice the strawberries into even pieces, about a quarter-inch thick. This uniformity not only makes for a prettier presentation but also allows for even distribution of flavors throughout the cake.
– Layering Techniques: Place the sliced strawberries over the cream layer, ensuring they cover the entire surface. This not only adds flavor but also creates a vibrant visual contrast against the white cream.
Creative Ideas for Additional Fruits or Flavors
While strawberries are the star of this dessert, feel free to experiment with other fruits.
– Blueberries and Raspberries: These berries can add a delightful tartness that balances the sweetness of the cream and crackers.
– Peaches or Mangos: For a seasonal twist, consider including slices of fresh peaches or mangoes, which will add a tropical flair to your dessert.
– Flavored Whipped Cream: You can also infuse your whipped cream with different flavors. A touch of vanilla extract, almond extract, or citrus zest can elevate the overall taste profile.
Repeating the Process
Once you’ve laid down the strawberries, it’s time to repeat the layering process.
– Uniformity is Key: Maintain consistency in layers for the best texture and taste. Each layer should mirror the previous one in thickness and distribution.
– Visual Cues for Layering: As you build your cake, look for visual cues. Each layer of whipped cream should appear smooth without any gaps, and the fruit should be evenly distributed. This attention to detail ensures that every slice is as delicious as the last.
Chilling the Cake
Chilling the cake is a crucial step that shouldn’t be overlooked.
– Flavor Development: Allowing the cake to chill enables the flavors to meld beautifully. The whipped cream absorbs some of the berry juices, creating a rich, creamy filling.
– Recommended Chilling Times: Ideally, let your cake chill in the refrigerator for at least four hours, but overnight is even better. This extended chilling time allows the layers to set properly and enhances the overall flavor.
Serving Suggestions
When it comes to serving your Berry Bliss Icebox Cake, presentation is everything.
– Garnishing Ideas: Consider garnishing the top with additional fresh berries or a sprinkle of mint leaves for a pop of color. A light dusting of powdered sugar can also add an elegant touch.
– Pairing Suggestions: This dessert pairs wonderfully with a variety of beverages. Serve it alongside a cup of coffee or tea for a delightful afternoon treat. For a more festive occasion, consider pairing it with sparkling wine or a fruity sangria.
Nutritional Information
Understanding the nutritional content of your Berry Bliss Icebox Cake can help you enjoy it guilt-free.
– Caloric Breakdown: Each serving of this delightful cake typically contains around 250-300 calories, depending on the specific ingredients used. The nutritional content can vary based on the type of cream and sweeteners.
– Health-Conscious Alternatives: If you’re looking to make this dessert a bit healthier, consider substituting regular cream with a lighter whipped topping or using Greek yogurt. You can also reduce sugar by using a sugar substitute.
– Balanced Diet: While this dessert is indulgent, it can still fit into a balanced diet when enjoyed in moderation. The fresh fruit adds vitamins and antioxidants, making it not just a treat but also a refreshing option.
Common Variations
Exploring variations of the Berry Bliss Icebox Cake can lead to delightful discoveries.
– Different Fruit Options: Beyond strawberries, feel free to mix in seasonal fruits. Blackberries, cherries, and even kiwi can create a colorful and flavorful cake.
– Flavor Twists: Add a splash of flavor by incorporating different extracts into the whipped cream, such as coconut or hazelnut. You can also experiment with chocolate shavings or crushed nuts for added texture.
– Seasonal Adaptations: Think outside the box by adapting the recipe to fit seasonal ingredients. In the fall, consider using apples and cinnamon; in winter, cranberries can add a tart contrast.
Conclusion
The Berry Bliss Icebox Cake is not just a dessert; it’s an experience that brings joy to any gathering. Its simplicity and versatility make it a go-to recipe for picnics, celebrations, and family dinners.
As you prepare this delightful cake, you’ll find that the blend of textures and flavors creates a treat that’s sure to impress. So, gather your ingredients, embrace the ease of assembly, and indulge in the deliciousness of the Berry Bliss Icebox Cake in your own kitchen. Whether you’re sharing it with loved ones or simply enjoying a slice yourself, this dessert is bound to become a cherished favorite.