
Introduction
If you’re looking for a dessert that perfectly encapsulates the delightful fusion of creamy, crunchy, and chocolatey flavors, look no further than the Crunchy Butterfinger Delight Pie. This decadent dessert is a crowd-pleaser, making it an ideal choice for any occasion, whether it’s a casual family gathering, a festive holiday celebration, or a special treat for your loved ones. The best part? It comes together effortlessly, meaning you don’t need to be a baking expert to impress your guests with this delightful pie.
At the heart of this recipe lies the nostalgic taste of Butterfinger bars—those iconic candy bars that have been a favorite for generations. The unique combination of crispy peanut butter and chocolate coating not only adds a delightful crunch but also elevates the overall flavor profile of this pie, making each bite a sweet journey down memory lane.
The Allure of Butterfinger Bars
To truly appreciate the Crunchy Butterfinger Delight Pie, it’s essential to understand the magic of Butterfinger bars. Introduced in 1923 by the Curtiss Candy Company, Butterfinger has become synonymous with peanut butter goodness. Their unique taste is a result of a blend of roasted peanuts and a secret recipe for the crunchy peanut butter core, all encased in a rich, chocolatey coating. This delightful combination creates a texture that is simultaneously crunchy and creamy, making Butterfinger a versatile ingredient in desserts.
Butterfinger candy bars are not just delicious; they also evoke a sense of nostalgia for many. They remind us of childhood treats, Halloween candy hauls, and late-night snack sessions. This emotional connection is one of the reasons why Butterfinger is a popular choice in desserts. Whether used as a topping, filling, or both, Butterfinger adds a unique sweetness and crunch that elevates any dish it graces.
In our Crunchy Butterfinger Delight Pie, we harness the full potential of these beloved candy bars, transforming them into a dessert that is sure to evoke fond memories while delighting your taste buds.
The Perfect Pie Crust
No pie is complete without a solid base, and that’s where our graham cracker crust comes into play. The crust is a critical component of the pie, providing a firm foundation that holds the creamy filling and adds a delightful crunch. For our Crunchy Butterfinger Delight Pie, we’ll be making a simple yet flavorful graham cracker crust that pairs perfectly with the rich filling.
Ingredients Breakdown
To make the graham cracker crust, you will need:
– Graham cracker crumbs: These are the star of the crust, providing that signature sweet and slightly nutty flavor.
– Unsalted butter: This ingredient binds the crumbs together and adds richness to the crust.
Step-by-Step Process for Preparing the Graham Cracker Crust
1. Preheat the Oven: Start by preheating your oven to 350°F (175°C). Preheating ensures that the crust will bake evenly and achieve that perfect golden-brown color.
2. Crush the Graham Crackers: If you’re using whole graham crackers, place them in a food processor and pulse until they reach a fine crumb consistency. If you don’t have a food processor, you can place the graham crackers in a zip-top bag and crush them with a rolling pin.
3. Mix the Crust Ingredients: In a medium-sized mixing bowl, combine the graham cracker crumbs and melted unsalted butter. Use a fork to mix until the crumbs are well coated with the butter.
4. Form the Crust: Press the mixture firmly into the bottom and up the sides of a 9-inch pie dish. Make sure to pack it tightly to prevent the crust from crumbling when sliced.
5. Bake the Crust: Place the pie crust in the preheated oven and bake for about 8-10 minutes, or until it’s lightly golden and fragrant. Remove it from the oven and let it cool completely before adding the filling.
Tips for Ensuring the Crust is Firm and Flavorful
– Use Fresh Ingredients: Ensure your graham crackers are fresh for the best flavor and texture. Stale crackers can result in a soggy crust.
– Pack it Tightly: When pressing the crust into the pie dish, make sure to pack it tightly and evenly to create a sturdy base.
– Let it Cool: Allowing the crust to cool completely before adding the filling is crucial. A warm crust can lead to a runny filling.
Creating the Creamy Filling
Now that we have the perfect pie crust, it’s time to create the star of the show—the creamy filling. This filling is a delightful blend of cream cheese and peanut butter, resulting in a rich and velvety texture that pairs beautifully with the crunchy Butterfinger topping.
Ingredient Analysis
For the creamy filling, you will need the following ingredients:
– Cream cheese: This provides the base of the filling, contributing a rich and creamy texture.
– Powdered sugar: This ingredient sweetens the filling without the grittiness of granulated sugar.
– Crunchy peanut butter: The star ingredient that adds flavor and texture; crunchy peanut butter provides that satisfying bite.
Instructions for Achieving the Perfect Creamy Consistency
1. Prepare the Cream Cheese: In a large mixing bowl, use an electric mixer to beat the cream cheese until it is smooth and creamy. This step is essential to avoid lumps in your filling.
2. Add the Powdered Sugar: Gradually add the powdered sugar to the cream cheese, continuing to beat until fully combined and fluffy. This will give the filling the sweetness it needs without overpowering the peanut butter flavor.
3. Incorporate the Peanut Butter: Add the crunchy peanut butter to the mixture and beat again until everything is well combined. The goal is to achieve a smooth and creamy consistency that is still rich and flavorful.
4. Fold in the Whipped Topping: To lighten the filling, gently fold in the whipped topping. This will make the filling airy and give it a delightful texture. Be careful not to overmix; you want to retain the lightness of the whipped topping.
The Role of Whipped Topping in Enhancing Texture and Lightness
Whipped topping serves a crucial role in this recipe. It lightens the dense filling, making it more approachable and less rich. The airy texture of the whipped topping balances the creaminess of the cream cheese and peanut butter, resulting in a filling that is indulgent yet not overwhelming. It also adds a subtle sweetness that complements the chocolatey crunch of the Butterfinger topping.
With the crust and filling prepared, you’re almost ready to assemble your Crunchy Butterfinger Delight Pie. Next, we’ll discuss how to bring all these components together, but for now, let’s savor the anticipation of this delicious dessert!
{{image_1}}
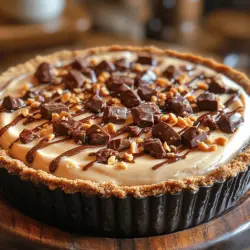
The Star Ingredient: Butterfinger Candy
Butterfinger candy bars are the heart and soul of the Crunchy Butterfinger Delight Pie. With their unique combination of creamy peanut butter and a crispy, flaky texture, Butterfinger bars add an irresistible sweetness and crunch that elevates this pie to a new level of decadence. The rich, chocolaty flavor of Butterfinger complements the creamy filling, creating a perfect balance that delights the palate.
When incorporating Butterfinger bars into your pie, it’s essential to ensure even distribution throughout the filling. To achieve this, start by placing the bars in the freezer for about 30 minutes. This simple step firms them up, making them easier to chop. Next, use a sharp knife to cut the bars into small, bite-sized pieces. Aim for roughly equal sizes to ensure that every slice of pie has a consistent amount of Butterfinger goodness.
If you want to explore variations, consider substituting Butterfinger with other candy bars. Snickers, Milky Way, or Reese’s Peanut Butter Cups can provide exciting twists while maintaining that crunchy and creamy texture. Each alternative will bring its own unique flavor profile, allowing you to customize the pie to your taste preferences.
Assembly of the Crunchy Butterfinger Delight Pie
Once you’ve prepared your ingredients and have your Butterfinger pieces ready, it’s time to assemble the pie. Start by ensuring that your pie crust—whether homemade or store-bought—is fully baked and cooled. This step is crucial for achieving the desired texture in your pie.
1. Prepare the Creamy Filling: In a large mixing bowl, combine your cream cheese, whipped topping, and powdered sugar until smooth. The mixture should be creamy and free of lumps. Gently fold in the chopped Butterfinger pieces, ensuring they are evenly distributed throughout the filling.
2. Fill the Crust: Carefully spoon the creamy mixture into the cooled pie crust. Use a spatula to spread it evenly, reaching all corners of the pie. This step is important for both aesthetics and flavor; an even filling ensures that each slice is just as delightful as the last.
3. Chill the Pie: Once filled, cover the pie with plastic wrap and place it in the refrigerator. Chilling is essential for several reasons: it allows the flavors to meld beautifully, helps set the filling, and ensures a sliceable dessert. Ideally, let the pie chill for at least three hours, although overnight is even better for maximum flavor development.
Serving Suggestions
When it comes to serving your Crunchy Butterfinger Delight Pie, presentation is key. A well-garnished pie not only enhances its visual appeal but also adds extra layers of flavor. Here are some creative ideas for garnishing your pie before serving:
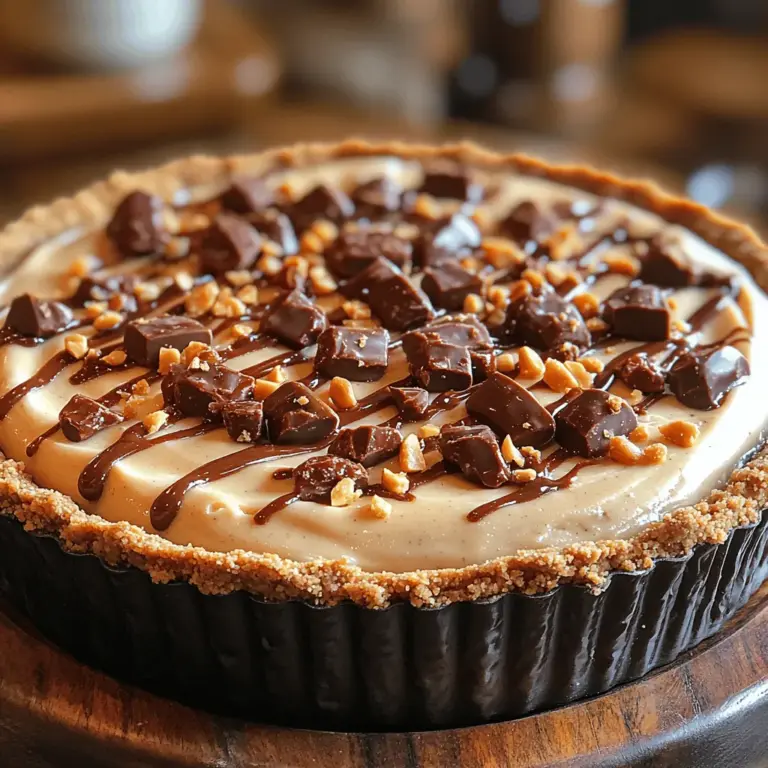
– Chocolate Syrup: Drizzling chocolate syrup over the top of the pie adds a rich, chocolaty finish. You can create a beautiful pattern or simply go for an elegant drizzle, depending on your style.
– Extra Butterfinger Pieces: For an even more indulgent touch, sprinkle additional chopped Butterfinger pieces on top of the pie before serving. This not only adds visual texture but also heightens the candy flavor in every bite.
– Chopped Peanuts: To enhance the pie’s crunch factor, consider adding a handful of chopped peanuts as a garnish. The saltiness of the peanuts contrasts beautifully with the sweetness of the pie, creating a harmonious blend of flavors.
The final presentation of your Crunchy Butterfinger Delight Pie should be show-stopping. Opt for a clean pie server or a decorative cake knife to cut the pie, revealing the creamy filling and candy pieces inside. This dessert is perfect for various occasions, including birthday parties, holiday gatherings, or casual get-togethers with friends and family. Its fun flavor profile and eye-catching appearance make it a crowd-pleaser.
Nutritional Breakdown
As with any indulgent dessert, it’s important to be mindful of the nutritional content of the Crunchy Butterfinger Delight Pie. On average, each slice contains approximately 400 calories, with a breakdown of around 25 grams of fat and 30 grams of sugar. While this dessert is certainly rich, it’s meant to be enjoyed in moderation.
If you’re looking for lighter alternatives, consider the following substitutions:
– Low-Fat Cream Cheese: This can reduce the overall fat content without significantly affecting the flavor.
– Sugar Substitute: Opting for a sugar substitute can help lower the sugar content while keeping the sweetness intact.
– Reduced-Fat Whipped Topping: Using a lighter whipped topping can also cut down on calories and fat.
By making these simple swaps, you can still enjoy the delightful flavors of the pie while being more mindful of your dietary choices.
Conclusion
The Crunchy Butterfinger Delight Pie is a delightful fusion of flavors and textures that will impress anyone who has the pleasure of tasting it. The creamy filling, combined with the crunchy Butterfinger pieces and the crisp pie crust, creates an indulgent dessert that is both satisfying and memorable.
Whether you are celebrating a special occasion or simply craving a sweet treat, this pie is sure to become a cherished favorite. So why not gather your ingredients and try making the Crunchy Butterfinger Delight Pie? Share the joy of homemade desserts with your family and friends, creating lasting memories around the table. With its decadent flavors and visually stunning presentation, this pie is bound to be the highlight of any gathering.