
Introduction
If you’re looking for a delectable dish that can serve as both an appetizer and a main course, look no further than crunchy panko-battered shrimp. This delightful recipe showcases the perfect combination of textures and flavors, making it an irresistible choice for seafood lovers and casual diners alike. Imagine succulent shrimp encased in a golden, crispy coating that crunches delightfully with every bite, releasing a burst of flavor that tantalizes your taste buds. Whether enjoyed on their own with a zesty dipping sauce or served alongside a fresh salad, panko-battered shrimp are sure to impress.
The secret to achieving that crave-worthy crunch lies in the use of panko breadcrumbs, which are lighter and flakier than traditional breadcrumbs. This unique texture not only elevates the shrimp but also enhances the overall eating experience, creating a contrast between the tender shrimp and the crispy coating. For the best results, it is crucial to use fresh ingredients. Fresh shrimp and quality seasonings will significantly impact the flavor and texture of your dish, ensuring that every bite is as delicious as the last.
Understanding Panko Breadcrumbs
To truly appreciate the magic of panko-battered shrimp, let’s delve into the world of panko breadcrumbs. Panko is a type of breadcrumb that originated in Japan and has gained popularity worldwide for its distinct texture and superior frying capabilities. Unlike traditional breadcrumbs, which are made from the crusts of bread, panko is created from bread that is processed into large, airy flakes. This unique method results in a lighter, crispier texture that is perfect for frying.
When comparing panko to traditional breadcrumbs, there are several key differences. Traditional breadcrumbs tend to be denser and can absorb more oil during frying, resulting in a heavier coating. In contrast, panko breadcrumbs maintain their structure better, creating a light and crunchy exterior that doesn’t become soggy. This is particularly important when frying shrimp, as you want to achieve a crispy outer layer that perfectly complements the tender shrimp inside.
One of the primary benefits of using panko for frying is its ability to deliver an exceptional crunch. Panko-coated foods tend to be crispier and stay that way longer than those breaded with traditional breadcrumbs. Additionally, panko breadcrumbs have a neutral flavor that allows the natural taste of the shrimp and seasonings to shine through, making them a versatile choice for various dishes.
Ingredients Breakdown
Now that we understand the significance of panko breadcrumbs, let’s take a closer look at the ingredients used in our crunchy panko-battered shrimp recipe. Each component plays a vital role in achieving the perfect crunch and flavor profile, ensuring a delightful culinary experience.
Large Shrimp
The star of this dish is, of course, the shrimp. When selecting shrimp, freshness is paramount. Opt for large, raw shrimp with a firm texture and a mild, sea-like scent. Fresh shrimp should be glistening and translucent, with no signs of discoloration or an off-putting odor. Deveining the shrimp is also essential, as this process removes the intestinal tract, ensuring a cleaner taste and improved presentation. For optimal results, keep the shrimp refrigerated until you’re ready to prepare them.
Flour
Flour serves an important purpose in the breading process. It helps the panko adhere better to the shrimp, creating a solid base for the crispy coating. When using flour, a light dusting is all that’s needed—too much can lead to a heavy, gummy texture. For this recipe, all-purpose flour works perfectly, but you can also experiment with alternative flours for gluten-free options.
Eggs
Eggs act as the binding agent in our breading process. Beaten eggs are used to coat the shrimp before they are dredged in panko, ensuring that the breadcrumbs stick effectively. The protein in the egg helps create a crispy exterior during frying, enhancing the overall texture and flavor of the dish.
Panko
As previously mentioned, panko is the star ingredient for achieving that coveted crunch. The airy texture of panko breadcrumbs allows for maximum crispiness when fried, making them the ideal choice for this recipe. When shopping for panko, look for brands that use natural ingredients and avoid any with added preservatives for the best flavor.
Seasonings
To elevate the flavor of our crunchy panko-battered shrimp, we incorporate several seasonings, including garlic powder, paprika, salt, and pepper. Garlic powder adds a subtle depth to the dish, while paprika imparts a hint of smokiness and a vibrant color. Adjust the seasonings to your preference to create a flavor profile that suits your taste.
Vegetable Oil
Finally, the choice of oil is crucial when frying shrimp. Vegetable oil is recommended for its high smoke point and neutral flavor, allowing the shrimp to fry evenly without imparting any unwanted tastes. Ensure you have enough oil in your frying pan or deep fryer to submerge the shrimp partially for optimal frying results.
Setting Up Your Breading Station
Creating an efficient breading station is essential for a smooth cooking process when making crunchy panko-battered shrimp. Here’s a step-by-step guide to organizing your station effectively.
1. Gather Your Ingredients: Assemble all the ingredients mentioned above, ensuring that your shrimp are cleaned and deveined. Have your flour, beaten eggs, and panko breadcrumbs ready to go.
2. Prep Your Workspace: Clear a space on your countertop or kitchen table where you can work comfortably. You’ll need enough room to set up three separate bowls or plates for the breading process.
3. Drying the Shrimp: Before breading, it’s crucial to dry the shrimp to remove excess moisture. Use paper towels to pat the shrimp dry thoroughly. This step helps the flour adhere better and leads to a crunchier final product.
4. The Three-Bowl Method: Organize your breading station using the three-bowl method.
– Bowl 1: Place the all-purpose flour mixed with a pinch of salt and pepper.
– Bowl 2: Beat your eggs in a separate bowl until combined.
– Bowl 3: Fill this bowl with panko breadcrumbs mixed with garlic powder and paprika for added flavor.
5. Breading Process: Follow this sequence for each shrimp:
– First, dip the shrimp into the flour, ensuring it’s evenly coated before shaking off any excess.
– Next, immerse the floured shrimp into the beaten eggs, allowing any extra egg to drip off.
– Finally, roll the shrimp in the panko breadcrumbs, pressing gently to ensure an even coating. Repeat this process until all shrimp are breaded.
Having a well-organized breading station not only streamlines the cooking process but also helps maintain cleanliness in your kitchen. By following these steps, you’ll be well on your way to mastering the art of crunchy panko-battered shrimp, ready to fry them to crispy perfection in no time.
Mastering the Breading Technique
The final step before frying is mastering the breading technique. It’s essential to ensure that the panko adheres properly to the shrimp to achieve that irresistible crunch. Here are some additional tips to perfect your breading technique:
– Coating Thickness: Aim for an even coating of flour, egg, and panko. A thin layer of each will help prevent clumping and ensure a crispy finish.
– Avoiding Sogginess: Ensure that your shrimp are not over-wet before breading. Excess moisture can lead to a soggy coating, so pat them dry thoroughly.
– Breading in Batches: If you’re preparing a large quantity of shrimp, consider breading in smaller batches. This allows for better control and ensures that each shrimp is evenly coated.
– Chill Before Frying: For an extra crispy finish, consider placing the breaded shrimp on a baking sheet and chilling them in the refrigerator for about 15-30 minutes before frying. This helps the breading adhere better and can improve the texture.
By following these guidelines, you’ll set yourself up for success, ensuring your crunchy panko-battered shrimp are not just a meal but a culinary delight that you and your guests will remember.
{{image_1}}
Detailed Instructions on the Breading Process for Optimal Adherence
To achieve perfectly crispy and golden panko-battered shrimp, the breading process is crucial. Start by preparing your shrimp: ensure they are peeled, deveined, and patted dry with paper towels. This step is essential as moisture can prevent the breading from adhering properly.
1. Set Up Your Breading Station: Arrange three shallow dishes for the breading process. In the first dish, place about 1 cup of all-purpose flour mixed with a pinch of salt and pepper. In the second, whisk together 2 large eggs until well combined. In the third dish, pour in approximately 2 cups of panko breadcrumbs.
2. Dredging Process: Take a shrimp and first coat it in the flour mixture. Make sure it is evenly covered; this helps the egg adhere better. Shake off any excess flour before moving to the egg mixture.
3. Egg Coating: Dip the floured shrimp into the egg, allowing any excess to drip off. This step is crucial for the next layer of panko to stick effectively.
4. Panko Coating: Finally, gently press the shrimp into the panko breadcrumbs. It’s essential to firmly press the panko onto the shrimp to achieve maximum crunch. You want to ensure the shrimp is well-coated, with no bare spots visible. Repeat this process until all shrimp are breaded.
Importance of Shaking Off Excess Flour and Egg for a Perfect Coating
Shaking off the excess flour and egg is a vital step in the breading process. If you skip this, you risk having clumps of flour or egg on your shrimp, which can lead to uneven cooking and a less appealing texture. A well-adhered coating will result in a light, crispy crust that enhances the shrimp’s natural flavor.
Tips for Pressing the Panko onto the Shrimp for Maximum Crunch
To achieve that signature crunch, pressing the panko breadcrumbs firmly onto the shrimp is key. Use the palms of your hands to gently press down, ensuring that the breadcrumbs adhere well. You can also double-dip the shrimp in the egg and panko for an extra layer of crunch. For a more pronounced texture, consider mixing in some finely chopped herbs or spices into the panko for added flavor.
—
Frying the Shrimp to Perfection
Frying is where your panko-battered shrimp will transform into a crispy, golden delicacy. Follow these best practices to ensure perfect results every time.
Best Practices for Frying Shrimp: Oil Temperature, Batch Sizes, and Avoiding Overcrowding
1. Oil Selection: Choose an oil with a high smoke point, such as vegetable oil or canola oil. This allows for high frying temperatures without the oil burning.
2. Temperature Control: Heat the oil in a deep pan or fryer to around 350°F (175°C). You can use a thermometer for accuracy or conduct a simple test by dropping a small piece of bread into the oil; if it sizzles and browns in about 60 seconds, the oil is ready.
3. Batch Sizes: Fry shrimp in small batches. Overcrowding the pan can lower the oil temperature, leading to soggy shrimp. Aim for about 6-8 shrimp per batch, depending on the size of your pan.
Signs That the Oil is Ready for Frying: Visual and Auditory Cues
When the oil reaches the optimal temperature, you’ll notice small bubbles forming around the edges of the pan. Additionally, you’ll hear a gentle sizzle as the shrimp begin to fry. If the oil begins to smoke, it’s too hot; remove it from the heat immediately to prevent burning.
Cooking Time: Achieving a Golden Brown Color and Crispy Texture
Cook the shrimp for about 2-3 minutes on each side, turning them gently with tongs. You’ll know they are done when they are golden brown and the shrimp are opaque and curled. Overcooking can lead to rubbery shrimp, so keeping a watchful eye is important.
—
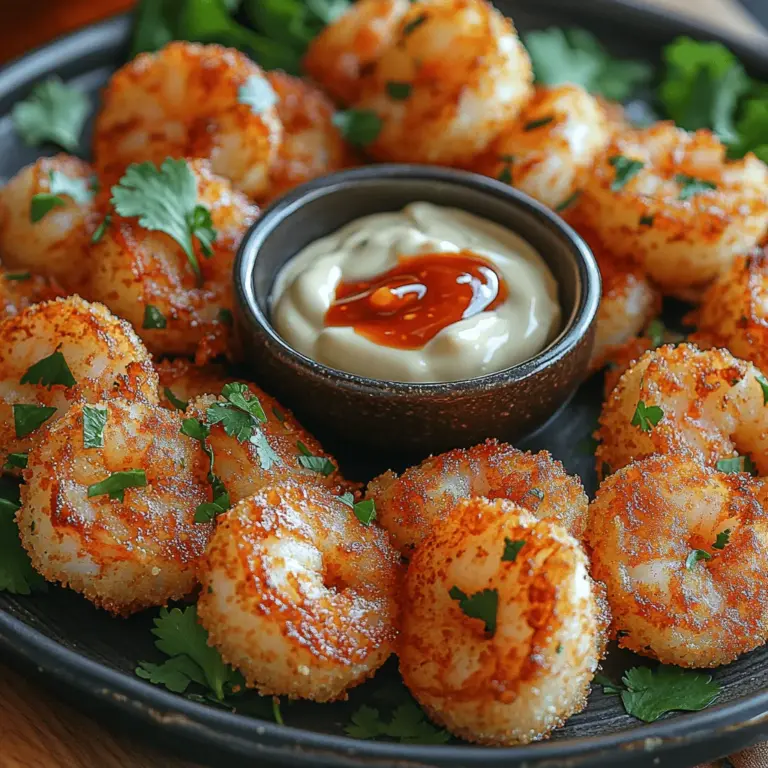
Crafting the Perfect Dipping Sauce
A complementary dipping sauce can elevate your panko-battered shrimp to new heights. This simple yet flavorful sauce combines creamy, spicy, and tangy elements.
Importance of a Complementary Dipping Sauce for Enhancing Flavor
The right dipping sauce enhances the shrimp’s flavor profile and adds an exciting element to each bite. A sauce can balance the rich, crunchy texture of the shrimp, making every mouthful a delightful experience.
Breakdown of the Sauce Ingredients: Mayonnaise, Sweet Chili Sauce, Lime Juice, Sriracha
For the dipping sauce, you will need:
– ½ cup mayonnaise
– ¼ cup sweet chili sauce
– 1 tablespoon lime juice (freshly squeezed for the best flavor)
– 1 teaspoon sriracha (adjust based on your heat preference)
Step-by-Step Instructions for Mixing the Sauce and Adjusting Flavor to Preference
1. In a medium bowl, combine the mayonnaise and sweet chili sauce, stirring until smooth.
2. Add the lime juice and mix well. This will brighten the flavors.
3. Finally, add sriracha to taste, mixing thoroughly. Start with a teaspoon and adjust based on your preferred spice level.
Feel free to tweak the ingredients to suit your taste. For extra zest, consider adding minced garlic or a dash of soy sauce.
—
Serving Suggestions
Presentation is key when serving panko-battered shrimp. Here are some ideas to make your dish appealing.
Presentation Ideas for Serving the Panko-Battered Shrimp
Serve the shrimp on a large platter lined with lettuce for a fresh touch. Garnish with lime wedges and fresh herbs, such as cilantro or parsley, for a pop of color. Arrange the shrimp in a circular pattern, with the dipping sauce in the center for easy access.
Pairing Options: Side Dishes and Beverages that Complement the Dish
Complement your panko-battered shrimp with light and refreshing side dishes. Consider serving with a crisp salad, coleslaw, or vegetable skewers. For a heartier option, garlic bread or jasmine rice can also pair beautifully. When it comes to beverages, a chilled white wine or a light beer can enhance the meal’s flavors.
Creative Serving Options: Sliders, Tacos, or Salad Toppings
For a fun twist, consider transforming your shrimp into sliders or tacos. Slide the shrimp into a soft brioche bun or corn tortilla, topped with shredded cabbage and a drizzle of the dipping sauce. Alternatively, chop the shrimp and add them to a fresh salad for a crunchy topping.
—
Nutritional Information
Understanding the nutritional profile of your dish is essential for meal planning and dietary considerations.
Overview of the Nutritional Profile of the Dish
Panko-battered shrimp provides a delightful balance of protein and flavor. A serving size typically contains around 250-300 calories, depending on the portion size and the amount of oil absorbed during frying. This dish is rich in protein from the shrimp while being relatively low in carbohydrates.
Discussion on Portion Control and Balance in Meals
While panko-battered shrimp is a delicious treat, portion control is key. Pair it with nutrient-dense side dishes to create a well-rounded meal. Aim for a serving of protein (the shrimp), a serving of vegetables (like a salad), and a serving of carbohydrates (like rice or bread).
Alternatives for Dietary Restrictions (Gluten-Free Options, Healthier Frying Methods)
For those with gluten intolerance, swap out regular breadcrumbs for gluten-free panko. You can also opt for healthier frying methods, such as baking the breaded shrimp in the oven at 400°F (200°C) for about 15-20 minutes, flipping halfway through, until golden and crispy.
—
Conclusion
The delightfully crunchy panko-battered shrimp is not just a dish; it’s a crowd-pleaser that brings joy to any gathering. Its crispy texture, combined with the right dipping sauce, creates a culinary experience worth savoring. Don’t hesitate to experiment with variations or dips to make this recipe your own.
Embrace the joy of cooking and sharing homemade meals with loved ones, creating lasting memories with every bite. Whether served as an appetizer, main dish, or creative slider, panko-battered shrimp is sure to impress everyone at the table. Enjoy the process, and happy cooking!
